
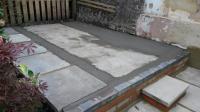
A homeowner has just had a new concrete shed base laid by a tradesman, but the finish isn’t right. One corner sits about 20mm lower than the other three, and there are smaller dips and patchy areas across the surface. They want to put a decent timber shed on it that’ll last, and they’re not convinced by the builder’s reassurance that “it’ll be fine.” To make matters worse, the builder has since knocked up a timber perimeter ring bedded on a thin skim of fresh concrete to try and create a level edge. Is the slab usable, should that ring stay or go, and what’s the proper way forward?
This is a common one in UK gardens. Before you start spending more money or ripping the lot up, it’s worth understanding what’s actually wrong, what you can live with, and what’s a bodge that’ll cause grief down the line.
What’s likely going on
A shed base doesn’t need to be a showroom finish, but it does need two things: a properly compacted sub-base underneath, and a reasonably flat top with a slight fall away from any wall or building. A 20mm drop across one corner on its own isn’t the end of the world – sheds get packed and shimmed all the time – but combined with random dips and patching it points to a rushed pour, poor screeding, and possibly an uneven sub-base.
The bigger worry isn’t the look, it’s water. The low corner sits against a wall, which means rain running off the shed roof or off the wall will pond exactly where you don’t want it. Over time that means damp timbers, rotten bearers, and possibly water tracking towards the house. The timber ring bedded on a 20mm skim of fresh concrete doesn’t fix any of that. It hides it and creates new problems.
Simple checks first
Before deciding what to do, run through these. Don’t guess, prove it.
- Check the fall with a long spirit level or straight edge. Lay it across the slab in several directions. You want to see whether the slab falls away from the wall (good) or towards it (bad). A 20mm dip in the corner against a wall is the worst case for water.
- Look for cracks, especially near edges and corners. Hairline shrinkage cracks are normal. Wide cracks, or cracks with one side higher than the other, suggest the sub-base wasn’t compacted properly and the slab is moving.
- Tap the slab with a lump hammer in different spots. A solid dull thud is fine. A hollow ring suggests voids underneath, again pointing to poor sub-base prep.
- Check the thickness at the edge. A proper shed base should be at least 75-100mm of concrete on a compacted hardcore sub-base. If the edge looks thin (under 50mm), it’ll crack under load.
- Look for a damp proof membrane (DPM). If you can see black plastic poking out at the edges, good. If not, you’ll need to protect the shed timbers from damp coming up through the slab.
- Pour a bucket of water on the low corner. See where it goes. If it sits there and doesn’t drain, you’ve confirmed the ponding problem.
The results of those checks tell you whether the slab is fundamentally sound but cosmetically poor (workable), or whether it’s actually failing (rip it up).
The proper fix – good, better, best
Good: shim the shed and live with it
If the slab is solid, thick enough, and on a decent sub-base, you can put a shed on it as it stands. When the shed arrives, sit it on its bearers and use slate, plastic shims, or offcuts of treated timber to pack out the low spots so the frame sits flat and square. Lay strips of DPC under each bearer to keep the timber off the damp concrete. This is what most shed installers do anyway – very few slabs are dead flat.
The one thing you must sort is drainage. If water ponds in that low corner, drill or chase a small channel so it can escape, or build the shed slightly proud of the slab on treated bearers with a clear air gap underneath. Air movement under a timber shed is your friend.
Better: self-levelling or a thin screed
If the dips are bothering you and the slab is sound, you can lay an exterior-grade levelling compound or a sand-and-cement screed over the top to true it up. Be aware that most standard self-levelling compounds are for interior use. You need one rated for external conditions, and even then it’s not bombproof under a shed for decades. A proper sand-and-cement screed, well bonded with SBR, is more durable but it’s a skilled job to get right.
Whichever you go for, build in a slight fall – around 1:80 – away from the wall so water runs off into the garden, not towards the house.
Best: break it out and start again
If the checks above show a thin slab, hollow spots, or movement, the honest answer is to break it out and pour a new one properly. That means dig out, lay and compact 100-150mm of MOT Type 1 hardcore, lay a DPM, and pour at least 100mm of concrete with a slight fall away from the wall, screeded flat with a straight edge. It’s a day’s graft for a competent groundworker and it’ll last decades. If you wouldn’t trust the slab to still be flat in five years, don’t build a shed you care about on top of it.
Bodges to avoid
- A timber perimeter ring bedded on fresh concrete to “level” the edge. The shed needs continuous support across its full footprint, not just around the edge. A ring like this leaves the middle of the floor unsupported, traps water underneath, and the timber will rot out within a few years even if it’s treated.
- Filling the low corner with a blob of mortar or post-mix. Without proper bonding and feathering it’ll crack off, hold water, and look worse than the dip.
- Sitting bearers straight onto wet concrete with no DPC. Concrete wicks moisture upwards. Your bearers will be soft inside three winters.
- Ignoring the fall. Water gets in, then it shows up somewhere else – usually the wall of the house.
When to bring someone else in
If the slab is cracked, hollow-sounding, or sitting against the wall of the house with no drainage path, get a second builder out to look at it in person before you do anything else. A decent groundworker will tell you in five minutes whether it’s worth saving. If the wall behind is part of the house and water is being directed at it, that’s a damp risk to the building itself, and worth taking seriously.
On payment: if the job hasn’t been signed off and money hasn’t all changed hands, you’ve still got room to push back. Put your concerns in writing, with photos, and give the original tradesman a chance to put it right or refund the difference. Nine times out of ten a proper tradesperson will come back and sort it. The ones who won’t are the ones you didn’t want to use again anyway.
Reality check
A shed base doesn’t have to be perfect, but it does have to be sound and it has to shed water. Twenty millimetres of dip in a corner against a wall is the bit that would bother me most, not because the shed won’t sit on it, but because of where the water ends up. Strip off any timber-on-fresh-concrete bodge before it sets hard, take a proper look at the slab underneath, and make a calm decision based on what you actually find. If the slab itself is solid, you can work with it. If it’s not, better to know now than after you’ve built a shed on top.