• Looking for a smarter way to manage your heating this winter? We’ve been testing the new Aqara Radiator Thermostat W600 to see how quiet, accurate and easy it is to use around the home. Click here read our review.

Removing radiator for decorating but hit a snag...?

Joined
2 Feb 2014
Messages
412
Reaction score
2
Country
United Kingdom
Had a look online how to do this as we've never touched one before beyond bleeding one.


I've seen how tos on those that don't have those thermostatic valves, but ours does.

In the video the chap uses a cap to cap off the top. Problem is we don't have these caps & i've read they're radiator specific & they weren't left for us by the previous house owner.

I've got 1/2" blanking caps for the end where the radiator meets the piping coming out of the floor, but not the top of the valve thing.

I also see on the other side, you need a set of adjustables to tighten the valve. What do you do then if you've no cap for the thermostatic valve side?


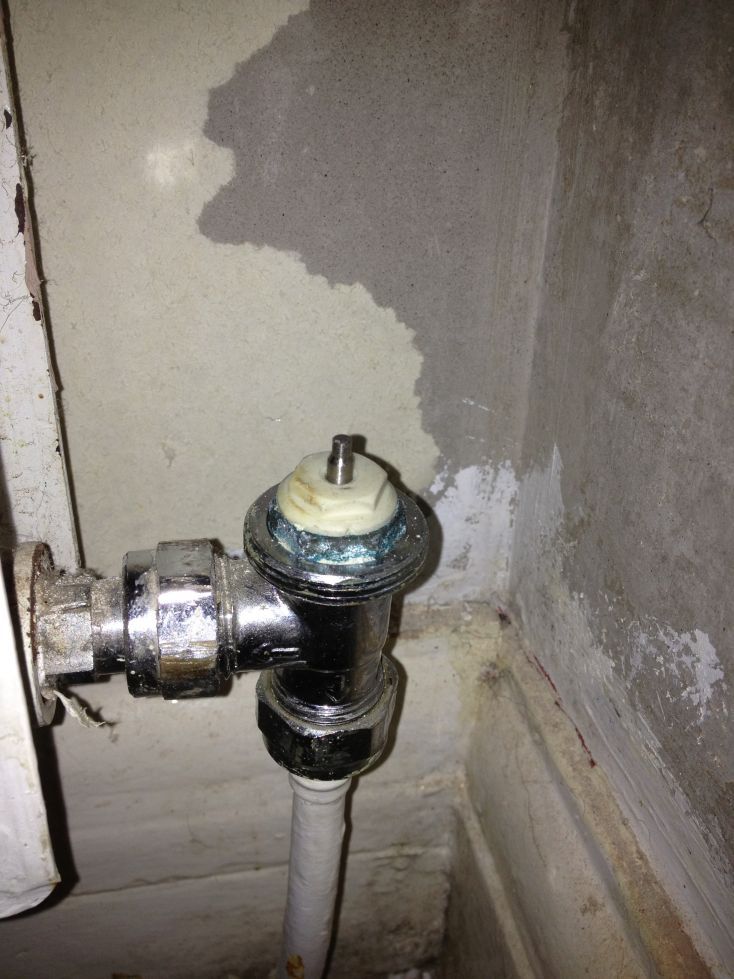
Also what size is the nut likely to be? I don't have a set of adjustables big enough & the biggest spanner i have is a 21mm which is also too small.


What we're wanting to do......

Is to remove the radiator so we can remove the wallpaper behind it, as well as allowing the plasterer to plaster behind it, then get it popped back on. Somewhere down the line once the plaster has dried out fully we'll want to re-wallpaper behind there too.

So how do we do it with those caps?
 
WRONG!!!

Put the TRV head back on that you have removed and turn it all the way to 0 setting and remove rad as normal
 
does he not mean the white caps that come with the TRV when bought (decorating cap) he didnt say he didnt have the TRV top
 
does he not mean the white caps that come with the TRV when bought (decorating cap) he didnt say he didnt have the TRV top

I'm assuming with it being a DIY job, the white cap is DIY talk for TRV. I'm only assuming. If it is the decorators cap that's missing. Then yeah reapply the TRV and wind down to zero. If not then drain down.
 
Sorry guys. I'm not up on the lingo so that isn't helping you.

I don't have those cap things they use in the video like blanking caps for the top but I do have caps for the sides (hope they fit). I do have the turny thing which has numbers 0-5 on it that I unscrewed to take that photo.
 
Take the head off another radiator (I'm assuming they have the same heads) fit it to that valve, close valve and lockshield, drain rad and remove. Simples.
 
Yep, as above put a standard TRV head back on and turn all the way down. I'm told that even turned down to 0 the heads can open and allow water through so don't leave the rad off too long but you should easily have time to take paper off and paint or whatever, especially if you leave this bit until the very end.

Put a sandwich bag over the head to prevent it getting paint/dirt on it.
 
You need to be careful as not all TRV's have a positive shutoff so in cold conditions can let some water by. I know - many years ago I made that exact same mistake and ended up with a stained ceiling below.

I would agree a plastic bag might do the job but would prefer to add a stopend to the outlet side on the valve just for comfort.
 
This will be getting removed for the plasterers so is likely to be off about 4-5 days. As with the other in the living room.

Can I not do anything like turn the temp setting down on that digital control thing?
I see in the vids that once the cap comes off you can turn the valve tighter with some grips. There isn't that on the side I took the photo.

Could I not just put the turny cap thing back on & stick a blanking cap on the bit that connects to the radiator?

Don't know how to do some of what has been said here & they're due to start tomorrow & I'm not off work to deal with them or get anyone in :/
 
Go to B&Q and buy a Drayton RT313 Chrome Angled Thermostatic Radiator Valve (search online).

Remove the 'white' section from the B&Q angled valve.

Install it onto your valve which is in place as per your picture.

Wind the 'white' section to zero (normally clockwise).

Drain and remove the radiator.

:D

However, this is a 'quick fix' and at some point you will have to drain the system and replace the TRV complete not just the 'white' top but also the valve under - it looks like you've written your name and address over the one in the picture!!
 
I might be wrong here, but i've got the impression that perhaps some have misunderstood me. Admittedly my lack of knowledge on this & the correct terminology certainly wont be helping.

First off it looks like the video didn't link up properly so you wont know what i'm referring to....


See if that's worked.

Not quite sure why we'd need that Drayton valve because it looks essentially like what we already have. Perhaps i should've taken the photo with that on because i'm getting the feeling that some think i'm missing that or that it's broken or something?

To try & clear things up with more photos & arrows because i don't know the correct terms...

The radiators throughout our house are the same so i have some snaps from another room...

We have a blanking cap for where this arrow is pointing. I was advised to buy 1/2". Whether this is correct or not i don't know, but in theory i can now cap this...


I also have another cap for where the arrow is pointing in the next photo so i can cap it at the side there.


That twizzy thing in that last photo (the thing with the number 2 on it) - i have that for the radiator in the original photo. I just took the photo with it unscrewed.

The problem is in the YouTube video i linked to, if you look at about 0:25 seconds, then he's using a cap for the top - i don't have this cap.

I read a 5p in there could possibly work.

Why wouldn't it work by putting blanking caps where the red arrows show & just leaving the turny thing (with the numbers) on top?
 
The turny thing is the trv head, someone suggested you get one from bnq because it will come with a decorators cap which will replace the head and guarantee no water can escape. If you have a blanking cap That fits you can use that. The plastic bag mentioned earlier wasn't to stop water but to stop rubbish getting on the valve and head.
 

If you need to find a tradesperson to get your job done, please try our local search below, or if you are doing it yourself you can find suppliers local to you.

Select the supplier or trade you require, enter your location to begin your search.


Are you a trade or supplier? You can create your listing free at DIYnot Local

 
Back
Top