Leaking drain gulley in street

Joined
28 Feb 2025
Messages
11
Reaction score
0
Country
United Kingdom
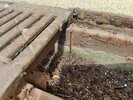
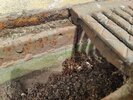
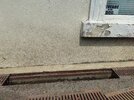
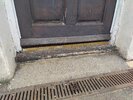
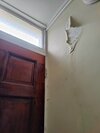
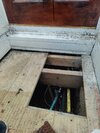
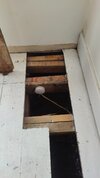
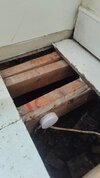
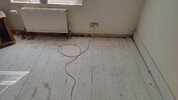
The joists beneath the front of my house have all rotted and I think it's because of the drain gully running alongside outside.

I've already asked the water company to fix it and they said it was blocked and that they've cleared it.

It still looks full of dirt to me and I'm concerned that water is leaking through the gaps between each segment.

I don't think the water company are going to do anything about it so would filling the gaps with something help?
 

Attachments

  • IMG20250708135354_01.jpg
    IMG20250708135354_01.jpg
    572.3 KB · Views: 65
  • IMG20250708135350.jpg
    IMG20250708135350.jpg
    582.1 KB · Views: 69
  • IMG20250708135405_resize_86.jpg
    IMG20250708135405_resize_86.jpg
    1.2 MB · Views: 70
It won’t take long to shovel the muck out; do that and then study the problem some more…
 
OP,
Joists mean a suspended floor - but no air bricks for ventilating a suspended floor can be seen.
The outside ground level looks to be too high. Possibly raised when the channel drain was installed?
Can you point out the FFL on pic #3? Also show any door threshold or sill?
The render might be bridging any high level DPC?

After clearing the channel why not locate and clean out the gulley at one end of the channel drain?
Dont fill the channel drain grating gaps with anything - leave them open.
Can you post pics of the rotted joists? Are there damp marks on the plaster above the joists?
 
Thanks for the replies. I've only just got around to clearing out the gulley. It was absolutely full of dirt (the water company said they had cleared it but obviously did nothing.)

In the second photo, where the drain pipe joins the gulley there is just a large open space behind that was filled with loose dirt. Surely this is a big contributor to the damp inside? How would I go about fixing it?

I don't know what an FFL is.

There's damp all up the walls at the front of the house on the inside.

I will post photos of the joists inside shortly, they've already been repaired once some time ago and the then new joists have also rotted. I plan on getting someone to jack up the existing joists to the correct height and add new wood, but I'd like to at least improve the damp before doing it to prevent it happening again.

Thanks again for your responses, much appreciated.

1000027145.jpg
1000027146.jpg
 

Attachments

  • 1000027142.jpg
    1000027142.jpg
    698.5 KB · Views: 22
Last edited:
In the second photo, where the drain pipe joins the gulley there is just a large open space behind that was filled with loose dirt. Surely this is a big contributor to the damp inside?

Yes, because the gulley was not kept clear it's likely that water was overflowing from it, over the top of the gulley and into your wall. So, just by clearing the gulley, you will probably improve the situation quite a lot.

Water has been reaching too high a level in the gulley, and reaching places where your wall can't keep it out. So, you need to keep the gulley clearer, and might have to improve waterproofing in your wall.

When you say "concerned that water is leaking through the gaps between each segment", can you explain better what gaps you are referring to? Gaps in what? Where are the gaps?
 
When you say "concerned that water is leaking through the gaps between each segment", can you explain better what gaps you are referring to? Gaps in what? Where are the gaps?
Just where the sections of gulley join, they aren't significant gaps.

I'm now mostly concerned about the huge gap in the channel beneath where the drain pipe joins it.
1000027147.jpg
 
Last edited:
OK, so you mean where the sections of gulley join together. If the joins are in poor condition, this could be a source of water ingress, amongst others. There do appear to be visible gaps between each section.

And yes, beneath the drain pipe, what is that gap for? It seems like there's a cavity going into the house?
 
I'm now mostly concerned about the huge gap in the channel beneath where the drain pipe joins it.

I would suggest the gap, is where the original fall pipe entered the gulley. Whoever replaced the original rainwater fall pipe, finished the end rather short, discharging, on top of the Aco. That will not be helping with your damp issue, nor will the obvious gap..

The best idea I can think of, is to extend the pipe, so it discharges below the Aco, with the end directed, to flow towards where the Aco drains, then cement behind the pipe. Cram in as much as you possibly can.
 
OP,
If you investigate the side wall slots (pic #1, post #4), perhaps you will find them to be vents cut into
the channel sides when the drainage was installed? Shine a light through them or poke a stick.
Any air bricks would have been bridged when the pavement was raised.
Do the same with the large gap below/behind the RWP shoe.
The section lengths of channel dont need airtight connections - on the RH side of the last pic you can see how the sections meet.

FWIW: You have a lateral channel connected at the low end to a gully. The gully must be kept clean & free to dispose of the channel water.
I'm still waiting for pics of the interior wall & the joists?
Yes, they do appear to be a vent, I'll poke around next time I lift the Aco grates. There is one air brick in the wall above floor height.

I'm getting the hole under the drain down pipe filled in to fix that.

Is there a preferred tool (preferably inexpensive) to remove the bolts holding down the channel grating? The ones I lifted already had the bolts removed. I tried with a cheapish socket set and I broke my 1/2" socket.
 

Attachments

  • IMG20250804142227.jpg
    IMG20250804142227.jpg
    660.5 KB · Views: 20
  • IMG20250804132812.jpg
    IMG20250804132812.jpg
    125 KB · Views: 21
  • IMG20250804132806.jpg
    IMG20250804132806.jpg
    406.9 KB · Views: 23
  • IMG20250804132845.jpg
    IMG20250804132845.jpg
    163.5 KB · Views: 22
  • IMG20250804132849.jpg
    IMG20250804132849.jpg
    198.8 KB · Views: 20
  • IMG20250405143719.jpg
    IMG20250405143719.jpg
    194.3 KB · Views: 19
  • IMG20250405143714.jpg
    IMG20250405143714.jpg
    207.9 KB · Views: 19
  • IMG20250402161831.jpg
    IMG20250402161831.jpg
    164.6 KB · Views: 18
Yes, they do appear to be a vent, I'll poke around next time I lift the Aco grates. There is one air brick in the wall above floor height.

There should not be any vents, from the Aco through to your property - any vent, would allow the water in the Aco into your property.
 
There should not be any vents, from the Aco through to your property - any vent, would allow the water in the Aco into your property.
So those horizontal slots all along the side of the channel will all leak towards the house if it gets too full?

Block them?
 
Any suggestions on the right tool to get the bolts out of the remaining grates?

I could buy another 1/2" socket but I don't want to break the ratchet. I have an SDS drill if that could help?
 

If you need to find a tradesperson to get your job done, please try our local search below, or if you are doing it yourself you can find suppliers local to you.

Select the supplier or trade you require, enter your location to begin your search.


Are you a trade or supplier? You can create your listing free at DIYnot Local

 
Back
Top