40mm shower pipe fall

Joined
8 Jun 2010
Messages
320
Reaction score
9
Location
Sussex
Country
United Kingdom
I’m installing a new shower run and the tray installation states 18mm per 1m fall. I can’t get that in without rising the floor.

I’ve got a 1/4 bubble fall on my level. Run is around 3-4m. I’m guessing around 4cm over the whole run.
Thoughts?
 
Sponsored Links
1. 18mm per metre is the MINIMUM fall. You are the one who is going to have to do the excavation if it doesn't work at less.
2. Unless you are using a calibrated engineers level, you can't rely on calculating the fall from the bubble. You could place a block on a known level surface at a known distance along the level, measure the bubble displacement for the block and distance.
3. If you do decide to take the risk, make sure the pipe is supported as well as possible along its length to avoid it drooping and creating a pool.
 
Does it have to be uniform? Ie if I raise the tray I’ll have 5cm at the start or is it 18mm every metre?
 
Sponsored Links
Insufficient fall may well result in the water not getting away quickly enough, and depending on the flow from the shower,it could cause water to build up in the tray whilst showering, with the risk of it overtopping if too long is spent using a high flow shower. This flow rate will decrease over time with the added build up of crud in the waste pipe.
 
As suggested, if you are using a low level tray with a high output shower you actually want a good bit more than 18mm/m, actually closer to 40mm/m TBH. If you don't then there is ever chance it will overflow the tray.

May be time to re-site your tray installation.
 
Going to have to raise the floor then, already 50mm into a 240mm (9inch joist)(don’t start on that one!)
 
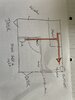
It looks like you're on a hiding to nothing, consider moving your tray closer to the final outlet connection. There are numerous potential downsides of too shallow a fall and a non-uniform fall, most of which have already been covered.

Chopping lumps out of 9" joists? The maximum allowed by Building Regs (Law) is 12.5% or 30mm in your case, and that's between a distance of 7% and 25% of it's span, so not enough to get your pipe below floor level.

A 40mm ABS pipe (solvent weld) is 46mm o.d., which means you'll have just 12mm of fall to play with if you use that method. {edit...ignore that last sentence, it makes no sense}

If you can drill 50mm holes in the joists (assuming they've not been notched or drilled in the same area already) then you have a little more leeway, but you must only drill the central 50% of span region (between 25% and 75% of joist span). The hole may be up to 25% of depth (60mm), wholely in the central 50% of depth (top of 50mm hole no higher than 60mm from top of joist, no lower than 110mm from its bottom). This equates to a maximum fall of 70mm, assuming your house and your joists are level, over the entire length of run, or a 1.7mm straight run at 40mm per metre fall.

In any case, and whatever laws and rules you care to break or follow, design your run so that you can rod out the pipework effectively with as little dismantling as possible. Use no more than one 90° bend in any place without a straight run to a rodding point.

If my Regs statements are wrong/out of date then I'm sure others will be along shortly to correct them.

MM
 
Last edited:
Thanks for input everyone. Attached some photos of plan and actual, nothing glued yet.
 

Attachments

  • 1F019EAC-B1A1-4651-8A78-0FC8662654BC.jpeg
    1F019EAC-B1A1-4651-8A78-0FC8662654BC.jpeg
    460.4 KB · Views: 531
  • 5E0AC881-E276-4459-83FE-1A66EF612118.jpeg
    5E0AC881-E276-4459-83FE-1A66EF612118.jpeg
    323.6 KB · Views: 583
So your shower drain has no real restrictions to its fall, the restricted one is the basin drain....(?) Even so, a 36mm (1 1/4") pipe won't fit into a 30mm joist notch.
I strongly suggest that you do not common-up the basin and shower waste pipes, rather take the basin one to a separate tapping on the 4" soil pipe....the advantage is that if the shower waste blocks you shouldn't get back flow from the basin to the shower tray. Use swept bends rather than knuckle joints.
 
I am confused.
Your drawing shows trays in right hand corner of both rooms yet shower waste is in left hand corner?
Your swept tees appear to be facing the wrong way
 
Unfortunately it's the proverbial Feux Pas. Never design a 1 1/2" waste run into the floor against the joists, it'll never be right unless the joist are huge and you don't see them very often.

I have had to fail 2 jobs because the previous installer fitted the waste pipes against the joists and excessively notched them out. One job 2 joists were starting to fail because of it and the notch had started to pinch the waste pipe, cracking it cause a leak, the client had to replace 4 joists and the insurance walked away. They had to take the previous installer to small claims to get them to cover the cost of new joists, that wasn't pretty.

Keeping it the way it is, then the problem areas I see would be the linear waste not draining quickly enough, basin could back up into the first shower and both could back up into the 2nd shower.

I'd look to take the quadrant shower's waste and run straight into the stack through the joists, you should get away with drilling a 9" joist for a 11/2" waste. Drop the waste from the basin to 32mm then increase it all to 50mm at the top tee for the 2nd shower then into the stack. Fit an antivac to the basin.
 
I'd look to take the quadrant shower's waste and run straight into the stack through the joists, you should get away with drilling a 9" joist for a 11/2" waste. Drop the waste from the basin to 32mm then increase it all to 50mm at the top tee for the 2nd shower then into the stack. Fit an antivac to the basin.

how would I run “through” the joists I would never be able to get the pipe in?
 
how would I run “through” the joists I would never be able to get the pipe in?

You may be quite surprised just how bendy a 3m piece of ABS can actually be, if you can't get it through, joist centres not withstanding, simply cut it into sections, thread it through, then solvent weld it back together.

Calculate the max dia for the holes, the larger they are the more flexi room there will be.
 

DIYnot Local

Staff member

If you need to find a tradesperson to get your job done, please try our local search below, or if you are doing it yourself you can find suppliers local to you.

Select the supplier or trade you require, enter your location to begin your search.


Are you a trade or supplier? You can create your listing free at DIYnot Local

 
Sponsored Links
Back
Top