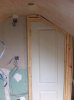
I have had a door frame and door fitted but am confused about how to finish off around it.
I plan to use 70mm architrave (18mm depth) around the rest of the house but I won't have enough space to fit that here. The door frame is also too thick for the opening and I'm worried it won't line up to the same thickness as the skirting
I have to ask - if you had the door and frame fitted, why didn't the installer finish the job by fitting architraves? Or was it too much for them? (based on how it looks to me)
Technically, it's a bit of a challenge. You'll need to learn how to scribe the 70mm wide architraves to the walls as well as how to bisect angles. the casing is also a dogs doo-da, as well, but it's in, so.......
The first thing I'd do is to mark-out a set-back around the inside of the frame using a combination square and a pencil (not a tape measure as that is far too inaccurate). The set-back of the architrave should match the other doorways in your house but 3/8in or 10mm are often used by chippies. In an ideal world this should be done with the door removes as it gets in the way on the hinge edge
Next bisect the angles of the joints and mark off the bisection with a pencil. In all probability the joints will be (viewed clockwise) 90/45 degrees, 45/22.5 degrees and 45/22.5 degrees. This will leave your frame marked-up thus:
Next, measure the lengths of each piece, inside point to inside point (or inside point to floor for the legs)
Starting with the top (header) cut a length of architrave with the bisected angles and to the exact length (i.e. very accurate) required, thus:
You almost certainly will require a sliding bevel to transfer the bisected anges from the door casing to the back (flat part) of the architrave before making the cuts, which must be dead square.
Next measure the heights at various points along the length of the header (shown in green) and transfer these heights to the rear of the architrave (ideally using dividers rather than by measuring)
Transfer the points from the rear of the architrave to the front using the combination square
Then join the points by pencil and smooth off the lines so that they more or less match the contours you are trying to follow (for simplicity the above illustration shows a flat surface without the architrave profile and is at the rear - yours will need to be at the front). Using a hand or circular saw cut away the majority of the waste with the blade set at a few degrees off vertical to gently undercut the edge. This allows easier installation. The curves are dealt with by using a coping saw held at a slight angle to gently undercut the curved edges in the same way. The resulting scribed piece is cleaned-up (sandpaper and sanding cork and/or sharp block plane) and offered into position
Any required adjustments are made to get as near perfect a job as you can. This will take some time and effort and it may be necessary to recut one or two pieces to achieve the desired end result. Once the fit is correct the header is temporarily fixed into position with a couple of small oval nails (shown in blue below).
The next double angled section is dealt with in the same way (shown in pink).
The two legs can be dealt with in the same way (right shown in green) although only a small part of this may need to be scribed (at the top corner):
The second leg is shown in white. The point of this may also need to be trimmed to fit:
You are aiming for tight joints and a mnaximum gap of 1 to 3mm where the scribes run against a ceiling or wall. As to the gap between the architrave and the plasterboard, if it is only a few millimetres, decorators caulk will fill it, otherwise you will need to saw and plane-up a fillet piece to be glued to the rear edge of the architrave (only the white one will be seen). The first and second diagrams show the projecting casing and the applied architrave:
The third shows the effect of adding a fillet beneath the architrave to fill the gap. The fillet ideally needs to be 20 to 25mm wide with the same thickness as the distance the door casing projects above the plaster:
Once you have undertaken all this work the nails can be driven under and more added to finish the joint. I prefer to add a little PVA glue onto my mitre joints. Any gaps between the architrave and plasterwork can then be filled neatly with a small bead of decorator's caulk prior to painting
The foregoing isn't easy, and in explaining the process you may get some idea of what a carpenter/joiner should be capable of doing (although TBH we all shy away from this type of approach - it's hard work). I'll bet you at the end of this you won't attempt the job either .....
Please note that a
professional tradesman would have ripped-down the casing to the exact required width (plus 3mm or so allowance for the plaster skim each side)
before installing the door casing, thus obviating the need for a fillet strip at all. A professional job would also have avoided butchering a panel door the way yours is - instead a flush door with, if needs be, applied mouldings to offer a facsimile of a panel would have yielded a far superior resuly IMHO. Foxhole is right - burn it and replace the thing