Boiler Leaking

Joined
29 Sep 2017
Messages
21
Reaction score
1
Country
United Kingdom
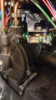
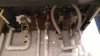
We have a Potterton Performa 24 combi boiler which has started to leak at the little rod that moves to activate the switch when the hot water is running. For reference it's item 130 in the following image;

https://www.heatingspareparts.com/boiler-diagrams/potterton/performa-spc-24?gid=16473

Some back story

I recently took off a radiator so the wall could be plastered, tried to flush it out a bit with a hose, put in a dose of inhibitor and popped it back on. All seemed ok but I noticed some additional sounds so thought the radiators needed bleeding more. They certainly did. I bled until the boiler pressure read empty, closed the rad and pressurised the boiler and re-bled the rad a further 3-4 times. All seemed good but when the heating came on the boiler pressure slowly rose over an hour to around 2.3 bar. It did slowly go down to normal with the heating on but after a day or two (I think) I noticed a pool of water on the kitchen counter under the boiler. Over a couple of days I topped up maybe .2 bar of water into the boiler because it had dipped to .5 bar which I believe it should rest when cold. I took off the front of the boiler to check and saw the issue.

What are my options please?

*EDIT: I should mention, I have only seen the occasional drip and since putting a plastic tub in place to catch it, there's only been a few drips. I don't know what caused the pool of water previously. Maybe it's pressure is now lower so it only leaks a tiny bit.
 
Last edited:
Sponsored Links
You have no business taking the front off a boiler. You have a dangerous lack of knowledge on heating and boilers

You need to ring a suitably qualified and experienced heating engineer :)
 
I wasn't sure if you were serious and I had to check to make sure I'd posted in the correct forum but as far as I can tell I have. Like many people I have replaced parts or repaired existing parts inside a boiler successfully with no certified training. I was hoping for some advice on what I could do and secretly hoping it wasn't going to cost me £140 for an entire diverter valve assembly. If water is getting through whatever magic is inside the diverter and progressing up the pin I'm guessing it's ready for the bin. Like I said though, I don't really know much about this, I'm just guessing.

Can anyone advise? Without suggesting a suitably qualified and experienced heating engineer? :)
 
Links in this post may contain affiliate links for which DIYnot may be compensated.
Sponsored Links
Here is the service kit for your valve, the item you say 1 no 130 is a electrical micro switch but all seals are in this kit, it sounds as if you have an expansion problem to so recharge the expansion vessel when you drain the boiler to change the gland seals, plenty of posts how you do it in here.

https://www.ebay.co.uk/itm/Potterto...582382?hash=item43ffde86ae:g:EhwAAOSw0d1cJh3E

Is this not classed as “work” on the boiler? Or on these because you have the separate inside cover after case removal then it’s ok?
 
Links in this post may contain affiliate links for which DIYnot may be compensated.
ffs its a performa the front case is nothing to do with the combustion chamber its purely a cover
 
Ffs that’s why I asked :p Too many people on this and other forums stating anyone removing any cover must be gsr and carry out 26.9 (n)(n)
 
Here is the service kit for your valve, the item you say 1 no 130 is a electrical micro switch but all seals are in this kit, it sounds as if you have an expansion problem to so recharge the expansion vessel when you drain the boiler to change the gland seals, plenty of posts how you do it in here.

https://www.ebay.co.uk/itm/Potterto...582382?hash=item43ffde86ae:g:EhwAAOSw0d1cJh3E

Thank you for the link and advice. I have attached a picture. From the set of bits and pieces in the link, it looks like the smaller black diaphragm may be what's needed if water is getting past and up the pin. Do you think it might be possible to remove the switch with the screws, one of which is circled in blue, which would give me access to remove the bit that looks like it houses the diaphragm, using the screws circled in green? I do not particularly like the idea of having to remove the whole thing. If I do need to, should it be a reasonably simple job?

Again, thanks for the help.
 

Attachments

  • pic.jpg
    pic.jpg
    241.1 KB · Views: 109
Last edited:
Links in this post may contain affiliate links for which DIYnot may be compensated.
yes, you dont need to remove the whole divertor valve, its an easy job, you have to drain the boiler though, I would change the diaphragm anyway but it wont be that causing the leak it will be the little gland seal that the pin passes through , very easily changed and is in the kit that I sent you a link for, just remove the switch assembly with the power isolated of course, then 4 screws and lift the diaphragm housing top section off
 
yes, you dont need to remove the whole divertor valve, its an easy job, you have to drain the boiler though, I would change the diaphragm anyway but it wont be that causing the leak it will be the little gland seal that the pin passes through , very easily changed and is in the kit that I sent you a link for, just remove the switch assembly with the power isolated of course, then 4 screws and lift the diaphragm housing top section off

Hi iancmd...

I've only just got around to tackling this for various reasons. I've unscrewed the four screws, undid the nut for the sensing pipe at the back and removed the diverter cap bit. I have replaced the diaphragm, mushroom bit with the rod, the gland and the washer that goes with it. However, the first time putting it back leaked from the join around the washer/gland nut and I took it apart and tried again. I was unable to remove the microswitch at any point because the screw head holding it on is oddly soft and if I try any harder it's going to round out the screw. Instead I poked the washer into the recess with a tiny bit of force and then screwed on the nut.

Also, during this second attempt, it slightly leaked at one of the four screws at the diaphragm. I unscrewed, jiggled the diverter cap bit to make sure it's a good fit and re-screwed. Now then, this is the good bit. I've not put much pressure into the boiler so far and I can't see water appearing but I can here dripping. It's actually coming from the highlighted black tap on the pipe under the boiler. What does this pipe do?

Thanks in advance.
 

Attachments

  • leak.jpg
    leak.jpg
    208.1 KB · Views: 110
Looks like I may need to buy a new cap and microswitch if it still leaks once this pipe/tap bit is sorted and it turns out it still leaks once under proper pressure. I do need to understand what I can do about that leaking black tap first though.
 
That is the CH flow isolation valve, did you close it ? they are terrible for leaking when closed, it might and I say might stop leaking when you put the heating on and it heats up, failing that you will have to replace it, but there is a drain point below it so an easy enough job to do, they might only come as a pair if so then change the return one too at the same time
 
That is the CH flow isolation valve, did you close it ? they are terrible for leaking when closed, it might and I say might stop leaking when you put the heating on and it heats up, failing that you will have to replace it, but there is a drain point below it so an easy enough job to do, they might only come as a pair if so then change the return one too at the same time

Thanks for the quick reply.

I did turn it when I started work on it earlier because I wasn't sure what is was for but since it this whole leaking issue started I assumed it was running down somewhere and dripping off there as a result. Or maybe it was and now it is actually leaking. No way to know I suppose.

*NOTE* I left at this point in my reply to fill the boiler one last time and it seems my handiwork is actually holding out this time and the dripping tap has slowed to a drip every 10 seconds or so, so it's much less. I've tried with the hot water running and so far no leaks from the area I've been working on. Tomorrow I can have a shower before work so it's a win. I will check for this replacement CH flow isolation valve tomorrow.

Many thanks once again for you help, I really appreciate it.

Lee
 

DIYnot Local

Staff member

If you need to find a tradesperson to get your job done, please try our local search below, or if you are doing it yourself you can find suppliers local to you.

Select the supplier or trade you require, enter your location to begin your search.


Are you a trade or supplier? You can create your listing free at DIYnot Local

 
Sponsored Links
Back
Top