Built in storage Cabinet

Joined
20 Jul 2015
Messages
6
Reaction score
0
Country
United Kingdom
I recently got on the property ladder and wanted to try my hand at some home DIY.

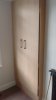
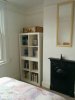
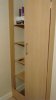
I wanted to convert the spare bedroom into an office, but wanted to keep some space for storing clothes and paperwork. The attached photo shows you the space that I wanted to capitalise on.

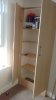
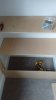
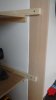
This photo shows how the previous owners were using the space before we moved in.
 

Attachments

  • 19237325893_158c7020c1_b.jpg
    19237325893_158c7020c1_b.jpg
    75.3 KB · Views: 297
Last edited:
Sponsored Links
Phase one for the build involved re-plastering the entire room. This isn't something I had anticipated doing but the woodchip wallpaper was quite a state. I started the actual cabinet a few weeks later after the plaster had time to set.

To begin with I put in some wooden ledges to hold the MDF shelves in place. I bought this from B&Q. I don't intend to put too much weight on shelves so this approach seemed to suffice.
 

Attachments

  • img_20150315_204227_16826259805_o.jpg
    img_20150315_204227_16826259805_o.jpg
    139.2 KB · Views: 271
After the shelves I started work building the outer cabinet. I wanted to get as much depth as I could so this meant bringing the cabinet out of the recess.

For the outer section I used Beech wood panels, bought from Wickes. I actually found this wood over by the kitchen cabinet section in my local store. It's not easy to search for online so I would recommend just going in and looking around the 'Kitchen/Cabinet' isle.

So that the left hand door hinges would have something to fix to, I put a strip of wood against the left hand wall and cut this to fit the depth required. This has been fixed in place with wall plugs and standard wood screws.
 

Attachments

  • img_20150718_171714440_19614615688_o.jpg
    img_20150718_171714440_19614615688_o.jpg
    37.7 KB · Views: 251
The right hand side of the cabinet was a little more tricky as this sits out of the recess. As this panel would need to take the full weight of the door I had to find a way to attach this and keep everything sturdy.

To do this I fitted some extended brackets that the right hand panel could be attached to. To make this stronger I fitted a beech wood panel at the foot of the cabinet, this also doubled up as a door stop for when the cabinet doors close.
 

Attachments

  • img_20150718_183829776_19181807644_o.jpg
    img_20150718_183829776_19181807644_o.jpg
    46.3 KB · Views: 248
  • img_20150718_171719234_19807428641_o.jpg
    img_20150718_171719234_19807428641_o.jpg
    41.4 KB · Views: 263
  • img_20150718_183836734_19778214116_o.jpg
    img_20150718_183836734_19778214116_o.jpg
    90.2 KB · Views: 247
Sponsored Links
Fitting the doors was probably the hardest part of the whole build. Initially I bought some european 90 degree hinges. I retreated from this idea when I realised how hard it would be to fit as I lacked the necessary tools for boring into the panels. Instead I opted for some basic brass hinges which were much easier to fit and fiddle with.

Despite measuring this several times I STILL managed to get the door overlap wrong. This resulted in me needing to take a bout 1/4inch off the left hand door with a jigsaw.

I also found the bottom door stop on it's own wasn't quite enough, to solve this I fitted another piece of wood to the very top of the cabinet, which doubles up a stabiliser for the top of the frame.
 

Attachments

  • img_20150718_211859743_19800484592_o.jpg
    img_20150718_211859743_19800484592_o.jpg
    62.7 KB · Views: 261
Last edited:
These shots show the final product. For the door handles I just went with bog standards from Wickes.

Overall I am pleased with the outcome. All comments and feedback welcome :)
 

Attachments

  • img_20150719_151441465_19640167030_o.jpg
    img_20150719_151441465_19640167030_o.jpg
    40.3 KB · Views: 251
  • img_20150719_151519833_19205574924_o.jpg
    img_20150719_151519833_19205574924_o.jpg
    47.9 KB · Views: 279
Last edited:

DIYnot Local

Staff member

If you need to find a tradesperson to get your job done, please try our local search below, or if you are doing it yourself you can find suppliers local to you.

Select the supplier or trade you require, enter your location to begin your search.


Are you a trade or supplier? You can create your listing free at DIYnot Local

 
Back
Top