Cable routes and drilling

Joined
30 Mar 2015
Messages
3,825
Reaction score
58
Country
United Kingdom
I always take the view that any lines vertical or horizontal from a socket or switch may have a cable and should be avoided for drilling. When unavoidable, I would do some further investigation but my default approach is as set out above.

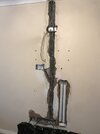
I am setting out some electrics for a wall that will have a TV hung on the wall and a wooden base unit with Sky, DVD, etc. Both of these require power. My plan was to bring a new power supply through the ceiling and down this wall. please see sketch below:
1659087887090.png


Because I am laying the cables, I know that the central sockets are where the cable is travelling vertical and I can miss this area when fixing the TV bracket to the wall. Anyone approaching this in the future wont know this and can assume that there is cable between the sockets on left too (travelling vertically). Is this bad practice and how do you guys handle this?

Thanks in advance.
 
Sponsored Links
The cable routes meet the regulations. The presence of the sockets denote a possible route either horizontally or vertically from the sockets.
Usually a peek inside the socket back box reveals the direction of the cable.

PS. I assume that you arent actually running spurs off spurs as your diagram seems to suggest?
 
PS. I assume that you arent actually running spurs off spurs as your diagram seems to suggest?
I have a separate thread to determine the most appropriate option. Currently, I am considering the extension of the existing ring to include these sockets. Alternatively, I could wire a new leg into the existing MCB. This would then feed these sockets. the combined load of both rings will still be within 32amps and we will probably have 7 sockets in total across both legs.

Definitely not a spur-on-spur.
 
Sponsored Links
What you are doing is completely legit. What you can do (if you want) since this is your home is document everything you are doing (pics of chased walls, sketches of cable routes, socket sequences etc, positions of wall studs, underfloor pipe runs, anything else you want to record).
Easiest way to keep track of it all is via photos from your phone camera- folder for each room, pics of walls, photos of layout sketches.
 
Alternatively, I could wire a new leg into the existing MCB.
BUT that single cable would be a spur from the 32amp ring final. Then you will be having illegal spurs from spurs.
You can only spur from the existing MCB if you install a 13A FCU before the first socket. But you (should) know that!
 
BUT that single cable would be a spur from the 32amp ring final. Then you will be having illegal spurs from spurs.
You can only spur from the existing MCB if you install a 13A FCU before the first socket. But you (should) know that!
I was aware of the requirement for a 13 amp FCU if we have a spur-on-spur situation but that's not what I was planning or understood my situation to be. I am considering two options:
1. extend existing ring final from nearby socket
2. add a new ring (with its own 2 legs) into the existing MCB. This new ring will service these additional sockets. This will mean that this MCB has 4 cables with two separate RFC's as I understand it.

As I said, I have put out a separate thread to get some advice around this.
 
add a new ring (with its own 2 legs) into the existing MCB. This new ring will service these additional sockets. This will mean that this MCB has 4 cables with two separate RFC's as I understand it.
Then 4 conductors in one MCB? NO

I thought you wanted to do things properly. I'll respond on the other thread.
 
UPDATE: tried to keep these chases as tight as possible but didn’t have too much success. Was using a hammer drill with a chisel bit. I used a drill bit to go around the edges first.

The easifil smoothed it all out in the end.

I’d welcome your feedback and thanks for your help.
 

Attachments

  • 65068907-ABE4-4EBD-84E7-40FC1919F3FA.jpeg
    65068907-ABE4-4EBD-84E7-40FC1919F3FA.jpeg
    143.5 KB · Views: 84
  • C5B4D467-B933-4F53-958E-01DAA92F3D50.jpeg
    C5B4D467-B933-4F53-958E-01DAA92F3D50.jpeg
    161.1 KB · Views: 89
what happened to the box above and to the left of the box with two drain pipes below it?? other than that no worse than I have seen
 

DIYnot Local

Staff member

If you need to find a tradesperson to get your job done, please try our local search below, or if you are doing it yourself you can find suppliers local to you.

Select the supplier or trade you require, enter your location to begin your search.


Are you a trade or supplier? You can create your listing free at DIYnot Local

 
Sponsored Links
Back
Top