Central heating timer / programmer - wiring help please

Joined
5 Feb 2019
Messages
7
Reaction score
0
Country
United Kingdom
Hi all,

I'm hoping someone would be kind enough to help me with a wiring question.

I am hoping to replace my existing analogue timer with a Drayton 7 day timer (Drayton t711r) that I recently purchased.

My boiler only heats central heating (i.e. No hot water)

My current timer has buttons for central heating and hot water but only central heating works (as water is heater by other means).

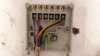
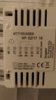
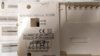
The attached images show the following :
-existing wiring
-wiring diagram for original timer
-wiring diagram for new timer.

It looks to me as if I need to move the following:
-wire in hole 3 to hole 2
-wire in hole 4 to hole 3.

If someone could confirm that would be great.

Thanks, Stuart
 

Attachments

  • existing wiring.jpg
    existing wiring.jpg
    200.3 KB · Views: 3,223
  • New wiring diagram.jpg
    New wiring diagram.jpg
    150.8 KB · Views: 961
  • Old wiring diagram.jpg
    Old wiring diagram.jpg
    139.6 KB · Views: 1,056
Sponsored Links
Swap the yellow and black wires around in terminals 3 and 4.
Then you need to link L and 1 with a short piece of wire.
 
Swap the yellow and black wires around in terminals 3 and 4.
Then you need to link L and 1 with a short piece of wire.
Hi thanks for your quick reply.

I understand the need for wire between L and 1, that's shown in the manual (although not on the actual timer for some reason).

If I swapped the yellow and black cables around, I'd have no cable in 2. The diagram shows a circuit from 1 to 2 or 1 to 3 depending on the switch. The circuit doesn't show anything in 4. Have. I misunderstood what the wiring diagram is asking for? Thanks
 
The yellow wire currently in 3 would have been for the hot water, but you said that the clock didn't control the hot water any more. So it is no longer needed.
Terminal 4 is just a spare terminal so I was just suggesting to put in ther so that it is safely terminated.
You don't need a connection to 2.
 
Sponsored Links
Hi Johnmdc,

Thanks very much for your help, I'll try and have a go tonight but might not have a chance until the weekend.

I don't think it has ever controlled hot water so I assumed that all wires were for the heating but ill follow your advice and see how it goes

Thanks again.
 
The yellow wire currently in 3 would have been for the hot water, but you said that the clock didn't control the hot water any more. So it is no longer needed.
Terminal 4 is just a spare terminal so I was just suggesting to put in ther so that it is safely terminated.
You don't need a connection to 2.

Hi, I just got round to trying this. The unit powers on and it lights up to suggest that the heating is on but the boiler doesn't fire up as it would normally. It does seem to make some sort of noise when set to 'on' but definitely doesn't come on. The boiler 'on' light doesn't come onm

Any ideas would be much appreciated.thanks.
 
With the old clock did you have to have water and heating on for it to work?
If you did then put the yellow wire in terminal 3 with the black wire.
The black will be the pump feed and the yellow the boiler feed.
 
The noise I heard probably was a pump so that would make sense.

We never quite understood the old timer - the heating and hot water 'on' lights lit up for both when on timer but to use the 'boost' or 'override' functions we just used the heating button.

Would there be any risk to putting the wires together? It seems like a sensible thing to try but didn't want to break anything.

Thanks again for your help with this, really appreciate it.
 
No there will be no problem.
The old timer was probably set up in what is known as "gravity mode" which brings the water (boiler) on automatically with the heating (pump).
If you look at the back of the old timer where it says 10 and 16 it will be set to 10 which is gravity.
 
Hi, that worked perfectly (putting both wires together). Thank you so much for your help, saved a lot of hassle!
 

DIYnot Local

Staff member

If you need to find a tradesperson to get your job done, please try our local search below, or if you are doing it yourself you can find suppliers local to you.

Select the supplier or trade you require, enter your location to begin your search.


Are you a trade or supplier? You can create your listing free at DIYnot Local

 
Sponsored Links
Back
Top