DIY Sash Window Renovation?

Joined
16 Mar 2011
Messages
37
Reaction score
0
Location
Yorkshire
Country
United Kingdom
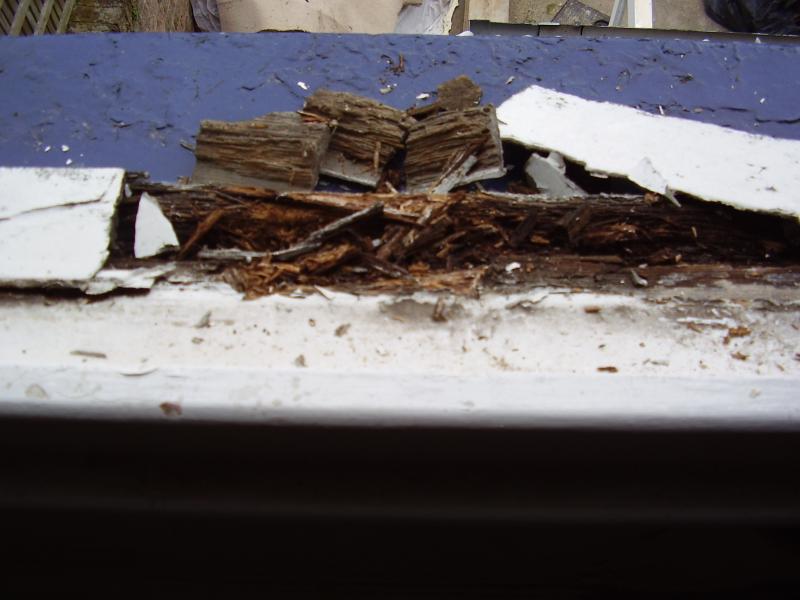
Morning all, as the title, i am stripping back my original sash windows from my Victorian terrace they have lacked serious TLC in the past. Bit of dry rot to treat but i have an idea on how to do this. My question is though it took me ages to get all the putty out, really past its best before date, brittle as hell and just crumbled.

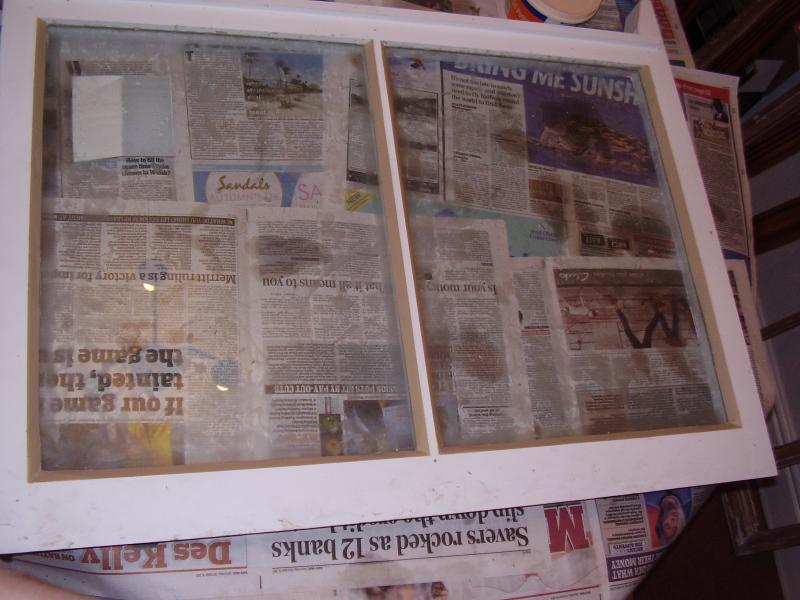
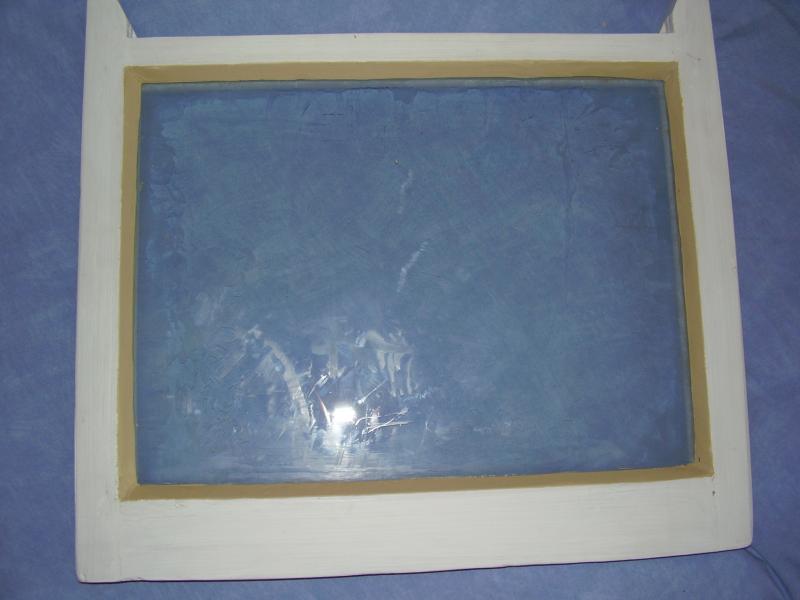
Now when i put new glass back in 6mm single pain (not able to put double glaze units in due to the size of recess, i know its not brilliant but its better than the original 3mm, weights added to cast weights to suit), i don't wish to use putty so what can i do? The timbers aren't completely flush so thought about applying a little white silicone around the edge of the pain to get a seal around the wood. Then add a little silicone to the bead trim and wipe excess of to get another seal. Painting windows white so shouldn't be visible too much.

Is this acceptable or is there a better method? Would love some advice, tips as i have 6 complete windows to do! Weather starting to turn should i just put this off till the spring?

Cheers
 
Sponsored Links
Bedding the glass into silicon will work but forming the exterior bead in silicon will lead toproblems with painting as the paint won't stick to it.
To be honest there's nothing wrong with facing it up in putty but if you are really against that then you could try using decorators caulk on the outside. I've seen it done , it's awkward to do and needs a decent paint finish although I wouldn't really like it on an exposed window.
I've also in the past faced up a window with wood filler, the two part stuff like car body filler but again it's awkward to do.There wass a security issue with the window I used the filler on so it's not a regular or common practice.
 
Wooden glass beading with silicon to act as a seal would be fine.

Decorators caulk isn't advisable externally.
 
Hi,

Restoring sash windows is what I do. :)
If you are changing the glass anyway,then if it breaks take it out and use a hot air gun to soften putty(use a mask with vapor protection as the paint on the frame will probably have lead primer/undercoat)and do outside.

Don't use caulk on the outside,it's for interior use only.

Best way to glaze is with putty.

I always use a bit of linseed oil where the glass sits before adding new putty as it will help the new putty stick properly.

Remember to pin glass in as well.

Bedding in new glass is better if the putty is soft,so add a little linseed oil to it.

When doing the finish bead you need the putty soft but not sticky as it's really hard to get a nice neat finish with sticky putty,so take a bit of linseed oil out of it by flattening it between newspaper and leaving 5 mins.When you roll putty in your hands it should still be soft and not break into little bits which means its too dry.Work it in your hands for a few mins if its dry add a very small amount of linseed oil and work it again.

For best results,roll into a sausage shape and press with thumb onto putty and against wood.

Remember to check the sight lines,you need the putty to not be visible from inside,if it is go over putty again and remove some until you can't see it when viewed from inside.

Wipe as many of your fingerprints from glass without going too close to putty.The rest you can remove when it has hardened...which can take a few weeks...best way is with a damp cloth and maybe window scraper...just be careful to not disturb new putty.

Hope this helps.
 
Sponsored Links
Thanks PBSCO. Yes that's correct i'm re-glazing all the windows and i chewed for seems like an eternity getting the putty out on 2 windows so will give the heat gun a go.

The reason i went off the putty idea is the majority of pains have been re-glazed previous and the putty finish is terrible. Its got fingerprints on show/ its lumpy and uneven! I thought this was the norm with a putty finish or is this someone that's had a-go themselves like me (don't want the same result twice). I'm after a really nice finish and one that can be kept on top of, how often does the putty have to be replaced?
 
Just be careful using the hot air gun....the idea is to heat the putty up,not set fire to the sash :)

To get a good smooth finish is just practice i'm afraid...Have a look on youtube to see how it's done.
Most of the videos on there seem to be american,so I use a different putty knife(one with a point)to the ones they show in the videos.
7or 8 quid for a good putty knife.
when you get the putty make sure you remove any crust from the top or it will just have horrible lumps in your finish.

I taught myself after watching a glazier do it.

Main points to get right are....putty not too sticky,good knife remove crust from top of putty and try not to play with it by getting a really smooth finish....if it's your first time...get it as good as you can and leave for a day or two and then have another go at smoothing it...putty will firm up with time and can make it easier to get the required finish(i.e smooth and without fingerprints in it :))

Not sure how long it should last 10's of years I would guess...if the sashes are painted every 5 or so years.

Post a photo of your progress....cheers Rob.
 
Rob, shame your in Devon could do with you round the corner!!

Will look up the videos and give it ago, but like you say bit of practice could make all the difference.

As this is your trade i'm going to pick your brains on parting bead! Now i don't have any to hand so cant answer on dimensions size but the parting bead that is in is badly rotten so needs replacing. Been to a few timber yards and they have all said you cant get any that size any more its all smaller (not small enough to join two together to fill it out). They gave a suggestion of packing it out but surely you would see the gap when window was up. Other alternative is to get some made which as a one off, was a costing i was hoping to avoid!!

Do you have any suggestions? Come across this before?

Mark
 
Most of the parting beads in my area are 8mm x25mm.I have come across the odd 9mmx25mm but not often.It can go up to 8mm x 30mm depending on the overall size of the frame...usually over 3m in height.

Usually the parting bead, inside staff bead and outside edge of your box are in a line...If you open the window and put a straight edge from the inside edge to outside edge of your box,you will see what I mean.(if the parting bead is sticking out further,then good chance they have been replaced before)

Most of the time I fit draught proofing and depending on what the customer wants.I make new parting beads......If the customer wants as original as possible,then I will cut out any rot and use parting beads I have saved from other jobs.........Best for you to take the parting bead from one window and use that to repair the other windows and then get 2 new parting beads for the window you cannibalized made by a joinery firm(made from proper joinery grade timber)they will last longer in the long run.

It should only cost a few quid to get parting beads made...10 mins tops to cut to rough size and then run through a thicknesser.
 
(How hard can it this upload be in the process have deleted my message!!Try Again)

I will attempt re-glazing with putty this weekend and will get some photo's, if i make a botch of it then i'm afraid the traditional skills are out the window and back to silicone and pre-made beading!

On another note my sills are all rotten, look sturdy enough from the outside but a tap and a prod with a screw driver shows there far form sturdy see pic! Do i address the sill first with, and dare i say it by simply chopping the bad out and making good or should i replace full sill?


:confused:
 
Is that the cill we are looking at? Looks like you have a bit of wet rot in there. This will require a bit more poking about to discover the extent but it's most likey to require replacement.
I'd said putty would be fine and I'd say follow PBSCO's advice , the manufacters of caulk do say it can be used externally if overpainted but to be honest it's probably better to er on the side of caution.
If you go for Lower's idea of timber beads I'd say use polysulfide rather than silicon , it will last longer and paint will stick to it.
 
If I was doing the job and looking at that cill,it's an easy choise.Take out the whole cill and replace.

Once you can remove a cill by only using your hands it's what we call in the trade totally f****d :)

If it was only the front part of the cill,up to where the inside window closes then it's possible to remove the front edge with a chisel and repair it.....Good idea to use some expanding foam under new part of cill after you have tried the new piece of wood first(don't go over board with foam as it expands to about 7 times its volume...use water in a window cleaner bottle to spray foam after wood is in place to stop foam expanding any more..... good idea to spray water on anything that you dont want the foam to stick to...if you have a little accident when applying it :)

As I said if I was doing this job ,it would be full cill replacement 100%

Don't be tempted to cover rotten cills(either tin or plastic) as all that happens is water will still get in and rot the cill from the inside out.....Always better to sort the problem out ,than cover it up.

If you are going to take the cill out yourself then try to cut about a 4 inch section out in the least rotten part,so you can take it to a joiner who will be able to recreate the cill shape for you....Have a quick check with a tape measure to make sure all the cills are the same...99.9% sure whey will be.

When removing old cill try to cut what you can and then drill timber as much as possible ,so you don't disturb the rest of the box too much...and split out small sections at a time.
There will be huge cut nails in the bottom part of the box where it meets the cill so don't try to just pull the old timber out.Cut nails with hacksaw.

If the box does start to move,then screw a piece of wood across the box to keep it ridged ...probably a good idea to do this anyway.

Starting a big job tomorrow and it needs 4 new cills,so will take some photos before,during and after for you...or go to my facebook page..paignton box sash window company...think I added a few photos of rotten cills.

Going to be really busy for the next 12 days,as the woman moving in is pregnant and I want to get all the messy stuff done before she moves in at the start of next month...but I will have a look at the fgorum ,if you get stuck :)

Rob.
 
@ Ladylola.....You can use caulk outside if it's an external one...what I should have said was.I wouldn't use it instead of putty....I can only imagine trying to get good clean lines using caulk if you have to smooth it in more than once :)
 
Correct of course PBSCO . To be honest I've never actually tried it myself although I have seen it done and yes it was a pig of a job. I'd think if you can use the caulk then you could putty in the dark wearing boxing gloves :LOL:
I've worked on hundreds of sash windows in my time and I'll admit they're not my favourite way of spending the day so I respect you for making you whole job sash window repair.
.A couple of years or so ago on a job with something like 40 odd sash windows
the site agent had us go round repairing them and reweighting them. This we did only to be told all the windows were to be fitted with electric motors which of course meant that the weights were now all wrong . The motors were of such a design that moved the window by a chain so for it all to work the sashes needed to be heavier than the weights.
However, there was a problem with the mounting brackets for the motors (really it was something of a cobbled together design) and the windows didn't operate properly and the upshot of it all was I had to go round and prop up the top sashes with a piece of tile battern as a tempoary measure, so tempoary in fact that the batterns are still there :rolleyes:
 
Thought i'd put up a few pics of my putty work!!! took a few attempts to get it right, jumped in with both feet, whacked a load of putty in, smoothed it out spent ages on shaping the edges, span the window round and there was half inch putty overlap, d'oh!!! Got the general gist now though, learning all the time!!

Thanks for all your help
 

DIYnot Local

Staff member

If you need to find a tradesperson to get your job done, please try our local search below, or if you are doing it yourself you can find suppliers local to you.

Select the supplier or trade you require, enter your location to begin your search.


Are you a trade or supplier? You can create your listing free at DIYnot Local

 
Sponsored Links
Back
Top