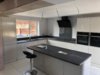
DIY Two Storey Extension

Kitchen Plastering

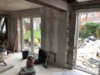
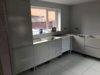
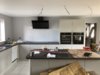
When it came to plastering the kitchen ceiling I did things a little different. I split the ceiling into three sections using some angle beads and just plastered the first section.

thumb_IMG_9378_1024.jpg


This allowed me enough time to get the first section smooth before moving onto the next section. Then I removed the bead to join the next section.

thumb_IMG_9385_1024.jpg


thumb_IMG_9386_1024.jpg


thumb_IMG_9390_1024.jpg


Then I plastered the walls... Like a plastering Jedi at this point :LOL:(y).

thumb_IMG_9393_1024.jpg


thumb_IMG_9392_1024.jpg
 

Attachments

  • thumb_IMG_9394_1024.jpg
    thumb_IMG_9394_1024.jpg
    211.7 KB · Views: 112
Sponsored Links
Kitchen Plastering 2

The extension wall and existing wall were different thicknesses and would've meant a step out to the new extension wall so I decided to make the back wall as smooth as possible by building out the existing wall. It did mean stripping the old plaster off..

thumb_IMG_9396_1024.jpg


thumb_IMG_9400_1024.jpg


thumb_IMG_9404_1024.jpg


thumb_IMG_9432_1024.jpg


thumb_IMG_9431_1024.jpg


thumb_IMG_9436_1024.jpg


thumb_IMG_9440_1024.jpg
 

Attachments

  • thumb_IMG_9402_1024.jpg
    thumb_IMG_9402_1024.jpg
    297.5 KB · Views: 111
  • thumb_IMG_9398_1024.jpg
    thumb_IMG_9398_1024.jpg
    264.4 KB · Views: 113
  • thumb_IMG_9439_1024.jpg
    thumb_IMG_9439_1024.jpg
    183.5 KB · Views: 123
Kitchen Installation Part 1

White 600x600 porcelain tiles in white. Started to put the kitchen units in place (I laid the tiles and fitted the kitchen too. I could hardly build the extension and then get someone to do these things!)

thumb_IMG_9461_1024.jpg


thumb_IMG_9459_1024.jpg


thumb_IMG_9460_1024.jpg


thumb_IMG_9471_1024.jpg


I had to break into the plaster and a bit of the wall to get the sink waste behind the dishwasher.

thumb_IMG_9457_1024.jpg


thumb_IMG_9475_1024.jpg
 

Attachments

  • thumb_IMG_9472_1024.jpg
    thumb_IMG_9472_1024.jpg
    165.4 KB · Views: 123
  • thumb_IMG_9458_1024.jpg
    thumb_IMG_9458_1024.jpg
    130.6 KB · Views: 105
Sponsored Links
Kitchen Installation Part 2

When I did the worktops, I was lucky to have gone for square edge worktops which meant the join would be simpler.

I basically removed the laminate from the joining edge of the worktop and used a hinge cutter to make the bolt holes.

thumb_IMG_9478_1024.jpg


thumb_IMG_9505_1024.jpg


thumb_IMG_9481_1024.jpg


thumb_IMG_9512_1024.jpg


Radiators and blinds for the back wall go up.

thumb_IMG_9675_1024.jpg


Waiting for the front blind and the electrician was supposed to come back and do the 2nd fix although with the lockdown he hasn't been able to, so our kitchen is not wired up yet. Spotlights will be going in too. It's getting there but not finished.

thumb_IMG_9673_1024.jpg
 

Attachments

  • thumb_IMG_9509_1024.jpg
    thumb_IMG_9509_1024.jpg
    171.1 KB · Views: 119
  • thumb_IMG_9671_1024.jpg
    thumb_IMG_9671_1024.jpg
    162.5 KB · Views: 107
Utility Room

I brought the waste pipes under the ensuite floor and under the floor joists in the utility.

thumb_IMG_9536_1024.jpg


I plastered and decorated the utility room, including boxing in the waste pipes.

thumb_IMG_9555_1024.jpg


thumb_IMG_9549_1024.jpg


thumb_IMG_9553_1024.jpg


Plaster and paint.

Installed some cupboards from the old kitchen and a piece of old worktop from the shed. The room still needs some finishing touches and the electrics are not done yet so i'm running an extension lead to power the washer, dryer and fridge.

thumb_IMG_9677_1024.jpg


thumb_IMG_9676_1024.jpg


thumb_IMG_9678_1024.jpg
 

Attachments

  • thumb_IMG_9540_1024.jpg
    thumb_IMG_9540_1024.jpg
    221.1 KB · Views: 111
  • thumb_IMG_9544_1024.jpg
    thumb_IMG_9544_1024.jpg
    152.2 KB · Views: 113
  • thumb_IMG_9679_1024.jpg
    thumb_IMG_9679_1024.jpg
    214.7 KB · Views: 113
Still Some Way To Go

So I'm pretty much up to where the posts are now. I have decorated both my daughters rooms which I'll post when I finish the upstairs hallway and I have the dining area to finish and the old kitchen conversion. There is still a lot of work to do and some small finishing jobs in each room i've posted but I'll get there!
 
Hi Chris, looking through your photos brought memories of our self build exploits in the early 80s. . Looks great.
 
Hi acurachris

Brilliant thread and you never even laid a block before???

I am fairly good and DIY (bathroom refurbs, tiling and other DIY I will give it a go) only thing I dont touch is electrics really.

I am hoping to block up 2 garage doors in the near future, what were the metal strips you used to connect extension to existing house?

Would you recommend skimming walls & ceilings DIY?

Thanks
 

DIYnot Local

Staff member

If you need to find a tradesperson to get your job done, please try our local search below, or if you are doing it yourself you can find suppliers local to you.

Select the supplier or trade you require, enter your location to begin your search.


Are you a trade or supplier? You can create your listing free at DIYnot Local

 
Sponsored Links
Back
Top