edz flashing with ashmore tiles

Joined
24 Jul 2011
Messages
59
Reaction score
0
Location
Sussex
Country
United Kingdom
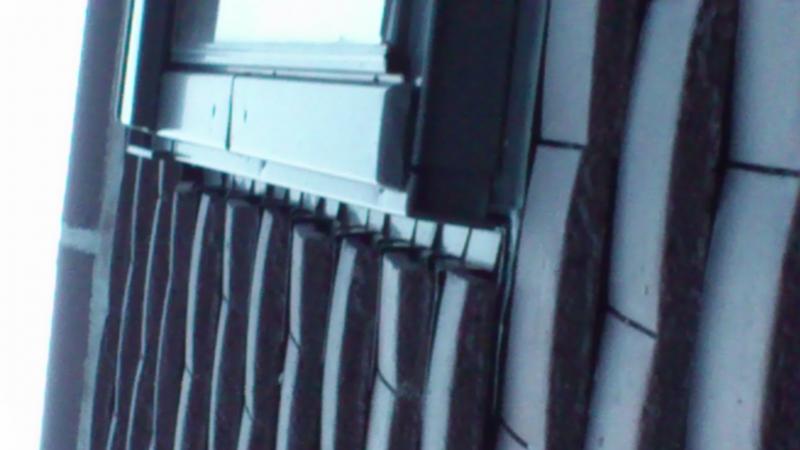
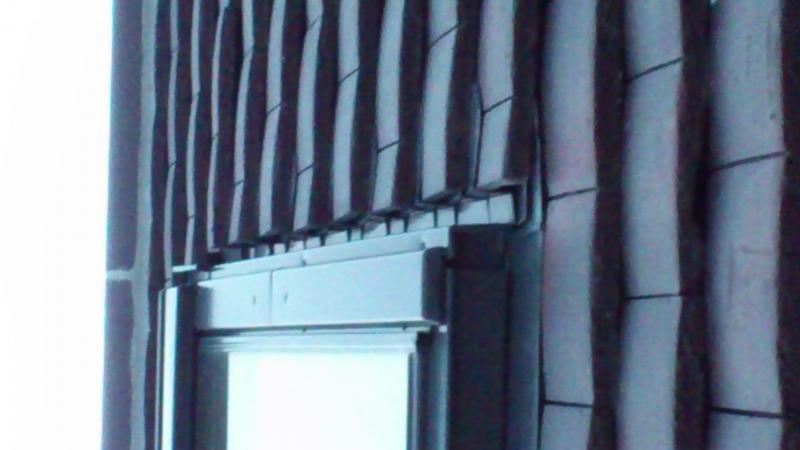
Hi all - in the process of fitting the flashing, have trimmed sponge so follows contours of underside of Marley ashmore tiles - we're not happy with the size of the gap from underside of tiles to flashing. as tile overlaps top of next tile down there is a good 20mm gap. Doesn't look brilliant, and although sponge is in this gap, we are not convinced that it would stop driving rain penetrating across flashing, especially as foam degrades over time.
Although have doublechecked this is the right flashing, the instructions only talk about wibbly edged tiles (!) and show how to butt these up to v ridge on flashing. Do we need another kit? Cn't find any info on internet (and everyone shut now!). We could make our own stepped lead, to slip under each tile (as the flashing kit does for plain tiles). Could we make it look prettier :) ?

Any ideas? Many thanks, kaz
 
Sponsored Links
just for info, in case anyone looks up this post...

I spoke to Velux who agreed that although we got the right flashing kit as stated in their brochures, it is NOT the right flashing kit :confused: !

So Velux have been great about it and they are sending out new free EDP flashing kits to replace them, which WILL work - yippee! :)
 
Hi - same person as karenandoz here - had to rejoin under different name.

Any way thanks for your response - yep you were right EDP not the right kit, as overlap of tiles too small for soakers to work (plain tiles have a much greater overlap). Phoned Velux back, and they said EDZ definitely the flashing kit Marley state is right for their Ashmore tiles, and they should never have recommended EDP! :confused:

So what we have done is notch out a V with an angle grinder from the back of the tiles so that they can sit closer to the frame, and used the soakers from the EDP set overlapping which means every alternate one sticks out, so I tin snipped them into a decorative curve. We also replaced the corrugated EDZ apron with the flat EDP apron. A bit more jiggery and pokery needed with tin snips by the top flashing piece with the soakers, but because we retained the EDZ side flashings, this was more for aesthetics than weatherproofing.

This means the foam is no longer visible (and so should not disintegrate so fast), and the whole thing looks better, and is more weathertight! Phew wot a job! :)
 
Sponsored Links
Interested to see a pic of the finished job!

Re the tile laps... ones for a single lap tile the other is a double lap

(However an EDZ can be used with plain tiles (which is a double lap) ,and has been used for years in the past)

EDP plain tile only.

TBH with careful tile cutting and a little thought it's possible to use the edz and not see any foam at all..
 
but you can see the adapted soakers??? how about a pic looking up the side channel
 
Thayts why I tinsnipped every alternate soaker in to 'decorative' curves -take it you don't approve! We think it looks attractive! ;)
The best thing about it is that we know that this 'double insurance' means that we are completetly waterproof.
Will try to get a photo for you posted asap (means getting out there on a ladder) - though you can't see a lot looking up the channel - just looks like a load of overlapping soakers flush with the edge of the tiles
 

DIYnot Local

Staff member

If you need to find a tradesperson to get your job done, please try our local search below, or if you are doing it yourself you can find suppliers local to you.

Select the supplier or trade you require, enter your location to begin your search.


Are you a trade or supplier? You can create your listing free at DIYnot Local

 
Sponsored Links
Back
Top