1. You are correct, live should go to the thermostat, although the additional safety is marginal.
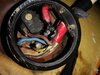
2. BOTH need rewiring as a matter of urgency, as both show severe damage to the insulation, particularly on the live cables.
3. Unless there is sufficient slack in the cables to allow the wires to be stripped back to sound insulation and still connected without strain you will need new cables.
4. New cable should be heat resistant, not just ordinary 3 core.
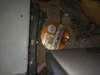
5. The key to rewiring is to make sure the cables are securely and tightly connected to the terminals. So:
5a. Isolate all power to both immersions. Unless you are certain about what you are doing turn off the main consumer unit switches for normal and Economy 7 circuits.
5b. Remove existing wiring.
5c. Thoroughly clean the existing terminals. Take off the nuts and washers as necessary and clean them to get good electrical contact.
5d. Strip the outer sheath, trim back the inner cores just long enough to wrap round the terminals.
5e. Wrap each wire round its appropriate terminal, laying the wire to the left of the post then wrapping it round clock wise looking down.
5f. Make sure any washers are clean, and attach in the correct positions. If you have "cup" washers with a cut out, these go on first, the wire next wrapped round and out through the cut out, then the plain washer on top. All washers should be brass.
5g. Tighten the nuts down securely, making sure that no insulation is trapped under the wire. The nuts must be very tight, but of course not so tight as to strip the threads.
5h. Secure the outer cover in place with the necessary nuts on the earth pillar.
6. The main reason for wires getting damaged is arcing. These cables and terminals have about 15 amps of current at 230 v going through them whenever the immersion heater is on. The slightest looseness allows the cable to move and an arc to form, which is intensely hot.