Hall tiling opens a can of worms?

Joined
23 Jun 2020
Messages
4
Reaction score
1
Country
Ireland
Hi folks.

I am living in a terraced house built 13 years ago. I have been trying to make use of the lockdown to tackle some redecorating projects. I just started preparation for retiling the hall.

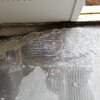
The old tiles came up without too much issue. After removing the tiles adjacent to the front door sill, I noticed some dampness and rot along the door sill. I removed some of the crumbling mortar between the sill and the internal concrete slab to inspect further.
Unfortunately I don’t know what I should be looking at but am concerned that the damp proof membrane doesn’t continue outside under the door sill. Should this be the case and is this the reason for the rot?

The rest of the door and frame appear to be in reasonable condition and ideally I would like to retain the door/frame to save money. Any suggestions really appreciated.
IMG_20200623_093855.jpg
 

Attachments

  • IMG_20200623_093910.jpg
    IMG_20200623_093910.jpg
    402.5 KB · Views: 262
  • IMG_20200623_094017_1.jpg
    IMG_20200623_094017_1.jpg
    442.4 KB · Views: 269
Sponsored Links
You can replace just the sill and put down a new dpc layer underneath it. I did so myself at the start of lockdown after I started sanding the sill and it came away in my hands. I had to replace a few inches of door frame either side too, which meant I could get a near-perfect fit.
e15bd9cc90673e913991ffedf11e9fc4.0.jpg
Totally rotted.
34aa1cbffdda622abb93d2356b0c958a.0.jpg
The cracked stuff is the old dpc. The strip is from a new roll I bought from Toolstation.
30817f573dd3b97a8a24c18f7444a595.0.jpg
The concrete under the tiles was crumbly, so I lay the new dpc (double) and concreted it in. The new sill I cut to size and gave multiple coats of Sadolin - you can see a bit of the unpainted offcut that I used to test the fit on the right.
a9c64d7c58f14d2d4a3bd972f1a26766.0.jpg
Test fitting the new sill and fascia pieces - I replaced several inches of frame and fascia.
1935547d0719b144e586ce0101e0e222.0.jpg
Perfect, or near, dammit.
Then I screwed the sill down, filled, and sanded, and repainted everything before replacing the threshold and sealing the corners.
b3ed441c733238ab44696888a3c6df0b.0.jpg
 
Thanks for your reply and the great pictures which explains it really well. I will have a go at doing same.

Did I understand you correctly in that you didn't have to remove the door and door frame? ... just cut the bottom sides away to free up the sill and go from there?

Thanks again
 
Yep. The old sill was so rotten, it came out with a few tugs. The frame where it met the sill had been drilled into and was rotten also.

7874911e9196a7dd06594d29d5ca042e.0.jpg

I used an Erbauer multi-tool with a plunge blade* to take out ~10cm pieces - see here both the fascia and inner door frame have been cut. The middle section I just trimmed off the rot to sound wood.

If your frame is sound, you can cleanly cut pieces out (use a square for a straight line) and replace the same pieces. Mine were unusable, so I found some old frame bits in the firewood pile of the local double-glazing place and cut them to fit.

5932a767785a5ce0e95c1c6ca8be2ac2.0.jpg
Lots of trial and error.
Once I was happy with the position of the sill (I used plastic spacers 3628T to get the right height), I drilled three holes and inserted bolts (6939G - Screw fix, though the heads are awfully soft so I wouldn't recommend) with plastic sleeves. I filled around the sides with foam then added the new pieces (glued and screwed), filled** (sanded-filled-sanded, etc), painted then sealed.

I did take the door off at the end as I wanted to check it for rot, strip and paint it, but it didn't need to.

*have a spray bottle of water handy to cool your blade and kill any embers - the wood will burn quite readily
**I used some more of the spacers between the sill and frame where I hadn't replace with wood and couldn't get filler in
 
Last edited:
Sponsored Links
Brilliant.

You have given me the confidence to go ahead with it now. Going to get my ducks in a row in the next week or so and then get stuck in on a fine summer day....if one ever returns.

Many thanks for your advice

Regards Joe

P.s. I will take a few pictures and upload to complete my story with a (hopefully) happy conclusion.
 
Wow, in one day? That's ambitious. First job will be getting the old sill out, offering up the new one, cutting it to fit and treating. It does depend on what you treat the sill with - it should have three coats on the underside and ends. I used Sadolin which takes 24 hours per coat. I had other jobs to do though while it dried. It probably took me over a fortnight of evenings, but I wasted a lot of time sitting staring, test fitting, and having to take trips into town to buy something I forgot. Plus, I'm the slowest DIYer in the world.
If it helps, this is generally what you'll need:

Sill stuff:
Sill (Howdens, TP, online)
Paint/stain for sill & frame (preservative too if not hardwood)
Wood filler (I used the Everbuild one-pot stuff)
Plastic spacers/shims
Wood/PVA glue
Sikaflex or similar exterior sealant suitable for wood; Caulk
Dpc (sheets or roll) & dpc tape
Rawlplug-type bolts (I used 100 x 8 ) AND/OR
Tub of ready-mix concrete/mortar*

Things you may need & are useful to have:
Bits of scrap wood to fill any holes
New threshold; new draught excluder strips
Foam (Soudal with the replaceable plug)
Ronseal Wood Hardener (if you find rot elsewhere & can't dig it out & fill)
Woodworm killer (nasty stuff, but if you have rot, you may have Woodworm too. I did.)
Dpc spray - for the areas you can't get sheets in (I bought a can but didn't use it in the end)

Normal DIY toolbox stuff:
Sharp knife, spirit levels, hammers, combination square, spray bottle, pencil, tape measure.
Filler knives
Sandpaper (80, 120, 180, 220/240)
White spirit & meths
Brushes
Gun & nozzles for gun tubes (you can stick nails in the end or wind plastic around, but these are better)
Drill-driver & drill bits for wood & masonry to match rawlbolts (size 8? I got an extra long one)
Multi-tool with plunge blade
Masking tape
Old rags
PPE (masks, ear & eye protection, paper coveralls, gloves)
Bangin' tunes on your playlist & tolerant neighbours.

*some people actually mortar the sill in. I didn't trust myself to do this though, I just used it to reinforce crumbly concrete behind the sill. Before mixing, I walked around the house making a list of all the areas needing a repair - loose bricks & paving slabs, wobbly fence posts, missing pointing, cracks around drains - & used the leftovers to fix these while the sill area dried.

Good luck. Let me know how you get on. I'll be around if there's anything you're stuck on.
 
Yes, it will probably take me 1 day spread out over 1 or 2 months!

Did you consider fitting one of those sill pans under the sill? It seems to be an American standard solution. A neighbor of mine suggested it and told me that it is often done with thin lead or aluminum and shaped to the underside of the sill? Not sure how I would manage it but I think the sandolin and the dpc sheet should be enough.

The pavers outside are probably not helping the situation. I am also thinking of fitting an AXO slot drain outside the door to draw any excess rainwater away from the door.
 
I saw a video about them, but couldn't figure out how it would work. I'm hoping the dpc does its job.

I'm looking at directing water away from another door by fitting a paver at a slant, and something above the door (it opens outwards and water coming off the porch roof could seep in), but that's a project for later this year. I have windows to do in the meantime...
20200624_064331.jpg
 

DIYnot Local

Staff member

If you need to find a tradesperson to get your job done, please try our local search below, or if you are doing it yourself you can find suppliers local to you.

Select the supplier or trade you require, enter your location to begin your search.


Are you a trade or supplier? You can create your listing free at DIYnot Local

 
Sponsored Links
Back
Top