Help with DC 3 gang rocker switch panel please.

Joined
28 Dec 2009
Messages
62
Reaction score
1
Location
Devon
Country
United Kingdom
Hi, I'm sure this should be simple but I cannot get my head around it and Googleing just compounds my confusion!

My brother bought me a 'simple' solar kit for lighting my small shed but no instructions came with any of the parts. As pictured here there is a panel, an 'ecoworthy' solar charge controller, a 3 gang switch panel, two LED strip lights and a bunch of spade connectors:

solar-kit.jpg


Everything is relatively self-explanatory to me as the solar charge controller shows where the connections go:

eco-worthy-solar.jpg


However, the 3 gang switch panel has royally confused me as I haven't worked with DC electrics before and pictures of similar panels look like a bunch of spaghetti! The front looks like this:

front-of-panel.jpg


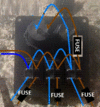
and the rear looks like this:

back-of-panel.jpg


In my mind there is positive and negative going from the 'load' connection of the solar controller to the panel. However, what specifically are they connecting to on the back of the panel?

The cigarette lighter and USB have clearly marked positive/negative connections. Each of the three switches have four connections but not marked with anything. I'm presuming one half of the switch connectors will be inputs from the other connectors in some daisy chain fashion (from images of similar yet not exactly the same panels!) and the other half will be postive/negative going to the two LED lights i.e. two of the switches. No markings means I don't know where to start :(

Can anyone help with how the panel should be wired, or at least the methodology I should be following? The other thing I'm seeing whilst googling is fuses (which are missing from this kit)...should I have them for this particular two led strip light setup and whereabouts would they go?


Thanks


Dan
 
Sponsored Links
I can't see you + & - signs so you will have to ensure you get that right but this is the general arrangement:
1677416249326.png


I've shown supply at the top and 3 loads at the bottom. It looks like the switches have red lights so it is possible I have top and bottom rows mixed and possibly left/right polarity too.

I suggest you start with testing one switch with these 4 combinations of 12 volt supply with it switched off to see when the light is on:
1677417260674.png
That will be your load/output


You could also use one switch as a master:
1677418017606.png
Again checking the switches for correct polarity etc.


Start with checking a switch and feel free to ask more questions.

Do you have a test meter of any sort?
 
The white box is the charger and will probably have a fuse in there somewhere but the only disconnection is the plug for the solar panel.

So the theory is, the solar panel sends a charge to the battery via the white charger. The battery acts as a store and ballast for the panel and any load. The panel its self has no way of regulating its output, direct sun on full tilt, cloud 60% so if you don't have a battery the lights would flicker more than a student on acid.

So the rules ...pretty simple always disconnect the panel before removing or adding a battery. Same for adding a new load ie one where there is a chance of two wires touching so for example you want to add another usb port, that's not plug in a usb to black box but hardwire in a new usb block. Disconnect the battery and the panel...shorts can fry the battery and the charger.

@SUNRAY wiring diagram is excellent but I would protect the usb and the 12v with an inline fuse either before each of the positive terminals, 5 amp for the usb, max 10 amp for the lighter port and I would wire these separately from the lights. If you wire a fuse in before the lighter socket and chain to the usb then whatever the rating of that fuse will be the rating for both sockets. ie 5 amps. You can power a surprising number of things from a 10 amp 12v lighter socket, 120 watts easily does a kettle.

Again the lights need a fuse which need a fuse either before the first terminal in the daisy chain or separately from the switch to the light. If put a fuse on each of the lines out you could use a different rating, say use one of the switches for a fan.
 
Sponsored Links
The white box is the charger and will probably have a fuse in there somewhere but the only disconnection is the plug for the solar panel.

So the theory is, the solar panel sends a charge to the battery via the white charger. The battery acts as a store and ballast for the panel and any load. The panel its self has no way of regulating its output, direct sun on full tilt, cloud 60% so if you don't have a battery the lights would flicker more than a student on acid.

So the rules ...pretty simple always disconnect the panel before removing or adding a battery. Same for adding a new load ie one where there is a chance of two wires touching so for example you want to add another usb port, that's not plug in a usb to black box but hardwire in a new usb block. Disconnect the battery and the panel...shorts can fry the battery and the charger.

@SUNRAY wiring diagram is excellent but I would protect the usb and the 12v with an inline fuse either before each of the positive terminals, 5 amp for the usb, max 10 amp for the lighter port and I would wire these separately from the lights. If you wire a fuse in before the lighter socket and chain to the usb then whatever the rating of that fuse will be the rating for both sockets. ie 5 amps. You can power a surprising number of things from a 10 amp 12v lighter socket, 120 watts easily does a kettle.

Again the lights need a fuse which need a fuse either before the first terminal in the daisy chain or separately from the switch to the light. If put a fuse on each of the lines out you could use a different rating, say use one of the switches for a fan.
Excellent advice.

Looking at the original pictures I reckon the supplied flex is only 0.75mm² so I'd be inclined to use a 5A fuse (or maybe a 6A MCB which would also act as a main switch) to power the whole panel unless powering it directly from the battery.
 
Thank you all so much! That certainly explains it so a thicko like myself can follow.

It wasn't an eco-worthy kit per se, I think this is an assembly of things to make a kit. Either way, the panel itself is non-branded and the ones I see on Amazon/Ebay, that sometimes show a wiring example, seem to have 6 terminals per switch which foxed me.

As to the fuses, the easiest way (I think) other than a seprate MCB, is to just buy three/fpur of these:


to put before the USB/Lighter and after each of the positive line out for the lights:

panel-layout-phrase.jpg


Correct?

Thanks

Dan
 
Links in this post may contain affiliate links for which DIYnot may be compensated.
Thank you all so much! That certainly explains it so a thicko like myself can follow.

It wasn't an eco-worthy kit per se, I think this is an assembly of things to make a kit. Either way, the panel itself is non-branded and the ones I see on Amazon/Ebay, that sometimes show a wiring example, seem to have 6 terminals per switch which foxed me.

As to the fuses, the easiest way (I think) other than a seprate MCB, is to just buy three/fpur of these:


to put before the USB/Lighter and after each of the positive line out for the lights:

View attachment 296848

Correct?

Thanks

Dan

1677443645448.gif
I don't seem to be able to post an image tonight. If you do wish to add multible fuses, I'd aim for putting the supply on the row of switches and from there to the USB & socket, also probable neater to fit the fuses before the switches and not after.
 
Links in this post may contain affiliate links for which DIYnot may be compensated.
Hope this works as a .Gif
 

Attachments

  • dc switch panel.GIF
    dc switch panel.GIF
    46.1 KB · Views: 41
View attachment 296868I don't seem to be able to post an image tonight. If you do wish to add multible fuses, I'd aim for putting the supply on the row of switches and from there to the USB & socket, also probable neater to fit the fuses before the switches and not after.
Thanks, so if the fuses are before the switches that must mean the fuse sits between each positive lead between them e.g.

supply + ---> fuse ---> switch 1 + ---> fuse ---> switch 2 + ---> fuse ---> switch 3 + ---> lighter + ---> usb +

?

Thanks

Dan
 
Ideally there would be a fuse from the supply to & before every device, just the same as a home consumer unit.

IE; 12V supply from charge controller, then:
fuse to switch to light
fuse to USB
fuse to socket

However the version in my grotty GIF is equally acceptable as is a single fuse feeding the whole panel.
 
Thanks.ordered a bunch of fuse holders and fuses from Ebay so should be able to do it all. Thanks once again for your help.
 

DIYnot Local

Staff member

If you need to find a tradesperson to get your job done, please try our local search below, or if you are doing it yourself you can find suppliers local to you.

Select the supplier or trade you require, enter your location to begin your search.


Are you a trade or supplier? You can create your listing free at DIYnot Local

 
Sponsored Links
Back
Top