Joined
18 Dec 2023
Messages
3
Reaction score
0
Country
United Kingdom
Hi All

I’ve seen a few posts around regarding Nest 3rd Gen Learning and wanted to install one in a rental of mine.

I’m struggling to get hold of any electricians at the moment so thought I’d give it a try.

I’ve watch numerous videos, and got somewhat of an understanding of the principles of CH wiring etc.

But need a little help as I don’t want to cause any major damage to boiler etc.

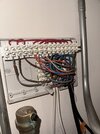
Current system is an S Plan I believe.

HW Value and CH Value, with Pump and Cycl Thermostat.

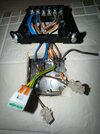
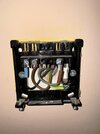
Programmer is Drayton LP822 with Drayton Thermostat.

Attached are some photos for reference.

I’ve seen majority of the posts show a bridge between L - 2 - 5

Then separate calls to 3 - 6

So I need to just replicate the same wiring in the heating as per the programmer?

I’ve managed to find which cables are from the thermostat (highlighted in orange) I’ll use these for the 12v nest power.

I’d just like some guidance on how best to approach? Happy to provide any further information if needed.

Thanks in advance.
 

Attachments

  • IMG_2083.jpeg
    IMG_2083.jpeg
    265.1 KB · Views: 44
  • IMG_2078.jpeg
    IMG_2078.jpeg
    245.9 KB · Views: 45
  • IMG_2076.jpeg
    IMG_2076.jpeg
    257.5 KB · Views: 40
Sponsored Links
Once Nest is installed all setting are done either on the thermostat or with the app, there is no reason to access the heat link, so it does not need to go where easy accessed, so favourite is next to the wiring centre.

In theroy it could replace the wiring centre, but there is not much room in the wiring centre so easier to mount at the side of it. I may be possible to replace the programmer with the heat link, but I would just fit blanking plates.

Not sure why you want Nest, Hive and Drayton wiser would replace the old thermostat without any re-wiring and would allow TRV heads to link to the thermostat, I am looking at fitting a second thermostat along side Nest because it does not connect the TRV heads. In hind sight, and hind sight is easy, I should have never fitted Nest Gen 3.
 
I want to replace the entire thing with Nest - first image is the spur off the boiler - I haven’t included a photo of the wiring center.

Image below.

I’m not overly fussed where the heatlink goes however the thermostat cables go to the programmer rather than the wiring centre.

So to use the existing cable I’d like to put the heatlink in the location of the programmer?
 

Attachments

  • IMG_1996.jpeg
    IMG_1996.jpeg
    279.8 KB · Views: 28
The Nest Heat Link does replace the Drayton LP822. The wires are moved from the terminals at the LP822 to the Nest Heat link terminals that have exactly the same function.

Here are the Drayton terminals...

Capture.JPG


...and here is the Heat link

1zy9936.jpg


(N) & (L) are self explanatory
Drayton (3) 'HW ON' = Heat link (6) 'Hot Water Call For Heat'
Drayton (4) 'CH ON' = Heat link (3) 'Heating Call For Heat'
Then 'Common' terminals (2) and (5) need connecting to the (L) terminal with wire links
Earth wire goes in the earth terminal and the metal back box in the wall.

If you want to use the Heat link to provide operating power (12V) for the thermostat, then T1 and T2 at the Heat link connect to T1 and T2 at the Nest thermostat. Or alternatively you can use a separate plug in power supply available from Nest

To decommission the old room thermostat:

Unfortunately not everyone installs the wiring centre according to the printed nomenclature, so the terminal numbers used for the various functions can vary from installation to installation. However it does look (as far as it is possible to tell from a photo where you can only see one end of the wires) that yours may be connected to terminals 2 & 3. Which if your wiring centre nomenclature is as below would be correct. But don't assume without checking.

123.jpg


You don't give the thermostat model, but it looks to be a Drayton RTS. If so, to remove it:

1. Trace the thermostat cable from the thermostat back to its origin. [Possibly wiring centre 2 & 3 plus a neutral somewhere]

2. At its point of origin, make a note of where the wires from the thermostat terminals L and 3 are connected

3. Disconnect all of the wires going to the old thermostat and remove the cable from the wiring centre

4. Insert a wire link between the terminals where the two wires going to thermostat L and 3 have just been removed from, so that they are now electrically joined together.

Once the thermostat cable is completely disconnected it's available for connecting the Heat link T1 & T2 to the thermostat T1 & T2 provided the cable was originally installed so that its origin is adjacent to the location of the Heat link. Unfortunately quite often they aren't.
 
  • Thanks
Reactions: CBW
Sponsored Links
Edited - Mistake.

Thanks Stem.
I’m looking to wired up after Christmas so will let you know.
 
Last edited:

DIYnot Local

Staff member

If you need to find a tradesperson to get your job done, please try our local search below, or if you are doing it yourself you can find suppliers local to you.

Select the supplier or trade you require, enter your location to begin your search.


Are you a trade or supplier? You can create your listing free at DIYnot Local

 
Back
Top