Hive wiring

Status
Not open for further replies.
Joined
5 Jan 2017
Messages
9
Reaction score
0
Country
United Kingdom
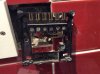
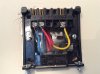
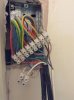
I am attempting to replace my existing Drayton LP522 controller with a Hive dual channel receiver. The wiring to my existing Drayton does not have any wires going to the hot water off (NC) or Heating Off (NC) Both are required according to the Hive manual. Can anyone help please?
 

Attachments

  • IMG_0235.JPG
    IMG_0235.JPG
    171.9 KB · Views: 226
Sponsored Links
If your Drayton LP522 works in conjunction with a wired room thermostat, that will need removing from the system and its switching wires linking somewhere, to avoid it overriding the Hive.

If you don't have an existing wired room thermostat then there's nothing else to do.
 
Sponsored Links
Sorry another question - do I need to completely disconnect the old room stat?
 
OK sorry posted at the same time - what is the easiest way to remove the room stat from the system?
 
Can you post some pictures of both the thermostat wiring and the wiring centre, if there is one. If there is it would help a lot if you were able to identify the wires there that come from the existing room thermostat.
 
Sorry another question - do I need to completely disconnect the old room stat?
Because the Hive carries out the functions of the room thermostat, the old wired thermostat needs to be 'non functioning' to prevent it overriding the Hive. This can be done in three ways, in order of preference, they are.

1. Find the other end of the thermostat cable and disconnect it. Then link the terminals where the two switching wires were together.

2. Remove the existing thermostat and replace it with a junction box, connect the two switching wires together and isolate the neutral (if there is one)

3. Leave the existing room thermostat in place and set it to the highest setting. (Or put the switching wires in the same terminal)

If you need any further assistance, post the photos requested by jackthom then someone will be able to advise further.
 
Thanks - I really appreciate the support.

I attach a couple of pics - this first is the room stat wiring which looks quite simple and the second is the wiring centre in the airing cupboard which looks horrendous! I posted a picture of the wiring of the existing Drayton controller earlier.

I think I will pursue option two in your post unless you disagree?

Thanks again. J
 

Attachments

  • IMG_0236.JPG
    IMG_0236.JPG
    155.7 KB · Views: 272
  • IMG_0237.JPG
    IMG_0237.JPG
    90.8 KB · Views: 239
Option 2, is probably the best option for you. The live switching wires at the thermostat are Red and Yellow. They should be joined together. The Blue is a neutral which should be isolated and left on its own.

If you did want to remove the thermostat wiring altogether, then you would need to trace the cable back to the wiring centre and remove all three wires. Then link where the Red and Yellow wires were removed from. This can be tricky sometimes because depending on the personal preference of the original installer and the layout of your home, sometimes the thermostat has been wired back to the programmer instead of the wiring centre.
 
That does look like the easiest option and just means connecting the red and yellow together and isolating the blue safely on it's own.

Edit: beaten to it by stem. :)
 
Justin

Just looking at your photo of the wiring centre, the metal back box doesn't appear to have an earth connected to the earthing screw (top left hand corner) If there isn't an earth connected to it somewhere else, for safety sake, you should add one.
 

DIYnot Local

Staff member

If you need to find a tradesperson to get your job done, please try our local search below, or if you are doing it yourself you can find suppliers local to you.

Select the supplier or trade you require, enter your location to begin your search.


Are you a trade or supplier? You can create your listing free at DIYnot Local

 
Status
Not open for further replies.
Sponsored Links
Back
Top