How do I level this ceiling out?

Joined
30 Mar 2015
Messages
3,823
Reaction score
58
Country
United Kingdom
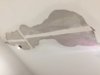
I’ve done a few repairs in the past which have been less than 10” wide. This has meant that my wide filling knife can rest on the edges of the old plaster and I can fill in the void. I can then feather it out wider to get a neat finish. Pretty easy.

On this occasion, the damaged area is wider and I am worried about levelling it. The existing skim is a few mm and hence I need to build up to this level and then feather out edges.

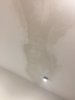
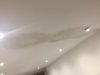
I’m using Toupret and applied the first coat. It’s very thin in comparison to the level I need to reach. I’m also dipping in when I am in the middle of this void. Perhaps the subsequent coats will be easier?

I would appreciate any advice and tips you can send my way. Thanks
 

Attachments

  • iOS Image - 382935414.jpg
    iOS Image - 382935414.jpg
    102.3 KB · Views: 150
Sponsored Links
is the p/board edges tapered?
is ther a room above?
anyhow, the previous skim an tapin has been done over a very poor preparation - the tapin is wrong an so is the fixin nails. the skim coat doesn't look to be right either.very poor DIY job.

i think youl get futuredifficulties with that ceiling no matter how you patch it for now.
 
Plasterboard is not tapered. This area hasn’t doesn’t have skim as I removed it as part of the repair. I’ve put the tape on the seams as I thought it was a sensible thing to do before I proceed with covering this area. What do you suggest?
 
Sponsored Links
the skim is peelin off around the patch because its not been prepped - look at the background, the skim never took maybe it was the wrong mix or the wrong finish powder.
a couple of coats of pva will give a background bite for the patch. thats if your paper tape holds. how was the tape stuck on?

like i said above the job doesnt look right so juast patch - use a 11" to 14" steel plasterin trowel
 
I’ve put PVA on this patch and then proceeded to mud in the tapes I’ve added.the original skim was done by he builders but I’m left to deal with this issue! When patching, should I start around the edges of this area and feather out. I can then move inwards? I appreciate your advice on this
 
cut back the edges to clean straigt lines - pva the whole patch - skim on a very tight coat - give it a few mins then go over it with another tight coat if needed.
feather into the cut edge using good pressure on your trowel - use a wet brush to help keep skim off the old surroundin plaster
 
Thanks for the response @bobasd. As indicated in my original post, I've already started to fill the patch with filler. I assume it's now too late to cut straight lines. I tried to keep the cut at a minimum as I was worried about patching a large area, yes, even larger than I have at the moment!

On a more promising note the second coat felt more satisfying. I am starting to see some progress (to the untrained eye!) and the level is starting to rise. I think I will need 2-3 more coats and will start to feather it out now.

Again, I would appreciate any suggestions from the experts.
 

Attachments

  • file1.jpeg
    file1.jpeg
    85.3 KB · Views: 95
  • file-1.jpeg
    file-1.jpeg
    85.1 KB · Views: 99
then why post a photo showing the situation before youu had worked on the patch?
 
I didn’t have the filled pic at the time of the original post. It’s not at my own property.

Am I making progress with this?
 

DIYnot Local

Staff member

If you need to find a tradesperson to get your job done, please try our local search below, or if you are doing it yourself you can find suppliers local to you.

Select the supplier or trade you require, enter your location to begin your search.


Are you a trade or supplier? You can create your listing free at DIYnot Local

 
Sponsored Links
Back
Top