How to fit T&G floorboards which meet in the middle of the joist notching

Joined
8 Feb 2022
Messages
10
Reaction score
0
Country
United Kingdom
Hello fellow forum users,

Quick question for experienced carpenters/builders out there.
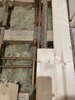
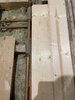
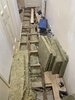
My floor boards currently meet right in the middle of where joist notching is.
What's the best way of fitting the t&g floorboards in my case, so these don't sag and bend the copper pipes then walked on?

Thank you for any advice.
 
Sponsored Links
Images of my floor joists/notches.
 

Attachments

  • IMG_0118.jpg
    IMG_0118.jpg
    438.2 KB · Views: 98
  • IMG_0119.jpg
    IMG_0119.jpg
    398.8 KB · Views: 76
Its a simple enough job but fiddly to explain.

Why have existing boards been removed?
Are the notches deep enough so that boards dont compress the insulation or touch the pipes?
Was there any previous squeaking?

If needed, Wickes and others sell 4m long T&G boards in various widths & thicknesses to replace like for like.
Or you could use a mix of T&G chipboard flooring & T&G boards like you have now?

Based on the pics I presume that you removed the boards which suggests perhaps you should get a local joiner to do the job - thing is, if you make a mistake you could end up with screws piercing pipes?

Thank you for your reply. The floorboards were lifted as entire hallway was just squeaking and bouncing up and down (there was loosely fitted piece of ply and floorboards)
I bought closely matching size floorboards with intention of putting insulation and fitting those floorboards tight, so the whole floor is stable.

Is there something like metal brace that can be fitted on top of the notch for support or something along those lines?
 
Sponsored Links
Sunjat,
Why not post a pic showing the whole length of the hallway with all removable boards removed?
The pic to show the full length, & from skirting to skirting.

Are the notches deep enough?
Do any of the joists show any signs of movement?
 
Sunjat,
Why not post a pic showing the whole length of the hallway with all removable boards removed?
The pic to show the full length, & from skirting to skirting.

Are the notches deep enough?
Do any of the joists show any signs of movement?

Pipes sit about 3-5mm below the top of the joist, I take it that’s low enough, as this is how they were laid originally when house was built. There are no free joist movement, but I do feel small movement when I walk on them, but I’m a big lad (110kg)
As for the full picture, please see attached.
Cheers
 

Attachments

  • DF7A28B9-A64A-4EF5-8A55-FA1A840838AF.jpeg
    DF7A28B9-A64A-4EF5-8A55-FA1A840838AF.jpeg
    429.4 KB · Views: 82
You could cut boards length ways, route a new slot then lay just one row of the narrower boards. Then, keep laying normal width boards, such that it straddles the gap fully.

Nozzle
 
Thanks for the pic.

So you have some movement in the joists. Test each individual joist.
Do the boards touch the pipes - anywhere? low enough doesn't mean much.
Use a board to test every notch and free length of pipe for not touching.
Use a torch to check under the fixed boards.
What about the pipe that curls off to the left?

Hot & Cold Pipes tight together will creak with expansion and contraction.
Elec cables should not touch any water pipes.
 
I would use 600x2400 flooring grade chipboard with the joint centered between the two sets of pipes. Cut off the tongue on the left hand boards so the chipboard butts up to it. Chipboard screws every 100mm. Noggins below the join between boards and chipboard in the heavily trafficked area at the bottom of the stairs. You will need a decent saw and attention to detail to accurately fit them. A decent jigsaw and a multitool will do the job. Obviously avoid the pipes by measuring and marking. You will be able to unscrew and remove the chipboard for future maintenance access. The chipboard comes in 18mm and 22mm thickness so get the right one.
The existing boards will have been damaged when lifted for the pipework - unfortunately pretty much exactly where you would walk up and down the corridor.
 

DIYnot Local

Staff member

If you need to find a tradesperson to get your job done, please try our local search below, or if you are doing it yourself you can find suppliers local to you.

Select the supplier or trade you require, enter your location to begin your search.


Are you a trade or supplier? You can create your listing free at DIYnot Local

 
Sponsored Links
Back
Top