How to repair an external window sill

Joined
30 Aug 2010
Messages
708
Reaction score
4
Location
London
Country
United Kingdom
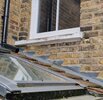
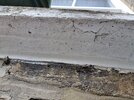
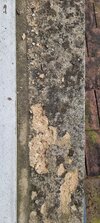
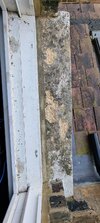
The window sills outside my windows have deteriorated. One is cracked the others seem in one piece (and have possibly become porous). It was painted with masonary paint but that has peeled off. I'd like to repair it rather than replace it.

Here is how I thought of doing it: chisle off any loose bits. PVA on the sill. Make a form and apply a cement mix and smooth over.

Is this the right way of repairing it? Is a cement + pva mix the right material to use (if so whats the minimum thikness)? If not, whats a better material?
 

Attachments

  • 20221015_115407~2.jpg
    20221015_115407~2.jpg
    565.8 KB · Views: 299
Sponsored Links
Your proposals wont work.

You say window sills but only show one sill?
You mention "porous" - is damp showing inside the house?
More detailed pics might help - pics that show the cracks and from under the sills the drip channels (these channels have to be clear of paint or debris.

FWIW: the flashing is wrong for those tiles but if it works then its working.
The re-pointing seems to be mostly a sand & cement pointing
mix (it should have been a sand&lime mix), and its very poorly done and failing, its almost smeared on and lacks depth of raking out.
The downspout could have been arranged far better to carry on below the sill to discharge in the gutter.
 
The pointing and flushing are not something I can do myself. The whole of the outside of the house is pointed with sand/cement mix. I can get someone to look at the flushing. What would be the right way of doing it so if I get it done I know what to ask for?

I would like to start with this sill because three is a damp patch inside under the window. Here are pics of the top and underside and top of the sill. There is a drip channel but it's full of paint. There is a gap between the sill and the brickwork that I will need to fill.

Can it be fixed?
 

Attachments

  • 20221015_123442.jpg
    20221015_123442.jpg
    533.3 KB · Views: 138
  • 20221015_124237.jpg
    20221015_124237.jpg
    466.7 KB · Views: 134
Last edited:
Your best bet would be to clean off the top of the sill and use a metal tool to open the channel up - then take fresh, carefully focused pics of what you've just done?
A selfie on a stick will show more of whatever is directly below the sill and the flashing for the roof?
A pic or two from inside showing the signs of damp will also help?
The gap and crack in the brickwork need attention.

"Flat tiles" like yours need soakers and stepped flashing - it could be that the interior damp is coming from the incorrect flashing - you would need to lift the flashing to search for water tracking under it.

The RWP discharge doesn't help - the general idea is to keep down spout water off the roof not to discharge it onto the roof, esp. at a vulnerable, flashed abutment.
Closely examine both sides of that wall ground floor and first floor for any damp signs.
 
Sponsored Links
Your best bet would be to clean off the top of the sill and use a metal tool to open the channel up - then take fresh, carefully focused pics of what you've just done?
A selfie on a stick will show more of whatever is directly below the sill and the flashing for the roof?
A pic or two from inside showing the signs of damp will also help?
The gap and crack in the brickwork need attention.

"Flat tiles" like yours need soakers and stepped flashing - it could be that the interior damp is coming from the incorrect flashing - you would need to lift the flashing to search for water tracking under it.

The RWP discharge doesn't help - the general idea is to keep down spout water off the roof not to discharge it onto the roof, esp. at a vulnerable, flashed abutment.
Closely examine both sides of that wall ground floor and first floor for any damp signs.
There's a little bit of damp just under the window but hard to see in pic, see attached. I also cleaned up the tip of the sill and took a pic.

It is very possible that the water is coming in through the lead flushing but it's like to be made worse by the downpipe that is chucking lots of water on the tiled roof just outside the window.

Would you be able to advise how to repair rhe sill?

And what I need to do with the rainwater down pipe? Is it a matter of extending so it runs all the way to the guttering below?
 

Attachments

  • 20221016_110240.jpg
    20221016_110240.jpg
    103.4 KB · Views: 85
  • 20221016_124138.jpg
    20221016_124138.jpg
    356.4 KB · Views: 106
Last edited:
Damp patches are caused by the dodgy down pipe flushing rain against brickwork. Nothing to do with a damaged sill .
 
Damp patches are caused by the dodgy down pipe flushing rain against brickwork. Nothing to do with a damaged sill .
I'll get the downpipe extended as you suggested. Can you explain a bit more about which hopper I need and how I would fit it onto my existing guttering?

I'd also like to repair the sill even if foe aesthetics. What's a durable way of fixing it so it doesn't look so tatty?
 
Here is an example of how a hopper is used to collect from two down pipes at differing levels. You need one under the top guttering and a second below you lower roof .
 

Attachments

  • 429256C2-60B3-475F-BD00-34C57080F854.jpeg
    429256C2-60B3-475F-BD00-34C57080F854.jpeg
    622.8 KB · Views: 47
I have used self leveling compound to repair a worn sill, clean up the damage and flood the sill with the compound , needs timber at edges to stop it flowing over the edge .
 
Your pics are still not properly focused so not much good - however, working with whats there:
the interior shows damp penetration just below the window board, and dark smudgy areas on the panel of plaster below the window board.
Why have the skirtings been removed?

The sill has had attempts at sealing it: the underside has been sealed with what looks like cartridge sealant, and the top of the sill has a fillet of sand and cement.
When you finally clean off the shelling from the sill replace the S&C fillet with sealant.

I mentioned in post #2 what needed doing with the down spout, and now you are talking about hoppers - why? You say you cant go on the roof so any plumber will instantly know how to turn the corner & run the down spout to the lower gutter.

FWIW: the only place where down spout water could affect the brickwork is if it penetrated under the flashing.
The brickwork above the flashing is not being affected by the down spout.
A hopper typically is not needed at gutter outlets.
 
Remove sill
Soldier bricks long I've seen done. That's neat.
Also seen a box made and concrete poured.
Both will want window removing.

You will also need scaffold
 
Your pics are still not properly focused so not much good - however, working with whats there:
the interior shows damp penetration just below the window board, and dark smudgy areas on the panel of plaster below the window board.
Why have the skirtings been removed?

The sill has had attempts at sealing it: the underside has been sealed with what looks like cartridge sealant, and the top of the sill has a fillet of sand and cement.
When you finally clean off the shelling from the sill replace the S&C fillet with sealant.

I mentioned in post #2 what needed doing with the down spout, and now you are talking about hoppers - why? You say you cant go on the roof so any plumber will instantly know how to turn the corner & run the down spout to the lower gutter.

FWIW: the only place where down spout water could affect the brickwork is if it penetrated under the flashing.
The brickwork above the flashing is not being affected by the down spout.
A hopper typically is not needed at gutter outlets.
Sorry but these are the best pics I can provide. When zoom in at the bird's eye image of the sill I can see the individual grains of sand and cement where managed to remove the top layer.

The skirling boards were removed because I am changing the floor in the house. It is unrelated the problem in hand.

I will wait to see if the damp dries out when I sort out the downspout. The flushing aren't done properly but having a downspout checking a lot of water just next to it cant help. If not I can always change he flushing later.

Thank you for clarifying that a hopper is not needed.

I don't really understand what I need to do to to rectify the downspout issue. You advised that 'the downspout could have been arranged far better to carry on below the sill to discharge in the gutter'. It would be great of you could be more specific about how to do it. My thought was to extend the downspout all the way down to the guttering below to avoid rainwater discharging just next the Velux windows. The reason I am asking for specifics is because I have not done this before so step by step instruction would help.

How much of the S&C fillet do I need to clean off? How would I know that I have gone far enough?
 
I use (lots) of 2 pack filler to tidy up window sills. It does require a lot of sanding, refilling and re-sanding but you do get very crisp edges and a very smooth finish.


sill-before.jpg

sill-after.jpg

To get the underside of the sill flat, I wrap some polythene around a length of timber and clamp it to the underside of the sill. The polythene can be pulled away after the filler has hardened.

I start by removing any loose paint and then sand it with 40+ grit sandpaper. Dust off and apply a coat of dilute SBR. When dry, I start applying the two pack filler on the top face. Once cured, I sand that back after about 30 mins (in the middle of summer). Then work on the front face. Sand that back and refill the top, sand and then back to the front face. repeating the above as required

I would guess the the filling and sanding is up to 4 hours per sill, depending on the original state of it.

Most of the houses that I work don't have concrete sills. If a victorian sill has cracks, I use an angle grinder to create a channel in the front face and one in the top of the sill. I then insert helifix bars and use two part anchor fixing resin to hold them in place. If there are lots of cracks in the brick work, those will need helifix bars every 3 courses of brick.
 
I suspect that visible damp patches might be a legacy from the old windows, which have now been replaced..
 

DIYnot Local

Staff member

If you need to find a tradesperson to get your job done, please try our local search below, or if you are doing it yourself you can find suppliers local to you.

Select the supplier or trade you require, enter your location to begin your search.


Are you a trade or supplier? You can create your listing free at DIYnot Local

 
Sponsored Links
Back
Top