Installing Light Fitting

Joined
7 Jun 2011
Messages
589
Reaction score
3
Location
East Lothian
Country
United Kingdom
We recently purchased a new light fitting from Next.

If we were to install the product as pictured, then due to the length of the chain, we would be bashing our head into the light fitting every time we walked under/close enough to it.

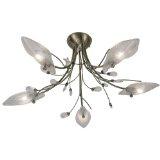
We therefore need to remove the chain (i.e. make as short as possible), which we can do, but we also need to have the top of the spokes (see picture) flush with the ceiling height.

This would mean that the ceiling cup (labelled in the picture) would need to be in the void between the ceiling and the floor of the room upstairs.

However, as can be seen from the picture, the ceiling cup has a set of vents around it, presumably to allow the heat from the transformer to dissipate.

Is it permissible (and safe) to install the ceiling cup in the void between the ceiling and the floor of the room above, and if so, how are issues of e.g. condensation in the void dealt with?

i.e. would we need to build a plasterboard box around the ceiling cup that was:-

(a) big enough to allow the heat from the ceiling cup to dissipate enough that it wouldn't overheat the transformer; and
(b) tight enough to prevent moisture from getting into the transformer?

b7nwur.jpg


j7tj5t.jpg
 
Sponsored Links
The transformer does need ventilation to keep the electronics cool, , so any protective box would need to be very large and not just a fire protection flowerpot.
If you put the whole ceiling cup in the void, how would you fix it? Might it be easier to cut off the top spikes?
Sorry, but unless you really really want that lamp, it might be much easier and cheaper to exchange it for another unit - perhaps a 230V version which would not have the big cup?
 
Note the comment about fixing to a JOIST. The weight may be too much for a fixing into plaster board.

You might be able to dispose of the cup around the transformer and leave the transformer uncased provided the mains terminals are shrouded.

Or you could use the continental method. The cup with the transformer fits where the existing cables come out of the ceiling ( which may not be under a joist ) and the chandelier is hung a few inches away where there is a joist and the 12 volt cable goes from one to the other.
 
I think the best thing to do here is to use a little bit of common sense, it is obvious the fitting is not suitable and adjusting as required would look bad and without chain the flex would be under too much stress and be dangerous, even with reduced in length chain, likely the fitting would not hang very well.
So take it back and purchase something that is suitable.
 
Sponsored Links
The transformer does need ventilation to keep the electronics cool, , so any protective box would need to be very large and not just a fire protection flowerpot.
If you put the whole ceiling cup in the void, how would you fix it? Might it be easier to cut off the top spikes?
Sorry, but unless you really really want that lamp, it might be much easier and cheaper to exchange it for another unit - perhaps a 230V version which would not have the big cup?

Thanks for this. What aspects of the light fitting will inform the size of the box and how do these aspects translate into the size of box required?

I accept it would be much cheaper to purchase/install a more suitable option but this is the fitting we want, and it matches our floor/table lamps, so we're keen to progress this option, albeit at some expense, as far as possible. If the cost simply becomes astronomical then we would absolutely have to look at purchasing another fitting, but until this becomes crystal clear I'm keen to continue to look at the option as described.
 
I think the best thing to do here is to use a little bit of common sense, it is obvious the fitting is not suitable and adjusting as required would look bad and without chain the flex would be under too much stress and be dangerous, even with reduced in length chain, likely the fitting would not hang very well.
So take it back and purchase something that is suitable.

Hi PrenticeBoy - please see my comment above re that we're keen to progress this option, accepting this will cost, but not at astronomical expense.

With that in mind, I can confirm that we would still have the chain, although this would need to sit and be secured in the (to be constructed) plasterboard box in the void between the ceiling and floor above.

Surely there is a workaround where part of the chain can be attached to a piece of plywood along the top of the (to be constructed) plasterboard box (in the void), and hang down from there, with the chain sized such that the spokes (as noted in the picture) would hang flush with the ceiling?
 
And how would you maintain accessiblity to the cable terminals and the transformer?
This project seems impractical to me.
Surely something like this would be a more sensible option.

Hi PrenticeBoy

Why do we need accessibility on a frequent basis?

Surely we would only need accessibility if we want to remove fitting / replace transformer if it blows, in which case we'd need to re-open ceiling. Clearly that is more difficult if the transformer is sitting in a plasterboard box in a void (than if it were sitting on the underside of the ceiling); however we could still open up the ceiling to access. Given the need to do this would be infrequent (please correct me if I'm wrong) I don't see the issue.

That other fitting that you posted the image for - where was that from?
 
What aspects of the light fitting will inform the size of the box and how do these aspects translate into the size of box required?

It is the heat output from the transformer and heat loss via ceiling and upper floor which will determine the space necessary around the transformer. This in turn depends on temperature difference and so on the highest temperature the electronics can withstand. Roughly, if the temperature at ceiling height is 25C then the plasterboard ceiling will allow heat out at about 25W per square metre if the transformer temperature is 50C and the bedroom above unheated. This assumes that the lamps are not heating the area under the transformer (which is likely) in which case the temperature difference will reduce, the rate of transfer slow and the transformer will get hotter.
You do need to consider that access to the transformer will be required as they do fail.
Having rambled through the above, there is another way to do it; put the transformer on it's own in an accessible place and run the elv cables to the fitting. Voltage drop could be a problem if too far away, but using good cross section cables (depends on current used by fitting) it should be viable.
 
Why do we need accessibility on a frequent basis?
Hopefully you do not require frequent access, but you still need the facility to access, the terminals and the transformer for maintenance, inspection and testing. frequent or not.
Surely we would only need accessibility if we want to remove fitting / replace transformer if it blows, in which case we'd need to re-open ceiling.
You would need access for ant type of repair, replacement and for inspection and testing reasons and this accessibility should not mean you have to rip the ceiling open, that is not considered accessible. This is a requirement within BS7671 (wiring regs)
Clearly that is more difficult if the transformer is sitting in a plasterboard box in a void (than if it were sitting on the underside of the ceiling); however we could still open up the ceiling to access. Given the need to do this would be infrequent (please correct me if I'm wrong) I don't see the issue.
That is not considered accessible, so you are wrong, as detailed in above replies.
That other fitting that you posted the image for - where was that from?
Googled Amazon I think!
 
Dear Spiidey,
A simple (but perhaps ugly solution) is to put the transformer on the ceiling in its normal place (ie covering the hole in the ceiling where the mains cable comes through), the light on the ceiling a couple of inches in front of the transformer, and a short loop of cable between the two.

To do this I would:
- Remove the chain from the light except for one or two links that you would leave on the light (no chain on the transformer).
- Put a hook on the ceiling a couple of inches in-front of the transformer (preferably through a joist to get the load bearing properties).
- Hook the light, using the single chain link, onto this hook and have the cable looping from the light to the transformer (make shorter to reduce cable loop length).

This way you get you ceiling height, and the transformer is in normal vented position. Down side is that you have loop of cable.

SFK
 
After careful consideration of the many helpful replies, we initially decided to NOT install the light at all and were planning on taking it back.

However, the missus came up with a great idea - instead of the 2 ceiling light fittings in the living room that we were planning on using (based on where the current light fittings are), we are going to cap one of these off, and move the second light fitting into the middle of the room. This light fitting would then be replaced with the Next light fitting as shown in the pictures above.

This would then allow us to install both the transformer and fitting below the existing ceiling height (we'd screw the transformer cup with air vents to the underside of the ceiling, and then reduce the number of chains from the cup to the light fitting itself from 8 chain links to 1, to keep the fitting as high up as possible).

As the Next light fitting would be directly above our coffee table, it is not at risk of anyone knocking their head against it (even although it is slightly lower than we would have preferred).

Having looked at the instructions in a bit more detail, we also need a dimmer switch installed, as the Next halogen lamp is dimmer compatible and we currently only have a standard on/off light switch.

It says in the Instruction Book for the Next light fitting that "this light fitting is only suitable for dimming with a Next halogen compatible dimmer".

Is this correct that we need to buy a Next halogen compatible dimmer, or can we buy a third party dimmer?
 

DIYnot Local

Staff member

If you need to find a tradesperson to get your job done, please try our local search below, or if you are doing it yourself you can find suppliers local to you.

Select the supplier or trade you require, enter your location to begin your search.


Are you a trade or supplier? You can create your listing free at DIYnot Local

 
Sponsored Links
Back
Top