Hi all
A genuine ‘thank you’ to the online DIY community for your help. After a lot of reading, I had no need to start a new thread to redo the silicone, replace a leaking kitchen tap, replace some window handles, and fix a sliding door. I don’t have any DIY skills or knowledge (or some of the right tools) and these supposedly simple jobs took me many hours, but I followed your guidance to get these jobs done for my parents and it was worth it.
I have 1 more job that will be too much for me alone and involves raising the floor joists in the loft of our 3.5 bedroom semi-detached ~1950s property in order to get insulation in, then boarding over for storage. There has been zero loft insulation for 20+ years. I have emptied the loft - about 400-500kg of stuff up there. I have reduced this down to about 250kg of storage to go back up.
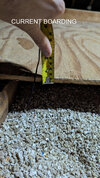
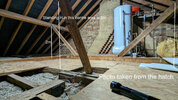
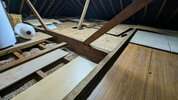
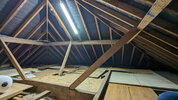
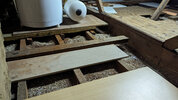
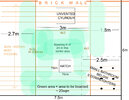
The current joists are 4x2s. Please see diagram and images: https://flic.kr/s/aHBqjBgbmN
The current ‘boarding’ in the centre area looks like 10mm ply nailed down. And the rest is old scrap wood (offcuts etc.) which is thicker, but never screwed down – all been walked on (carefully!) for over 20+ years without issue.
I am looking for the easiest method (but no small plastic loft legs) which won’t cause issues down the line…and not after anything ‘pretty’ as the loft is only visited 10 x a year for a few mins at a time. The lathe & plaster ceilings in the rooms below the loft have feint lines due to, presumably, the weight of the excess storage over the years. These lines have not worsened and have been there for years. No loft conversion is planned for the future and we hope to be in the house for at least another 10 years. The access to the hatch from below is quite good – it’s on a landing and some stuff I removed from the storage included a 2.6m length copper pipe.
PLEASE kindly see what you think of the following options
Option 1: New 6x2s *parallel* directly on top of existing 4x2s @ 400mm centres > takes total height to ~ 250mm. Screwed in diagonally with plenty of (PVA?) glue in between the wood. Finish with plywood or OSB3 T&G screwed on top. This means 1 single layer of 200mm insulation + a ~ 50mm air gap. No joining with the brick wall.
Option 2: New 6x2s on top *perpendicular* to existing 4x2s @ 400mm centres > takes total height to 250mm. Screwed in diagonally with plenty of (PVA?) glue in between the wood. Finish with plywood or OSB3 T&G screwed on top. This means 1 single layer of 100mm insulation between the original (4x2) joists and another 100mm going across + a ~ 50mm air gap. No joining with the brick wall.
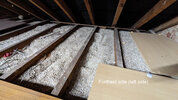
Both of the above options mean sweeping up to remove all the current vermiculite which is as low as a 1” and high as 3” in places. Find a local joiner to build sub-frame + board-over after I have rolled out the Knauf 44 insulation (leaving a ~ 5cm gap at edges). Remove the old boards + disposal myself (unless local joiner can use them). I have contacted a joiner who has advertised for years in the local church newsletter and when I described the job, he said he is happy to take a look in a couple of days.
Option 3: Go with a loft insulation company (with v. good online reviews). I got a response from two companies out of eight. 1 quote comes to £2100 for option 1 above using 18mm T&G. This includes disposing of current boarding and re-aligning the current 3 tier ALU loft ladder to work with the new floor height. They will use Knauf 44 and board ~ 20sqm. They measured the area insulated to be ~38sqm. They said they would lay the first 100mm over the current vermiculite, but ideally the vermiculite is removed (by me). They will need 1.5 days. They said 200mm insulation is enough and they gave the price instantly.
I am waiting for 1 more quote from another company. This 2nd company needs ~ 2 days to do the job and said he wants to put in 300mm, so I assume he is using 8x2s (8”+4” = ~300mm). This means no air gap if I have understood correctly. The loft is fairly well ventilated, however he also said he will put in several roof vents (the cheapo type that lift the felt a bit). Each of the guys from these companies took about 5mins to have a look at the job and said they cannot re-use current boarding. But, overall the job appears to be quite ‘normal’ for them rather than anything too complicated. The bathroom (no electrical shower) area has a bit of messy wiring above but neither company mentioned it. The other rooms have a single ceiling rose light.
Time is against me as I only have 13 days to get this done, so unfortunately, it is not something I will attempt as I don’t have any experience in wood work. I feel like shoving all the storage back up there and giving up, but the Mrs said to put some forum posts up online to get advice.
Some other things I am not sure about:
- Where there is no boarding, is there any harm in adding an extra 100mm of insulation? For example, boarded area =200mm insulation. Unboarded = 300mm insulation.
- How important is the air gap when using Knauf 44? Because, the 2nd company wants to go to 300mm insulation, but using 8x2s (on top of current 4x2s) means there won’t be much of an air gap. Perhaps, this is why he said he will put in several roof vents (cheapo type). Whereas company 1 going with option 1 above results in a 50mm air gap due to less insulation (200mm with (6x2s) used.
Initially, I thought I could do the job myself, but it is going to be too complicated, especially the levelling and T&G. I tried my best to ‘cost it up’, and this is what I got: Insulation: 1st layer, Knauf 44, 100mm 13.89m2/pack (perforations at 380mm and 570mm) = 38m2/13.89m2 = ~ 3 packs / ~ £100
2nd layer, Knauf 44, 150mm 9.18m2/pack (perforations at 380mm and 570mm) = 38m2/9.18m2 = ~ 4 packs / ~ £133 . Extra roll for unboarded areas = 1 pack of 100mm = £33 TOTAL FOR INSULATION (Insulation costs + £50 delivery) = £316
Timber, a mix of 6x2s and 4x2s = £450
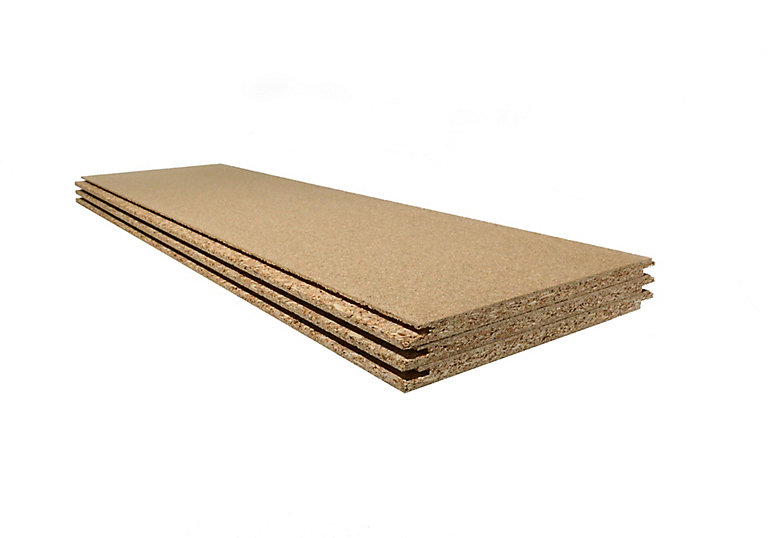
Boarding = 20m2 x £18/m2 for shorter lengths = £360
Tools = ~ £100 ...Stanley knife , spirit level, hand saw for cutting 6x2s/4x2s. screws, glue etc. I have access to drills.
TOTAL DIY cost IF I had the skills = ~ minimum of £1200 + time spent
Any thoughts on the above?
Sincere apologies for the long post!
Cheers
SJ
A genuine ‘thank you’ to the online DIY community for your help. After a lot of reading, I had no need to start a new thread to redo the silicone, replace a leaking kitchen tap, replace some window handles, and fix a sliding door. I don’t have any DIY skills or knowledge (or some of the right tools) and these supposedly simple jobs took me many hours, but I followed your guidance to get these jobs done for my parents and it was worth it.
I have 1 more job that will be too much for me alone and involves raising the floor joists in the loft of our 3.5 bedroom semi-detached ~1950s property in order to get insulation in, then boarding over for storage. There has been zero loft insulation for 20+ years. I have emptied the loft - about 400-500kg of stuff up there. I have reduced this down to about 250kg of storage to go back up.
The current joists are 4x2s. Please see diagram and images: https://flic.kr/s/aHBqjBgbmN
The current ‘boarding’ in the centre area looks like 10mm ply nailed down. And the rest is old scrap wood (offcuts etc.) which is thicker, but never screwed down – all been walked on (carefully!) for over 20+ years without issue.
I am looking for the easiest method (but no small plastic loft legs) which won’t cause issues down the line…and not after anything ‘pretty’ as the loft is only visited 10 x a year for a few mins at a time. The lathe & plaster ceilings in the rooms below the loft have feint lines due to, presumably, the weight of the excess storage over the years. These lines have not worsened and have been there for years. No loft conversion is planned for the future and we hope to be in the house for at least another 10 years. The access to the hatch from below is quite good – it’s on a landing and some stuff I removed from the storage included a 2.6m length copper pipe.
PLEASE kindly see what you think of the following options
Option 1: New 6x2s *parallel* directly on top of existing 4x2s @ 400mm centres > takes total height to ~ 250mm. Screwed in diagonally with plenty of (PVA?) glue in between the wood. Finish with plywood or OSB3 T&G screwed on top. This means 1 single layer of 200mm insulation + a ~ 50mm air gap. No joining with the brick wall.
Option 2: New 6x2s on top *perpendicular* to existing 4x2s @ 400mm centres > takes total height to 250mm. Screwed in diagonally with plenty of (PVA?) glue in between the wood. Finish with plywood or OSB3 T&G screwed on top. This means 1 single layer of 100mm insulation between the original (4x2) joists and another 100mm going across + a ~ 50mm air gap. No joining with the brick wall.
Both of the above options mean sweeping up to remove all the current vermiculite which is as low as a 1” and high as 3” in places. Find a local joiner to build sub-frame + board-over after I have rolled out the Knauf 44 insulation (leaving a ~ 5cm gap at edges). Remove the old boards + disposal myself (unless local joiner can use them). I have contacted a joiner who has advertised for years in the local church newsletter and when I described the job, he said he is happy to take a look in a couple of days.
Option 3: Go with a loft insulation company (with v. good online reviews). I got a response from two companies out of eight. 1 quote comes to £2100 for option 1 above using 18mm T&G. This includes disposing of current boarding and re-aligning the current 3 tier ALU loft ladder to work with the new floor height. They will use Knauf 44 and board ~ 20sqm. They measured the area insulated to be ~38sqm. They said they would lay the first 100mm over the current vermiculite, but ideally the vermiculite is removed (by me). They will need 1.5 days. They said 200mm insulation is enough and they gave the price instantly.
I am waiting for 1 more quote from another company. This 2nd company needs ~ 2 days to do the job and said he wants to put in 300mm, so I assume he is using 8x2s (8”+4” = ~300mm). This means no air gap if I have understood correctly. The loft is fairly well ventilated, however he also said he will put in several roof vents (the cheapo type that lift the felt a bit). Each of the guys from these companies took about 5mins to have a look at the job and said they cannot re-use current boarding. But, overall the job appears to be quite ‘normal’ for them rather than anything too complicated. The bathroom (no electrical shower) area has a bit of messy wiring above but neither company mentioned it. The other rooms have a single ceiling rose light.
Time is against me as I only have 13 days to get this done, so unfortunately, it is not something I will attempt as I don’t have any experience in wood work. I feel like shoving all the storage back up there and giving up, but the Mrs said to put some forum posts up online to get advice.
Some other things I am not sure about:
- Where there is no boarding, is there any harm in adding an extra 100mm of insulation? For example, boarded area =200mm insulation. Unboarded = 300mm insulation.
- How important is the air gap when using Knauf 44? Because, the 2nd company wants to go to 300mm insulation, but using 8x2s (on top of current 4x2s) means there won’t be much of an air gap. Perhaps, this is why he said he will put in several roof vents (cheapo type). Whereas company 1 going with option 1 above results in a 50mm air gap due to less insulation (200mm with (6x2s) used.
Initially, I thought I could do the job myself, but it is going to be too complicated, especially the levelling and T&G. I tried my best to ‘cost it up’, and this is what I got: Insulation: 1st layer, Knauf 44, 100mm 13.89m2/pack (perforations at 380mm and 570mm) = 38m2/13.89m2 = ~ 3 packs / ~ £100
2nd layer, Knauf 44, 150mm 9.18m2/pack (perforations at 380mm and 570mm) = 38m2/9.18m2 = ~ 4 packs / ~ £133 . Extra roll for unboarded areas = 1 pack of 100mm = £33 TOTAL FOR INSULATION (Insulation costs + £50 delivery) = £316
Timber, a mix of 6x2s and 4x2s = £450
Boarding = 20m2 x £18/m2 for shorter lengths = £360
Tools = ~ £100 ...Stanley knife , spirit level, hand saw for cutting 6x2s/4x2s. screws, glue etc. I have access to drills.
TOTAL DIY cost IF I had the skills = ~ minimum of £1200 + time spent
Any thoughts on the above?
Sincere apologies for the long post!
Cheers
SJ
Attachments

Last edited:

")