Nest 3rd Gen to replace Potterton EP2002-Installation Advice

Joined
5 Nov 2016
Messages
16
Reaction score
0
Location
Oxford
Country
United Kingdom
Dear Friends,

At this moment I have:
Ideal W Gas boiler
Cold water tank in attic
Potterton EP2002 Programmer (can currently control CH & HW independently) Pic 1
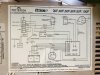
Potterton EP2002 Programmer (Wirings) Pic 2
PRT100 Thermostat Pic 3
PRT100 Thermostat (Wiring) Pic 3.

My questions are,
1. I did install heat link and I connected the Nest using a Nest Stand. They are paired.
I can see when I change the temp, I can hear a click sound. But no movement from boiler. I don't know what's going on?

Can you guys please help me how can I wire the current programmer wires to the heat link?

2. I have PRT100 thermostat, which I assume high voltage? How can I use Nest on it?

Currently, to make my life simpler I have bought a stand but I would like to fix it on the wall permanently.

Please help.

Many thanks.
1.jpg
2.jpg
3.jpg
4.jpg
1.jpg
2.jpg
3.jpg
4.jpg

 
Sponsored Links
The Nest unit incorporates an integral room thermostat, so the PRT100 is redundant and should be removed.

The two wires used for switching that are presently connected to PRT100 terminals 1(TL) & 2(H) should be connected together. Do this at the wiring centre end, then the existing cable to the PRT100 can safely be disconnected and removed.

The Nest Heatlink replaces the existing programmer. The instructions that come with the Nest show what wires you need; it's then a matter of looking at the instructions for the EP2002 and identifying those you need by finding out where they go now.
Dear Stem,

Firstly thanks for the reply.

Nest Thermostat Installation:

  • Nest thermostat base I got has only two slots..i.e... T1 and T2, So on this basis, what is my T1 and T2 here from PRT100 connections?
Nest Heat Link Installation:
  • I can install the sample wires and slots from EP2002 to my heat link. Does it work?
  • Also EP2002 'Neutral' has 3 black wires in one slot and its a challenge for me to put all three in one slot in the nest heatlink? any suggestions here?
Many thanks for your help.
 
Here is the Wiring Diagram of the Boiler, if it any helps.
 

Attachments

  • 6.jpg
    6.jpg
    147.6 KB · Views: 13,294
Sponsored Links
I did install heat link and I connected the Nest using a Nest Stand. They are paired.
I can see when I change the temp, I can hear a click sound. But no movement from boiler. I don't know what's going on?
Where and how did you connect the heatlink?
Nest thermostat base I got has only two slots..i.e... T1 and T2, So on this basis, what is my T1 and T2 here from PRT100 connections?
Unless your existing room stat is wired back to where the heatlink is going, no wires are connected to the nest stat.
I can install the sample wires and slots from EP2002 to my heat link. Does it work?
Excuse me?
Also EP2002 'Neutral' has 3 black wires in one slot and its a challenge for me to put all three in one slot in the nest heatlink? any suggestions here?
The heatlink terminals are designed for no more than 2 wires, if you have more fit them in a separate connector with a short wire from the connector to the heatlink.

Have you read the instruction manual? It's really important that you do. I would recommend calling a decent heating engineer/electrician who is familiar with nest to carry out this work.
 
Nest thermostat base I got has only two slots..i.e... T1 and T2, So on this basis, what is my T1 and T2 here from PRT100 connections?
Terminals T1 and T2 provide a 12V supply from the Heatlink to power to the new Nest Thermostat. They are nothing to do with control of your heating. You don't even have to use them if you choose to power the Thermostat using a separate power supply that can be plugged in. As I said before, your old Thermostat PRT100 needs to be removed and the switching wires joined together at their source. I suppose you could then use the redundant cable to get the 12V from the Heatlink to the Nest Thermostat if it happens to be installed in the correct place. Many aren't because they go to a wiring centre rather than to the programmer.

I can install the sample wires and slots from EP2002 to my heat link. Does it work?
Sorry, I don't understand what you mean by that either.

Also EP2002 'Neutral' has 3 black wires in one slot and its a challenge for me to put all three in one slot in the nest heatlink? any suggestions here?
In these cases, it is normal to terminate two (or three) of the wires separately using a suitable connector and then run a wire from the new connection to the Heatlink Neutral terminal.

The wiring at the EP2002 is presently as follows:

N=Neutral
L= Live
1=Hot Water 'Satisfied'
2=Not required [Heating 'Satisfied']
3=Hot Water 'Call for Heat'
4=Heating 'Call for Heat'
5=Link to L terminal - Note:The red wire left when the link is removed from here, should go to L on the Nest Heatlink.

So you will see that above, I have used the same terminology as the Nest Instructions so that you can make a direct substitution. The Nest Wiring is:

N=Neutral
L= Live
1=Not required [Heating 'Satisfied']
2=Link to L
3=Heating 'Call for Heat'
4=Hot Water 'Satisfied'
5=Link to 2
6=Hot Water 'Call for Heat'

T1 & T2 = 12v Supply to Nest thermostat (if used)

These things are not straight forward to install, they require a reasonable understanding of how heating control systems work and a good understanding of electrical circuits. If you have any doubts it is probably better to have it professionally installed as Echo suggested.
 
Where and how did you connect the heatlink?
I have removed the old EP2002 and Installed the HeatLink.
Unless your existing room stat is wired back to where the heatlink is going, no wires are connected to the nest stat.
Yes, the current Theromstat PRT100 is wire back and its a high voltage. So i bought a Nest Stand and connected the NEST thermostat to it.
Excuse me?
I mean to say, i would like to connect all the current EP2002 wiring to the HeatLink..I mean same connections type in to same slots in the HeatLink.
The heatlink terminals are designed for no more than 2 wires, if you have more fit them in a separate connector with a short wire from the connector to the heatlink.
Thanks. Can I use WagoConnecter for this?
Have you read the instruction manual? It's really important that you do. I would recommend calling a decent heating engineer/electrician who is familiar with nest to carry out this work.
I have ready throughly and I am quite comfortable to install, if there are clear instructions.

When I replaced the EP2002 with HeatLink and I can see green light and Also I Can See the Nest Thermostat is detected the HeatLink. But when ever I change the temp in Nest Thermostat, i can hear some clicking noise at Heat Link, but no movement in the boiler.

Just like, Mr.Stem said in the above/below comment..i need to take out the old thermostat (PRT-100) and connect the PRT100 terminals 1(TL) & 2(H) and leave it behind the wall..i am not sure it will solve my problem or not..Do youve any suggestions sir? Many thanks.
 
Terminals T1 and T2 provide a 12V supply from the Heatlink to power to the new Nest Thermostat. They are nothing to do with control of your heating. You don't even have to use them if you choose to power the Thermostat using a separate power supply that can be plugged in. As I said before, your old Thermostat PRT100 needs to be removed and the switching wires joined together at their source. I suppose you could then use the redundant cable to get the 12V from the Heatlink to the Nest Thermostat if it happens to be installed in the correct place. Many aren't because they go to a wiring centre rather than to the programmer.

I will do as you said i.e connect the PRT100 terminals 1(TL) & 2(H) together and left other one alone. I will add the tape and put them back in to the wall. I didnt do this last time when i replaced EP2002 with HeatLink. May this is reason why, even when i change the temp in NestThermostat, i can see sound from heatlink and not any movement from the boiler. I will do that today and let you know sir.

Sorry, I don't understand what you mean by that either.

I mean to say, copy the currentt EP2002 extactly to NestHeatLink. But I will follow u r instructions that is, add the wago connector and from that connect a single wire to the heat link.
In these cases, it is normal to terminate two (or three) of the wires separately using a suitable connector and then run a wire from the new connection to the Heatlink Neutral terminal.

The wiring at the EP2002 is presently as follows:

N=Neutral
L= Live
1=Hot Water 'Satisfied'
2=Not required [Heating 'Satisfied']
3=Hot Water 'Call for Heat'
4=Heating 'Call for Heat'
5=Link to L terminal - Note:The red wire left when the link is removed from here, should go to L on the Nest Heatlink.

So you will see that above, I have used the same terminology as the Nest Instructions so that you can make a direct substitution. The Nest Wiring is:

N=Neutral
L= Live
1=Not required [Heating 'Satisfied']
2=Link to L
3=Heating 'Call for Heat'
4=Hot Water 'Satisfied'
5=Link to 2
6=Hot Water 'Call for Heat'

T1 & T2 = 12v Supply to Nest thermostat (if used)

Many thanks for the taking time to explain me. I will exactly follow the above wiring procedure and let you know result by tomrrow.
These things are not straight forward to install, they require a reasonable understanding of how heating control systems work and a good understanding of electrical circuits. If you have any doubts it is probably better to have it professionally installed as Echo suggested.
 
Post a photo of your wiring.
Just like, Mr. Stem said in the above/below comment. I need to take out the old thermostat (PRT-100) and connect the PRT100 terminals 1(TL) & 2(H) and leave it behind the wall..i am not sure it will solve my problem or not..Do youve any suggestions sir? Many thanks.
You need to find where the old thermostat cable is connected back to , and fully disconnect it, then fit a link in it's place. If the stat is wired back to the heat link position you can re purpose it to feed 12V to the new stat, using the t1 and t2 terminals at both ends. If the old cable doesn't go back to the heatlink position you will not be able to make use of the t1+t2 connections and will have to power the stat with the plug in power supply. Do not connect the old wires into the t1+t2 terminals as it currently is or the new stat will explode. The wiring of the stat is sort of explained in the installation manual.
It is also unacceptable to just join the old wires and shove them in the wall behind the new stat.


I've just read right through the manual for the first time, it really isn't written that well and is rather vague compared to the Hive manual. I've only ever gone straight to the wiring diagram before. It's very obvious that an attempt has been made to convert it from US wiring to UK wiring with little understanding of how UK wiring is installed or how UK heating systems are configured. I hadn't realised before, as an electrician it's dead easy to work out, with very little thought.
One page that was particularly concerning was the one below. Spot the immediate hazard!
WTF.png
 
Terminals T1 and T2 provide a 12V supply from the Heatlink to power to the new Nest Thermostat. They are nothing to do with control of your heating. You don't even have to use them if you choose to power the Thermostat using a separate power supply that can be plugged in. As I said before, your old Thermostat PRT100 needs to be removed and the switching wires joined together at their source. I suppose you could then use the redundant cable to get the 12V from the Heatlink to the Nest Thermostat if it happens to be installed in the correct place. Many aren't because they go to a wiring centre rather than to the programmer.

Sorry, I don't understand what you mean by that either.

In these cases, it is normal to terminate two (or three) of the wires separately using a suitable connector and then run a wire from the new connection to the Heatlink Neutral terminal.

The wiring at the EP2002 is presently as follows:

N=Neutral
L= Live
1=Hot Water 'Satisfied'
2=Not required [Heating 'Satisfied']
3=Hot Water 'Call for Heat'
4=Heating 'Call for Heat'
5=Link to L terminal - Note:The red wire left when the link is removed from here, should go to L on the Nest Heatlink.

So you will see that above, I have used the same terminology as the Nest Instructions so that you can make a direct substitution. The Nest Wiring is:

N=Neutral
L= Live
1=Not required [Heating 'Satisfied']
2=Link to L
3=Heating 'Call for Heat'
4=Hot Water 'Satisfied'
5=Link to 2
6=Hot Water 'Call for Heat'

T1 & T2 = 12v Supply to Nest thermostat (if used)

These things are not straight forward to install, they require a reasonable understanding of how heating control systems work and a good understanding of electrical circuits. If you have any doubts it is probably better to have it professionally installed as Echo suggested.


Dear Stem,

I have installed the Nest Using the above said procedures. Central heating is working but Hotwater is not responding at all.
I have disconnected the old thermostat PRT100 and joined the wires together. Please see the attached picture.
To confirm I have conneted as following.

EP2002------------------NEST HEAT LINK(Bold)
N-------------------------N
L--------------------------L
1-------------------------4
3-------------------------6
4-------------------------3
5-------------------------5----------2---------------L

Please help

IMG_1408.JPG
 
Those live wires sticking out of the thermostat are giving me a heart attack. Find the junction box where the thermostat cable connects back to and disconnect the old thermostat cable. Put a wire link between the terminals where the thermostats red and yellow wires connected to. Do this first before someone dies.

Now for the hot water problem, your wiring description looks correct, check all the wires are correctly in the terminals and the terminal screws are clamping on the copper and not the insulation. Check the cylinder stat is set correctly. Does the heatlink click when hot water is selected?

Post some photos of the wiring.
 
Dear Sir,

Thanks for the quick response. I will check the wiring and post some pics in few minutes. Once again thanks for your time. Merry Christmas
 
Those live wires sticking out of the thermostat are giving me a heart attack. Find the junction box where the thermostat cable connects back to and disconnect the old thermostat cable. Put a wire link between the terminals where the thermostats red and yellow wires connected to. Do this first before someone dies.

Now for the hot water problem, your wiring description looks correct, check all the wires are correctly in the terminals and the terminal screws are clamping on the copper and not the insulation. Check the cylinder stat is set correctly. Does the heatlink click when hot water is selected?

Post some photos of the wiring.
Dear Echo,

My system working properly. Thanks to you and others who helped me to fit this system properly.
 
Hi All, I know it seems like you talked about this some time ago But did the wiring as follows work for you?

ep2002. Nest
1 4
2 na
3 6
4 3
5 5--2-L

L=cable removed from 5 in the ep2002 after the live link is removed.

As I am slightly confused by 5 as I do not understand why it gets removed from a live link then added to a common link between 5 and 2 but then never linked back again to live power

Any help?

Many Thanks.

Hope all had a great Christmas
 

DIYnot Local

Staff member

If you need to find a tradesperson to get your job done, please try our local search below, or if you are doing it yourself you can find suppliers local to you.

Select the supplier or trade you require, enter your location to begin your search.


Are you a trade or supplier? You can create your listing free at DIYnot Local

 
Sponsored Links
Back
Top