Hi guys,
I would appreciate just a check over to make sure my thinking is correct before I start the installation of my shiny new Nest V3 thermostat. I've done my research but I wanted to document my thoughts in one place:
My current ecoTec831 is controlled by a Vaillant VRT360 wireless programmer/thermostat. This is connected to the boiler by the eBus wire/controller box
To install the Nest thermostat I believe the process is as follows from the r
1. Turn the mains power off to the boiler.
2. Disconnect the eBus connector from the Pink connector block on the controller board.
3. Mount the heat link box near the boiler and run a fused 3 amp 240v supply to it connecting this wire to the respective live, neutral and earth on the heat link.
4. Remove the bridge connector between the RT24 on the white connector on the circuit board.
5. Use a new wire to connect the heat link to the boiler as the old eBus controlling wire has now been removed. The connections will be as follows.
Call for heat (pin3 on the heat link) to one of the connectors on the RT24 mentioned in point 4.
Common (pin2 on the heat link) to the other remaining connector on the RT24 mentioned in point 4.
6. I plan to wall mount are hard wire the Nest. So connect T1 and T2 on the Heatlink and the Nest wall bracket. This will now deliver the 12v DC to trickle charge the battery.
7. Power back on the boiler and follow the set up on the next. Fingers crossed everything works
Does anything need doing with the pink eBus terminals or can these be left totally unconnected / bridged or do they need bridging together?
Does any thing need doing in the boiler software menus to say the eBus is no longer needed?
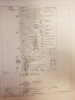
I have attached the boiler wiring diagram I'm working from and a picture of the current installation for reference.
Thanks for any assistance in advance.
I would appreciate just a check over to make sure my thinking is correct before I start the installation of my shiny new Nest V3 thermostat. I've done my research but I wanted to document my thoughts in one place:
My current ecoTec831 is controlled by a Vaillant VRT360 wireless programmer/thermostat. This is connected to the boiler by the eBus wire/controller box
To install the Nest thermostat I believe the process is as follows from the r
1. Turn the mains power off to the boiler.
2. Disconnect the eBus connector from the Pink connector block on the controller board.
3. Mount the heat link box near the boiler and run a fused 3 amp 240v supply to it connecting this wire to the respective live, neutral and earth on the heat link.
4. Remove the bridge connector between the RT24 on the white connector on the circuit board.
5. Use a new wire to connect the heat link to the boiler as the old eBus controlling wire has now been removed. The connections will be as follows.
Call for heat (pin3 on the heat link) to one of the connectors on the RT24 mentioned in point 4.
Common (pin2 on the heat link) to the other remaining connector on the RT24 mentioned in point 4.
6. I plan to wall mount are hard wire the Nest. So connect T1 and T2 on the Heatlink and the Nest wall bracket. This will now deliver the 12v DC to trickle charge the battery.
7. Power back on the boiler and follow the set up on the next. Fingers crossed everything works
Does anything need doing with the pink eBus terminals or can these be left totally unconnected / bridged or do they need bridging together?
Does any thing need doing in the boiler software menus to say the eBus is no longer needed?
I have attached the boiler wiring diagram I'm working from and a picture of the current installation for reference.
Thanks for any assistance in advance.