Hi all,
Have searched many threads but no one seems to have the same setup as mine.
I'm a fairly competent DIYer and like learning how to do things so thought I'd have a go at installing a nest myself. Doesn't look too hard but before I fry everything just thought I'd do a sanity check and ask you very knowledgable chaps (chapesses too).
So my setup:
Glow worm 30si heat only boiler
Heatrae Sadie cl170 tank
Potterton 3002 programmer
Honeywell t40 thermostat
Wiring box
I believe I have an S plan (2 Honeywell valves next to the tank).
I'd like to change location of the thermostat but that might be an additional headache so might leave that for now.
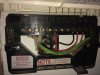
So, the heatlink will be replacing the programmer. Please see pic for wiring, the N and L I'm guessing will transfer straight to the heatlink. I'll add a link to 2 then on to 5. Then I think move 3 to 6 and 4 to 3. That would work right?
The problem is with the thermostat. The wiring box isn't labelled, it's a bit of a mess for an OCD demon like me. So in there are 2 white 4 core (blue yellow red and earth), one of which is to the therm, the other I guess back to the boiler. (Right of the picture) How do I know which is which?
The wiring box is quite far from where I'd out the heat link (in place of the programmer) so powering the thermostat I'd have to add a cable up to the heat Link. Based on that it's probably easier to move the thermostat and put it in a better location. This is where I'm getting a bit stuck at deciphering a wiring diagram. I'd need to neutralise the thermostat within the wiring box. Please help me with that!
Thanks in advance
Have searched many threads but no one seems to have the same setup as mine.
I'm a fairly competent DIYer and like learning how to do things so thought I'd have a go at installing a nest myself. Doesn't look too hard but before I fry everything just thought I'd do a sanity check and ask you very knowledgable chaps (chapesses too).
So my setup:
Glow worm 30si heat only boiler
Heatrae Sadie cl170 tank
Potterton 3002 programmer
Honeywell t40 thermostat
Wiring box
I believe I have an S plan (2 Honeywell valves next to the tank).
I'd like to change location of the thermostat but that might be an additional headache so might leave that for now.
So, the heatlink will be replacing the programmer. Please see pic for wiring, the N and L I'm guessing will transfer straight to the heatlink. I'll add a link to 2 then on to 5. Then I think move 3 to 6 and 4 to 3. That would work right?
The problem is with the thermostat. The wiring box isn't labelled, it's a bit of a mess for an OCD demon like me. So in there are 2 white 4 core (blue yellow red and earth), one of which is to the therm, the other I guess back to the boiler. (Right of the picture) How do I know which is which?
The wiring box is quite far from where I'd out the heat link (in place of the programmer) so powering the thermostat I'd have to add a cable up to the heat Link. Based on that it's probably easier to move the thermostat and put it in a better location. This is where I'm getting a bit stuck at deciphering a wiring diagram. I'd need to neutralise the thermostat within the wiring box. Please help me with that!
Thanks in advance