Newbee internal rendering - my first!

Joined
25 Oct 2008
Messages
1,185
Reaction score
145
Location
Cheshire
Country
United Kingdom
Hello all,

Have experimented using different undercoat plasters on refurb of the house so far.

Need to do a patch about 1.5m wide and standard ceiling height (2.4m) in the smallest bedroom.
It is on an external wall and will be brick - I think the cracking is due to a chimney stack. Not stripped it off yet - Saturday's job.

The easiest solution would probably be an undercoat plaster and multi to skim the whole wall.
However, I'd like to get some experience with render, so thought this a good opportunity :D

I've kept an eye on the rendering posts recently - but would like some specific help before I jump in.
Sorry guys - a raft of Qs! :oops:

Was thinking:

1) Wetting down bricks first (or even SBR? or is PVA ok for internal use with render?) Thinking about the join to existing plaster on wall.

2) Scratch coat sand/cement 4:1 (possibly with 1 part hydrated lime?)
Does it need plasticiser and/or waterproofer in the scratch for internal use?

3) top coat sand/cement 5:1 (possibly with 1 part hydrated lime if used in scratch?)

General Qs:

- Is a plaster mixer ok for mixing render ?

- Once a scratch coat is on, how long typically before it sets sufficiently to scratch it ? I'm guessing it doesn't set as fast as Bonding etc!

- Are the usual sheds ok for rendering materials (cement, sand, lime) or better off at a builders merchants?

- finally on the sand - is plastering sand ok? e.g. http://www.wickes.co.uk/Plastering-Sand/invt/224666

Big TIA!
 
Sponsored Links
Hi Newb! Offer what ican but don't take it as gospel, see what the other guys add, i use so much bagged plaster that it's been a while since i've mixed S&C, and if you've read my render ratios post you'll see i'm trying hard to get to grips with render, but for what it's worth:

1) Wetting down bricks first (or even SBR? or is PVA ok for internal use with render?) PVA is fine indoors, so would wetting the wall down, don't think you need SBR unless you have either a key or suction issue.

2) Scratch coat sand/cement 4:1 (possibly with 1 part hydrated lime?)
Does it need plasticiser and/or waterproofer in the scratch for internal use? yes, this is the conventional ratio for a scratch, adding lime in is a good idea or plasticiser or even both wont hurt, i think if you were choosing 1 though go for lime, it has more beneficial properties than plasticiser, waterproofer in the scratch will give you more time working on the top coat to rub up etc

3) top coat sand/cement 5:1 (possibly with 1 part hydrated lime if used in scratch?)as above, lime is good

General Qs:

- Is a plaster mixer ok for mixing render ? i'd use a shovel in a bath personally but a mixer on low speed i'd have thought ok too

- Once a scratch coat is on, how long typically before it sets sufficiently to scratch it ? I'm guessing it doesn't set as fast as Bonding etc! from memory yes it's a slower set, but not much, it's cement after all ;)

- Are the usual sheds ok for rendering materials (cement, sand, lime) or better off at a builders merchants? cement and lime yeah no problem, sand...well thats a different story

- finally on the sand - is plastering sand ok? e.g. http://www.wickes.co.uk/Plastering-Sand/invt/224666 in theory this hould be ok but i 'm not sure i'd trust it any more or less than a merchants sand, important to get a well graded, well washed plastering sand to avoid silt or shrinkage causing cracking, as to where to go for that type of sand mate i'm not sure
 
just wet the walls down no need for pva, well you could just put some around the existing plaster to help the s&c stick to it, theres no need to pva the bricks, 4-1 scratch - 5-1 top coat both with plasticiser
 
DIYnewbee99, Do you know how to mix s/c to the right texture for rendering or even brick laying ?
as getting your mix right is hardest part, applying it is much the same as any backing plaster,

You might use pva on the joint line of the old plaster,
you would be better off if you used a waterproofer for scratch and float if you are going to pva and skim the whole wall to finish,
( better than a patch )
your scratch coat will pull in fairly quick on old bricks and you need to leave it with a open face and not smooth and shiny,
your scratching goes across the render like WWWWWWWW but softer waves,
Time for scratching is as it gets firm, you'll most likely scratch the top before you get the bottom on.
If you have a hose and a spray gun for it use that to wet down the walls, If you've got a dog then nick its blanket and put this at the bottom
of the wall, give the wall 2 good soaks from top to bottom then have a cupper and do the wall again,
remove blanket and replace with an old piece of plasterboard or something like, this way what you drop you can scrape up and use again.
Wetting the wall will give you more time and hold back the drying time of the render so it has chance to cure.
try and get a cement mixer, its hard work mixing with a shovel.
 
Sponsored Links
Sorry, Steve but I have got to disagree with you on using soft sand. unless you know that Wickes soft sand is course,
around here a soft sand is like baking flour and no bloo*y good for render.
 
Sorry, Steve but I have got to disagree with you on using soft sand. unless you know that Wickes soft sand is course,
around here a soft sand is like baking flour and no bloo*y good for render.
soft sand is excellent for internal render its up to you if you disagree
"edit" internal render does not need the strength qualities of external render it doesent have to be coarse, which is why soft sand is suitable and as such i use it and lots of other spreads i know use it, if you have a look on the wickes bag it says used for internal render
 
DIYnewbee99, Do you know how to mix s/c to the right texture for rendering or even brick laying ?
as getting your mix right is hardest part, applying it is much the same as any backing plaster,
....
try and get a cement mixer, its hard work mixing with a shovel.

Hi marshman.
Not mixed render before - was thinking it needed to get to a similar consistency I would get a backing plaster to - maybe even a touch firmer. Too runny and it would slump and too firm, would not go on well.
I guess I'm expecting it to be a bit experimental and is only a relatively small area, so if it goes wrong, hopefully not too difficult to correct.

On the mixer front - not sure if I can get away with this - but was thinking of using one of my flexi buckets, add sand and cement and lime in correct ratios for mix and add mixed water/plasticiser/waterproofer into a 'well' in the middle and use my plaster mixer on slow speed to mix up. Is this possible or a no-no?


PS - thanks for the feedback so far Marshman, TM1 & Steve. A great help as always.
 
but was thinking of using one of my flexi buckets, add sand and cement and lime in correct ratios for mix and add mixed water/plasticiser/waterproofer into a 'well' in the middle and use my plaster mixer on slow speed to mix up. Is this possible or a no-no?

It might work, I've never tried it. If you have a half sheet of ply 4x4 ft or even thin hardboard laid over a flat surface would do,
you could mix it with a shovel,
Shovel mixing; put 4 of sand onto board and spread out about 3 inches thick, sprinkle cement over ( same with lime) and turn in until
they are mixed dry, heap up, pull heap out from centre with shovel to form ring leaving about a inch or 2 layer with a bank around,
add plasticiser to bucket of water and stir, add about one third of this to you s/c and drag your bank down into it then start to turn it in,
if the water runs out the side just scope it back with your shovel, ( not a spade ) when your s/c is damp you don't need to form a lake
just splash your water +' over it and keep turn it over, when its like a stiff mortar stop adding water, as you turn it you need to sort of
throw it down off the shovel and this will make it go fatty ( sticky ) this is what you want not just wet s/c, as you turn it it will become
softer, you might need a little splash of water +, but go careful.

If you mix on a board or concrete yard wet it down first, don't try and mix more than the one mix ( 4&1 / 5 & 1 / 5 1 &1, etc),
work one side of your mix in then bring in the rest that way you'll be least likely to end up with a water soft mix and its easier to work:
All this just in case your paddle mixer can't cope. :LOL:
 
Thanks for the detailed instructions - I've not mixed before, so is really useful.

I wasn't quite sure what you meant by this bit tho
don't try and mix more than the one mix ( 4&1 / 5 & 1 / 5 1 &1, etc),
work one side of your mix in then bring in the rest that way you'll be least likely to end up with a water soft mix and its easier to work

As an aside - I've hit a snag with some wood rot above in the roofing struts so it will slow me down a bit. :(
We fixed the roof leak 2 yrs ago when moved in. I need to also sort a small section of the ceiling.
I took a pic for the post in the roofing forum - here's a view of what I'm hoping to fix with the render.
View media item 25909Think may need some EML secured on first ;)
 
Its a lot easier to do a small mix and quicker to do 2 or 3 small than one big mix.
work one side. when your full mix is still to stiff, work half of it and as that work soften include a bit more of the stiffer bit into it until you
have it all fatty and soft. Its one of them job that would be better to show that trying to describe.
Yes eml.
 
I would put some ex-metal over that crack mucka. But first knock a bit more plaster off the r/h side so you have got a good 300mm either side. A little tip for you that I have used for 30 years to mix render (or concrete ) up, if I couldn't use a mixer. First of all cut your self a piece of thick gauge polythene 4'x6' and measure your mixes out with the appropriate size bucket and tip it on to the edge of the poly and pick up the two corners, (narrow edge and walk it forward and let the mix roll over itself and do the same when you have moved the mix to the other end, back and forth a few times then slowly add your water (A watering can with a spray nozzle is best )but if not pour a drop of water on slowly and walk it back and forth till you get your cosistency, Always makes a nice mix,If you are putting add-mixes in then make a hollow after the first few turn overs and put a drop of water in and add your addmix to it and give it a stir. When you get used to doing a mix this way you can use bigger sized poly. or a tarp and make bigger mixes, I have made stone laying mixes, concrete mixes render mixes and floor laying mixes like this , and have even mixed it up in customers houses (With another sheet of poly underneath ;) try it and see, I have introduced a lot of lads to this method over the years so hope it works for you ;)
 
I like your way Roy, I'll have to give that a try.

Let us know how it goes mm, ;) I always carry some poly and a small "tarp" in the van and they're used regular ,,,
 
A little tip for you that I have used for 30 years to mix render (or concrete ) up, if I couldn't use a mixer. First of all cut your self a piece of thick gauge polythene 4'x6' and measure your mixes out with the appropriate size bucket and tip it on to the edge of the poly and pick up the two corners, (narrow edge and walk it forward and let the mix roll over itself and do the same when you have moved the mix to the other end, back and forth a few times then slowly add your water (A watering can with a spray nozzle is best )but if not pour a drop of water on slowly and walk it back and forth till you get your cosistency, Always makes a nice mix,If you are putting add-mixes in then make a hollow after the first few turn overs and put a drop of water in and add your addmix to it and give it a stir. When you get used to doing a mix this way you can use bigger sized poly. or a tarp and make bigger mixes, I have made stone laying mixes, concrete mixes render mixes and floor laying mixes like this , and have even mixed it up in customers houses (With another sheet of poly underneath ;) try it and see, I have introduced a lot of lads to this method over the years so hope it works for you ;)

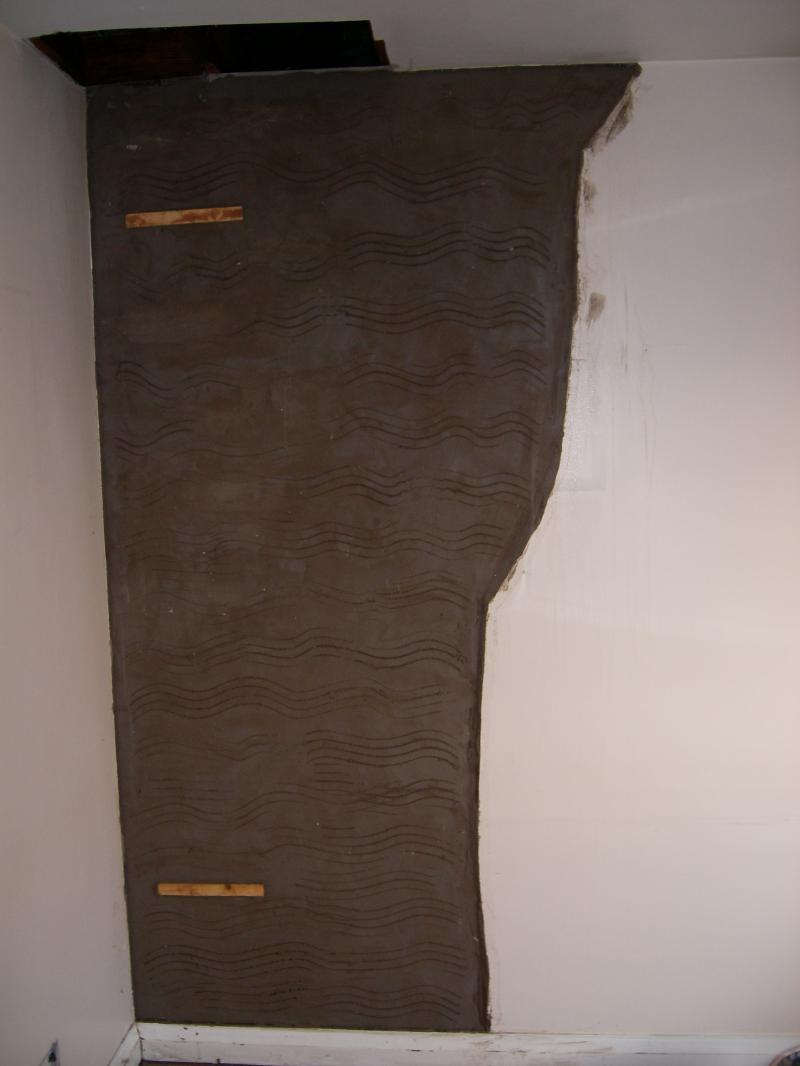
Well, I'd been a bit delayed but finally got round to doing my first scratch coat.
I tried the mixer in a flexi-bucket, but mix was too big.
So resorted to the polythene, that I had on reserve on your advice. ;)
Worked a treat!!!

Many thanks Roy & guys.

A picture of the results, for a DIY I'm pleased :D


I wasn't sure if you normally run the screed between the dots to full thickness, when you do the scratch coat?
I didn't want it to slump, so erred on the side of caution and will do it in two.
Would like to know what the pros do tho.
 

DIYnot Local

Staff member

If you need to find a tradesperson to get your job done, please try our local search below, or if you are doing it yourself you can find suppliers local to you.

Select the supplier or trade you require, enter your location to begin your search.


Are you a trade or supplier? You can create your listing free at DIYnot Local

 
Sponsored Links
Back
Top