Parapet wall issue/s leaking?

Joined
6 Oct 2014
Messages
74
Reaction score
2
Location
Cambridgeshire
Country
United Kingdom
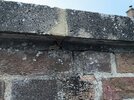
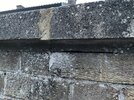
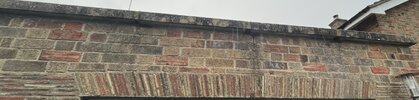
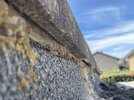
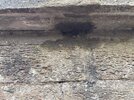
There's some 'leaky marks' which I thought was caused by the mortar between the coping stones having failed - the mortar has been chiseled out and replaced.

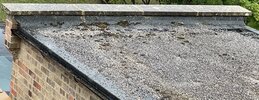
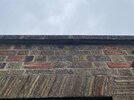
The roof is moist on the inside of garage, after rain fall on the inside underneath and behind the parapet wall, on the right hand side where you can see that grey/mouldy bit beneath the mortar joint. Never wet but you can see it's slightly damp, and moisture meter confirms it.

Any ideas?
IMG_9841.jpeg
 

Attachments

  • IMG_9839.jpeg
    IMG_9839.jpeg
    835.4 KB · Views: 88
  • IMG_9838.jpeg
    IMG_9838.jpeg
    518.6 KB · Views: 77
  • IMG_9837.jpeg
    IMG_9837.jpeg
    721.5 KB · Views: 82
  • IMG_9834.jpeg
    IMG_9834.jpeg
    382.4 KB · Views: 92
OP,
When the joint was repaired you missed continuing the drip channel below the parapet capstone - as a consequence, water is finding its way down, and possibly through the solid wall to show on the inside.
On the other, mirror side of the parapet there are more water stains on the felt upstand - perhaps due to the same reason ref the missing bit of channel?

FWIW: The roof felt was not prepped for stones - a large bare space has opened: maybe the gutter is slowly filling with loose stones from the bare spaces?
 
Thank you. I've now continued the drip channel (by scratching it in with a nail) - there was even evidence that just where the mortar meets the wall it was darker than the rest, implying it may be getting wet due to missing channel.

Did it to the rear of the capping stones too. Will see how it goes now. Am going to apply brick sealer too.]

One of our neighbours has seemingly 'slapped a load of mortar' all across the face of the wall, beneath his parapet wall and it looks awful but has worked. Another neighbour mentioned that they had their capping stones re-mortared 5 years ago - whatever that means!
 
Okay it's raining, and there's a string of water ruinning down the front middle, and the mortar underneath the middle and right hand joint (from the front) looks dark/wet.

What could this be? Is it the mortar joints between them allowing water, which then hits the DPC and then it leaks either outward at the front, or back in to the roof(under the flashing) and causing moisture/damp underneath inside the garage? If I need to repoint between the coping stones, do I need to chisel out ALL of the mortar, or a few mill below the top, front and rear edges?
 

Attachments

  • IMG_9980.JPG
    IMG_9980.JPG
    179.5 KB · Views: 56
  • Back View.JPG
    Back View.JPG
    445.9 KB · Views: 63
OP,
You originally said that "the mortar had been chiseled out and replaced" but it now looks as though the mortar joins are possibly allowing moisture penetration.
1. It could be because of a weak mortar mix. So rake & clean all the mortar out using an angle grinder and a chisel. Then use a 3:1 mix of sand and cement to make the join.
2. Go along with your nail raking clean the channel grooves full length on both sides of the parapet.
3. The last measure would be to lift all the coping stones, and re-set them with a fresh DPC & mortar.
 
Last edited:
Okay, another potential issue. As per the photo there is a bead of sealant of some kind and it partially bridges/covers the drip channel. It doesn’t push back when pressed either. Is this going to be an issue?
 

Attachments

  • IMG_0002.jpeg
    IMG_0002.jpeg
    273.7 KB · Views: 55
Okay, it’s rained and there’s still some dampness inside. I repointed, angle grinding the old mortar off, mixed up 3:1 and applied.

Added drip channel, also put a bead of silicone as an ‘enhanced’ drip channel.

Pictures showing that the mortar joint is damp at the bottom, but not above it. As if water is getting between the joint or stones from above and then running off the damp proof membrane making the bottom of the mortar damp. Presumably doing the same at the rear (next to flat roof).

Could the rain be getting through the coping stones in anyway? Surely it can’t still be the mortar joint?
 

Attachments

  • IMG_0123.jpeg
    IMG_0123.jpeg
    460.7 KB · Views: 50
  • IMG_0126.jpeg
    IMG_0126.jpeg
    485.8 KB · Views: 35
  • IMG_0124.jpeg
    IMG_0124.jpeg
    277.4 KB · Views: 44

If you need to find a tradesperson to get your job done, please try our local search below, or if you are doing it yourself you can find suppliers local to you.

Select the supplier or trade you require, enter your location to begin your search.


Are you a trade or supplier? You can create your listing free at DIYnot Local

 
Back
Top