

Hi All
I'd appreciate some help and advice installing my Nest 3rd generation that I've bought.
So far, I have traced all wires to map out my entire existing system - I can provide this if you'd like but I'd need to make it more legible!
I have a Y-plan installation with a three way valve, an Myson Apollo boiler, Switchmaster 900 programmer, hot water thermostat, room thermostat, wiring center, pump.
I have identified where my room thermostat in the hallway terminates in the wiring center and disconnected this. I have performed a continuity test by removing the thermostat joining the wires and testing with my multi-meter to confirm I've identified the wires correctly. I intend to re-use this wire via the 12v T1 and T2 terminals in the Heat Link to provide power to my Nest thermostat.
Should I join the two terminals where the existing thermostat terminated in the wiring center?
My next step is to replace my existing Switchmaster 900 programmer with the Nest Heat Link. I presume the L and N are a straight swap.
My question is really around where I should transfer my other three wires from my existing programmer into the Heat Link.
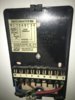
The three wires I have in my existing Swtichmaster 900 programmer are (photo attached):
1 - Heating On
2 - Water On
4 - Water Off
Can these be a straight swap into my Heat Link (Heat link diagram for Y-plan attached) for it to work correctly or is there a more fundamental rewire required?
If it is a straight swap, could you please confirm that the below would be correct:
1) Terminate old programmer L and N to Heat Link L and N.
3) Join Heat Link L to Heat Link 2 and 5.
4) Terminate old programmer wire "1 - Heating On" to Heat Link "3 - Heating call for heat".
5) Terminate old programmer wire "2 - Water On" to Heat Link "6 - Hot Water call for heat".
6) Terminate old programmer wire "4 - Water Off" to Heat Link "4 - Hot Water Satisfied (optional)".
7) Add an earth to the earth terminal.

Thany you very much for you help.
Neil
I'd appreciate some help and advice installing my Nest 3rd generation that I've bought.
So far, I have traced all wires to map out my entire existing system - I can provide this if you'd like but I'd need to make it more legible!
I have a Y-plan installation with a three way valve, an Myson Apollo boiler, Switchmaster 900 programmer, hot water thermostat, room thermostat, wiring center, pump.
I have identified where my room thermostat in the hallway terminates in the wiring center and disconnected this. I have performed a continuity test by removing the thermostat joining the wires and testing with my multi-meter to confirm I've identified the wires correctly. I intend to re-use this wire via the 12v T1 and T2 terminals in the Heat Link to provide power to my Nest thermostat.
Should I join the two terminals where the existing thermostat terminated in the wiring center?
My next step is to replace my existing Switchmaster 900 programmer with the Nest Heat Link. I presume the L and N are a straight swap.
My question is really around where I should transfer my other three wires from my existing programmer into the Heat Link.
The three wires I have in my existing Swtichmaster 900 programmer are (photo attached):
1 - Heating On
2 - Water On
4 - Water Off
Can these be a straight swap into my Heat Link (Heat link diagram for Y-plan attached) for it to work correctly or is there a more fundamental rewire required?
If it is a straight swap, could you please confirm that the below would be correct:
1) Terminate old programmer L and N to Heat Link L and N.
3) Join Heat Link L to Heat Link 2 and 5.
4) Terminate old programmer wire "1 - Heating On" to Heat Link "3 - Heating call for heat".
5) Terminate old programmer wire "2 - Water On" to Heat Link "6 - Hot Water call for heat".
6) Terminate old programmer wire "4 - Water Off" to Heat Link "4 - Hot Water Satisfied (optional)".
7) Add an earth to the earth terminal.
Thany you very much for you help.
Neil
Attachments
Last edited: