Radiator Valves, Tail Connections: Union Connection vs Compression / Oilves

Joined
8 Jan 2014
Messages
343
Reaction score
33
Location
Surrey
Country
United Kingdom
This is probably easier than tying a shoelace for those that have done it recently or those in the industry. But I've been looking at it for a few days, looked at countless technical diagrams / dimension and images of who knows how many different TRVs and Lockshields...

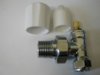
1. Do any reasonable quality and priced TRVs come with a union nut connection to the tail? Why did they change, surely union was more practical?

2. If I have to replace existing old valves and union tails with new 15mm compression tails, the total distance to the rad looks to be longer by up to 10mm each side unless the supplied rad tails can be cut off say 10mm shorter than supplied reducing overall extension.

3. I must be being really stupid, but please put me out of my misery. If I install 15mm tails with compression connections to the valve, how do you ever remove the radiator without entirely draining system and removing the rad valves as the tails on each side of the rad would extend inside the valve and lock the rad in place even after loosening the compression fitting?

Please help, many thanks.
 
Sponsored Links
Felling a little confused can you post a picture of the valve you need to replace and attached pipe please?
Old rad valves had an odd sized union but most new ones use the standard 15mm compression so the valve can be fitted upright or sideways if needed.
 
My system is 15mm drops to the bottom of the valve. That is the same no problems.

It is the tail and connection to valve that differs.

My terminology could be out but I think it is a 1/2BSP thread into the rad end and a union 3/4? fitting for the tail to radiator valve. The nut stays in place on the tail when you undo.

I see them everywhere and they are on all our radiators but almost all new valves seem to be 15mm pipe tail with compression fitting into valve. Is that any clearer? Photo below:
Thanks
 

Attachments

  • 20171013_102146.jpg
    20171013_102146.jpg
    141.9 KB · Views: 2,221
Last edited:
This photo shows it well. From https://www.stevensonplumbing.co.uk/10mm-radiator-valve.html

["Some radiator valves use a large union nut and tail, and others use a 15mm compression connection to the tail."]

10mm_Radiator_Valve_2.jpg


It is 10mm to bottom of valve in photos / link but they list a 15mm for purchase as well but photos not as good. So it seems you can get them for the non TRV valves. Seem to be very rare now?

But I'm still stuck for the TRV end. Or is there sufficient adjustability with the 15mm tail to compression fitting to make it the same overall projeciton into rad? I.e. about 50-52mm from centre of valve.

Most angle TRV with the 15mm compression connection to valve seem to list 60mm centre of supply pipe to end of thread.
 

Attachments

  • 10mm_Radiator_Valve_4.500.jpg
    10mm_Radiator_Valve_4.500.jpg
    15.3 KB · Views: 778
Last edited:
Sponsored Links
Yes, thanks. There is minimal movement, holes through laminate overfloor are cut pretty tight. Upstairs maybe doable (cut bigger hole in floorboard).

The problem is more the opposite of using extension pieces, my concern is the olive and compression fitting looks to be 10mm longer from the centreline of the valve to the end of the tail (per side) than the old union set up. Plus it all seems more of a faff at getting radiators on and off having to drain down the system if the pipes are in a rigid floor with little movement. Unless I am missing something (always possible).


So, it seems for the TRV there is just about no choice, there just isn't any supply of mainstream quality TRVs with a union set up to try to keep pipework as it is(and allow removal of radiator without draining and pulling the valves off).....
 
I have trimmed a little bit off the tail piece to allow it to enter further into the valve (and the olive to move along) before now, 10mm should be achievable, quite hard work as the tail is brass not copper so you need to secure it well in a vice or maybe in the rad while sawing.
 
You can get TRVs with 3/4" union connections, but they're expensive. (See http://www.uk-plumbing.com/acl-dray...angle-thermostatic-radiator-valve-p-1121.html)

You could try cutting the tails down to get ordinary TRVs as close a fit as possible, and perhaps just get one or two union connector ones for any difficult situations.

There is normally enough flex in the pipes to shut the valves, undo the valve to radiator connections, and wriggle the radiator off for decorating etc. This doesn't apply where the pipes come out of the walls behind the valves, or if there is very limited clearance between valve and floor.


Yes, that's kinda what I was thinking given responses so far....

Thanks for finding the valve - wow pricey considering you can pick up the 15x15 version for £20. Think I will follow your and Footprints advice. Modify the tail of conventional where I can, Maybe use a 3/4 union lockshield on the other side to limit movement required on one side. if all else fails, buy an expensive 3/4 union TRV or new rads and move pipes.....

Why did they change to this new / improved method! Seems worse and causes such a faff!

Thanks
 
I'm in the same boat. I'd like to keep ease of lifting out rads. One idea is to leave old valves and use an inline trv on the rising pipe. Would it work? TRV would be horizontal.
 
There is a picture in the Drayton TRV4 install manual I got with my TRVs that shows the TRV Horizontal, so I don't see why not. May depend on manufacturer.

Another possibility is maybe to use existing union type lockshield (replacement) on one side and a new TRV style on the other. May give you a bit more movement to play with from one side at least.

I managed to find conventional Lockshield and Wheelhead valves as Wickes. Seems they do exist but all the TRVs use the tail compression fitting despite hours of me looking. I can see it gives you a flexibility with tolerances when installing the rad and valves for the first time, but in my case it will make removing the rad for decorating / mtce potentially more difficult....

At least now I've replaced radiators (with faulty bleed screws) and all valves and drain cock, so I can actually drain system pretty quickly now.
 
Although, just thinking about practicalities. Not sure how much vert pipe run you have before rad entry? And if the TRV is very low down on the floor it may not respond to temp increases very well. The TRV4 diagram was a top entry rad.
 
Rads are quite high, 30cm to tail from floor. I've to change valve bodies to install tado smart TRV heads. I got a couple of Myson trv bodies for only £3.30 each from stevensonplumbing.co.uk, one tenth the price of the Drayton linked above, which btw has a 3/4 gb pipe connector, so ugly 15mm compression adaptor required to use it, you'd be at £40 each, and I just need the bodies. I found these Antares TRVs with union/15mm for £24 each, https://www.heatingcontrolsonline.c...ares-trv-with-34-union-connection-p-1048.html
Less expensive but still too much when I just needed the body. I wasn't too worried about squeezing them in, long pipes gave enough play. My big worry was extracting the old union tails, touch and go to get them loose without bursting the tail inside the rad. If that happens the games up for the old rads (30+ years old). The new sizes dont match, requiring extended tails on one end or cranking the rising pipe. I managed to free the tails only by alternately tightening, loosening until I cracked the seal. I figured an inline body on the riser would be a solution if I failed to non destructively remove the union tail.
 

DIYnot Local

Staff member

If you need to find a tradesperson to get your job done, please try our local search below, or if you are doing it yourself you can find suppliers local to you.

Select the supplier or trade you require, enter your location to begin your search.


Are you a trade or supplier? You can create your listing free at DIYnot Local

 
Sponsored Links
Back
Top