Re-plaster between bay windows

Joined
5 Jun 2014
Messages
6
Reaction score
0
Location
Manchester
Country
United Kingdom
I've got a bay with 3 walls/windows and want either side of the front window replastering so there is a 145 degree angle in the walls either side of it showing the separation of the 3 walls if this makes sense? This was done below the windows but needs continuing up the wall either side of the middle window. The existing plaster between the windows is curved and sits proud of the plaster under the windows. I've attached photos of the left side of the bay window showing the current position and have removed the plaster from the right pillar/window rebate to see what was underneath. Anyone know how to re-do between the bays so that the corner angle between each bay wall is approx. 145 degrees (in layman's terms please). Will the whole window rebate/angle beads need to be taken off and re-done? Plasterer's having a nervous breakdown thinking about it! :confused:
 
Sponsored Links
screenshot_26.png
 
Sponsored Links
can you stand back with the camera and take some pics of the Right side of front window and left so we can see the whole picture? up to the lintel? so keep the bottom in the frame from skirting to lintel
 
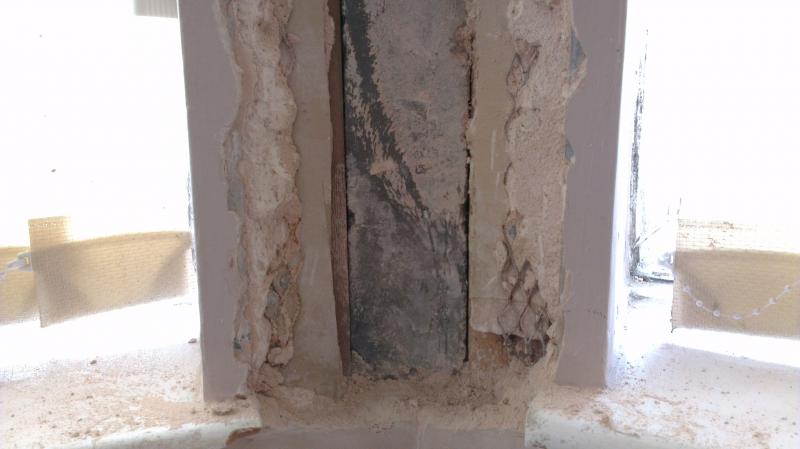
I'd take the beads off and replace them. The ones you have on are beginning to rust, so well worth doing. You can either use 2 quality galvanised ones (Expamet), or you can go for stainless steel, more expensive, but it's up to you.
If it was me going to plaster that job, i'd put the new beads on, plumb them up, but bring them forward slightly, 5, 6mm or so, just to give you a slightly thicker coat of plaster overall. Double check the measurement "across the 2 beads, making sure it hascthe same measurement across, all the way up,, vital for the central line. I would then make a pointed template of the shape out of a thin 5mm ply, plastic or similar. I'd then prep the strip of wall to be plastered. I'd put pieces of fibre tape "across" the two vertical joints, all the way up, so you're more or less covering the whole area with fibre tape, from top to bottom, "across the way", very strong, much stronger than putting a couple of strips up and down the way.
Once the template shape has been formed, hold it against the strip of wall, using the corner beads as runners, and slide it up the wall to make sure you have plenty of depth for the bonding plaster. Once your'e satisfied you have enough depth, put a small panel pin either side of the template to keep it steady. The new corner beads will act as "tracks" for the 2 panel pins to follow on the outside edge of the beads.. Give the area you prepped/tapedearlier a damp down/pva, then start building out the plaster. Once each coat has been put on, run your template carefuly up the wall each time, removing any excess as you go, and filling out any hollows. Once you have the basic shape, leave it to pick up, then fine tune it as it begins to set. Once it has set, you'll have the shape you want, then it's just a matter of putting on the finishing using a small trowel, making sure you keep the centre line looking plumb. Hard to put into words, but i'm sure you or the plasterer will know what i'm on about.
 
i dont think you will get the desired internal angle the way its sitting now as the wings from the beads and the render dont look like its going to give you the angle maybe chip the rest of the render off to the bead "if you can" witout damage and see if you can get the angle by putting a straight edge to the desired point of angle
 
That's what i think too Steve. He has enough room to bring the 2 new angle beads forward slightly towards the front of the sill, giving him extra depth for the bonding plaster, and the chance of a better shape. I'd love to do that job for him. :D
 
That's what i think too Steve. He has enough room to bring the 2 new angle beads forward slightly towards the front of the sill, giving him extra depth for the bonding plaster, and the chance of a better shape. I'd love to do that job for him. :D
yes rc shoudent be that hard i was thinking of the extra depth also, what i thought of firstly was to chip back to original beads if he dident have enough depth just a skim bead sitting on top might be good enough to get the extra depth if not then its your way take the beads right off and start over good thought about template though i was thinking of straight edge up the internal angle and float to it the straight edge could be a stop bead
 
Thanks Roughcaster and Stevethespreader, very helpful advice. I agree that the existing render on the reveal beading needs to be removed/re-done, as that wing of the existing bead on the internal wall does jut out slightly at the mo. Plasterer has done a great job on my other plain walls and ceiling downstairs, just got to see if he feels up to doing the bay!!
 
Great ideas from rc and Steve , l have also in the past dot and dabbed plasterboard on bay window pillars. I get the measurement of the pillar and allow a few inches then get the height and cut it to size.Then run your stanley down the centre on the back of the board then put it in position and push it in to the angle .Once you have done that you can put your board adhesive on the back of the board and put it in to place. You could do the cheeks of the pillar the same way and when it has all "gone off" cut off the overlap of the angles. Before you skim it you can put a "stop" bead on the corners and skim to it. I would also get a joiner to either put a new cill board on so he can run it into the angle of the pillars or cut off the "nosing "of the original one and put a new one on and run it in.
 

DIYnot Local

Staff member

If you need to find a tradesperson to get your job done, please try our local search below, or if you are doing it yourself you can find suppliers local to you.

Select the supplier or trade you require, enter your location to begin your search.


Are you a trade or supplier? You can create your listing free at DIYnot Local

 
Sponsored Links
Back
Top