Repair rotted floorboard and joist in bathroom

Joined
25 Dec 2013
Messages
186
Reaction score
1
Location
Manchester
Country
United Kingdom
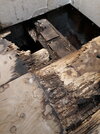
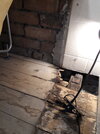
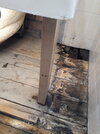
I have some floor boards in bathroom toward the end panel of the bath tub which have rotted including part of the joist. Access is restricted due to bath tub and there are pipes running directly below the main rotted floor board and perpendicular to the other adjacent floor boards which are also rotted to some degree.

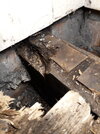
The joist is approx 3 x 7 inches and about 20mm from the top has gone all mushy and rotted toward the end where the rotted floor board sat (you can see this where the packers are left. This end of the joist also sits on the internal leaf of exterior wall.

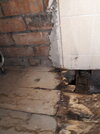
How can I repair this without removing entire bath tub. do I need to cut the floor board all the way back to the adjacent joist which would be risky as pipes are notched through it or can I get away with just replacing the section which has rotted so it will just be supported by one joist. It not like anyone can stand on it. I was thinking cutting back the two adjacent floor boards as well to a similar length, just before the pipes. (you can see where the pipes are and the adjacent joist in the pics provided marked by masking tape.

What about the rotted section of the joist. how can I secure the floor boards to that. do i notch out the rotted top part of the joist similar to how notches are cut out for pipes and screw some new timber to fill it in and then screw the repair section of the floorboards on top of that?

Any advise appreciated?
 

Attachments

  • 20230818_122448.jpg
    20230818_122448.jpg
    337.3 KB · Views: 111
  • 20230818_122521.jpg
    20230818_122521.jpg
    302.1 KB · Views: 107
  • 20230818_122602.jpg
    20230818_122602.jpg
    237.7 KB · Views: 102
  • 20230818_124343.jpg
    20230818_124343.jpg
    193.2 KB · Views: 105
  • 20230818_124527.jpg
    20230818_124527.jpg
    293.7 KB · Views: 110
  • 20230818_125647.jpg
    20230818_125647.jpg
    310.4 KB · Views: 117
Sponsored Links
You could cut out the rotted part and glue in new wood, or if its not too deep use wood hardener and filler to build the joist back up, and screw 18 mm ply either side.

Blup
 
how big is the span of the joist that is failing? how far before it is into/onto another supporting wall?
That means you can then decide how strong it needs to be. It my need a parallel joist to help take the strain.
I would just get in a structural carpenter for something that holds up part of the house. for me the diy is for bits that go in the house etc. Structural stuff I would get someone in.
any floor boards need to be cutback to an adjacent joist, so that 1/2 the width holds the floorboards, if you can do that without taking out the bath go for it, but I suspect the bath would need to come out.
 
My experience is that you can often get away with removing an entire joist, other than at the edge of a floor, and the remaining joists and floorboards will happily support the floor abd thd load on it while a repair is effected. In the event that the load on the floor is of concern an Acrow prop inserted beneath the affected area with two thicknesses of scaffolding plank (offcuts) spanning the affected joist plus both the adjacent joists is going to be man enough to hold the floor up whilst you do your ablutions (but probably unnecessary if the adjoining joists and floor are sound)

In terms of the repair itself, forget about screwing plywood facings onto the affected joist, or using glued in bits of timber - neither can or will ever put the strength back into a rotted joist.

In fact a 7 x 3in joist is pretty meaty, so the first question is how long is the joist (between support points). If it is less than 14 or 15 feet that joist is probably going to be a bit over engineered in any case, so losing 20mm (3/4in) at the top won't make too much of a difference. What I'd do, therefore, is to wire brush away and vacuum up all of the punky material to get rid of all the rotted timber. I'd then treat the base of the affected area with wood hardener which will effectively waterproof that area - don't just treat with wood hardener, the rot has to be completely removed first. Finally I'd screw a piece of something like treated 4 x 2in CLS to the side of the joist (5 × 100mm screws) to carry the new floorboards. Providing there is no major rot in the end of the other joist this should suffice. TBH I doubt that the job warrants a "structural carpenter"

Some notes on using plywood and/or glues to effect structural repairs of joists: plywood is very strong in full sheet form, but the problem when you rip down a sheet of say 18mm plywood to 150mm wide is that half of the material in that rip is short (cross) grain, which has relatively little strength and which itself is held together with glue that may be of questionable quality (especially if it is Chinese ply). In effect that 18mm thick plywood rip has very little more strength than 9mm solid timber. As to using glue on structural work I'll sound a note of caution: almost all wood glues are designed to be used on snug fitting joints and to be cramped whilst they cure to get the highest possible joint strength. Cutting into a joist to install a patch will never yield a truly flat mating surface (and where there is a gap, there is no glue joint strength, even if youbuseca "foaming" glue, aka polyurethane). In addition there will possibly be a lot of contamination from the environment (especially in an older building from the coal fired era where soot and lime plaster dust can abound in floor voids) which is goingbto reduce the joint strength. In any case there probably isn't any way to get cramps onto such a joint without punching holes through the ceiling(?) below. So any "structural carpenter" won't use auch techniques, because they cannot guarantee that they will be strong enough or that they will not subdsequently fail in service

Sorry if I have a bee in my bonnet about this, but thisvl.piece of Internalet lore is so common, and so wrong, that it warrants some push back IMHO
 
Sponsored Links
In fact a 7 x 3in joist is pretty meaty, so the first question is how long is the joist (between support points). If it is less than 14 or 15 feet that joist is probably going to be a bit over engineered in any case, so losing 20mm (3/4in) at the top won't make too much of a difference. What I'd do, therefore, is to wire brush away and vacuum up all of the punky material to get rid of all the rotted timber. I'd then treat the base of the affected area with wood hardener which will effectively waterproof that area - don't just treat with wood hardener, the rot has to be completely removed first. Finally I'd screw a piece of something like treated 4 x 2in CLS to the side of the joist (5 × 100mm screws) to carry the new floorboards. Providing there is no major rot in the end of the other joist this should suffice. TBH I doubt that the job warrants a "structural carpenter"
Do I need to cut back the floor board to the adjacent joist as that is the tricky bit due to pipes notched through it or can I get away with cutting back the rotted floor board up to the where its rotted just before where the pipes bend under it?

Also should i do the same for the adjacent two floorboards which have also rotted to some degree or would you leave them as is?
 
Ideally cut back the floor board(s) to the next joist - the main reason being that you are going to need that joist to support the end of the new board. Don't worry about cutting the board "half and half" on the joist (where you are bound to hit a nail or two) because you can fix something like a piece of 2 x 1 in softwood lath, 2 x 2 softwood, etc to the side of the last joist to carry the end of the repair boards.

Personally I'd not only cut out all the rot and also trim back, but I'd go belt and braces and treat the visible edges with wood hardener or alternatively Cuprinol wood preservative - rotted timber isn't very strong and so needs to be removed and treatment just stops any future spread should the timber get damp
 
Last edited by a moderator:
Ideally cut back the floor board(s) to the next joist - the main reason being that you are going to need that joist to support the end of the new board. Don't worry about cutting the board "half and half" on the joist (where you are bound to hit a nail or two) because you can fix something like a piece of 2 x 1 in softwood lath, 2 x 2 softwood, etc to the side of the last joist to carry the end of the repair boards.

Personally I'd not only cut out all the rot and also trim back, but I'd go belt and braces and treat the visible edges with wood hardener or alternatively Cuprinol wood preservative - rotted timber isn't very strong and so needs to be removed and treatment just stops any future spread should the timber get damp
Don't know how I can cut the board back to the next joist as there are water pipes running under that board and through the joist?

Also would you replace with tongue and groove boards (original boards are T&G) or just normal boards. If I use tongue and groove boards and screw them down I wont be able to remove them without cutting through the tongues again?
 
Don't know how I can cut the board back to the next joist as there are water pipes running under that board and through the joist?
Looking at the photos you posted it looks like you need to cut away the ends of 3 boards. You obviously need to cut no deeper than the boards where the pipes run so as to avoid the pipework, but that can be achieved using a multitool to make the cut, with one of those blades which has the cut depth marked on the face of the blade, like this:

71EHkuFABjL._AC_UF1000,1000_QL80_FMwebp_.jpg


Some multitools even have depth stops available for them (not that I have one, but they do exits)

There is a technique used with circular saws called a plunge cut or drop cut where you set the depth of the blade a millimetre or so less than the thickness of the floorboards, make the cut and then finish to full depth by scoring through the last bit with a sharp Stanley knife. However, I cannot emphasise enough that this is a dangerous technique which can injure you seriously if you experience a kickback andcyour fingers or person is in the wrong place. So if you are NOT an experienced and confident circular saw user it is best avoided. I did find a YouTube video which demonstrates the technique here:


(American, but a lot more to the point than other videos I looked at) but there are a couple of extra things to be aware if with cutting floorboards in situ - firstly a length of slate lath or the like (2 x 1in softwood) screwed tonthe floor makes an excellent straight line guide for either a multitool or a circular saw cut (and I've often wished that plumbers or spakies would realise this before they decide to butcher floors with their wonky cut lines) and there will be grit, possibly nails or even screws in those floor boards, all of which conspire to cause kick back and blunt saw blades. So just don't expect any.saw blade to last too long cutting out floors

Also would you replace with tongue and groove boards (original boards are T&G) or just normal boards. If I use tongue and groove boards and screw them down I wont be able to remove them without cutting through the tongues again?
I think I'd probably replace the whole section with a single piece of 18mm or 22mm hardwood plywood, screwed in place. If the original boards are thicker (likely) strips of thin plywoood or even hardboard could be tacked onto the tops of the joists to bring the surface of the ply level
 
Last edited by a moderator:
Ideally cut back the floor board(s) to the next joist - the main reason being that you are going to need that joist to support the end of the new board. Don't worry about cutting the board "half and half" on the joist (where you are bound to hit a nail or two) because you can fix something like a piece of 2 x 1 in softwood lath, 2 x 2 softwood, etc to the side of the last joist to carry the end of the repair boards.

Personally I'd not only cut out all the rot and also trim back, but I'd go belt and braces and treat the visible edges with wood hardener or alternatively Cuprinol wood preservative - rotted timber isn't very strong and so needs to be removed and treatment just stops any future spread should the timber get damp
I managed to cut back the floor boards by using a 3mm drill bit and drilling a series of holes in a straight line just short of the thickness of the floor boards and finish off with a saw and stanley knife.

What size screws do I use fix the 2 x 1 softwood to the side of joists?
 
4.5 or 5.0 x 50/60/70mm
Just out of curiosity what type of wood are these old floorboards made from. Is it whitewood or redwood or something else? The floorboards you get these days is no where near as durable as these old boards.
 
Without seeing them better and knowing the age of the house it is difficult to say. Possibly pitch pine, although TBH that is pretty rot resistant (and has a distinctive turpentiney smell when cut), so maybe more likely to be Candian or American yellow pine, or possibly a baltic pine. You can getmire durable siftwood these days, but you do have to specify larch or joinery grade redwood - a lot of DIY store planking seems to be Swedish whitewood (pine) which is a gawdawful to start with
 
Without seeing them better and knowing the age of the house it is difficult to say. Possibly pitch pine, although TBH that is pretty rot resistant (and has a distinctive turpentiney smell when cut), so maybe more likely to be Candian or American yellow pine, or possibly a baltic pine. You can getmire durable siftwood these days, but you do have to specify larch or joinery grade redwood - a lot of DIY store planking seems to be Swedish whitewood (pine) which is a gawdawful to start with
I've got some of that malaysian hardwood ply lying around. It's not the greatest stuff, has only 5 layers and the sheet is just about big enough to do the last 3 boards. Would this ply be adequate?

I've also removed the next 3 boards and got some 20mm redwood tongue and groove boards to replace them with. Do you have to leave a gap between tongue and groove floor boards or do you fit them tight?
 
I've got some of that malaysian hardwood ply lying around
If it is at least 18mm it should do the job, especially if you fix it down well and do the repair in one piece If needs be pack it up.on strips if thinner plywood or oven hardboard (not ideal, but OK as long as it stays dry)

I've also removed the next 3 boards and got some 20mm redwood tongue and groove boards to replace them with. Do you have to leave a gap between tongue and groove floor boards or do you fit them tight?
Take the tongue off the last one and lay them in tight and well fixed down.
 
If it is at least 18mm it should do the job, especially if you fix it down well and do the repair in one piece If needs be pack it up.on strips if thinner plywood or oven hardboard (not ideal, but OK as long as it stays dry)


Take the tongue off the last one and lay them in tight and well fixed down.
so do tongue and groove floor boards not require expansion gaps between them, The old boards all seem to have around 2mm gaps between them?
 

DIYnot Local

Staff member

If you need to find a tradesperson to get your job done, please try our local search below, or if you are doing it yourself you can find suppliers local to you.

Select the supplier or trade you require, enter your location to begin your search.


Are you a trade or supplier? You can create your listing free at DIYnot Local

 
Sponsored Links
Back
Top