Replacing leaky plastic roofing on utility room

Joined
20 Jul 2021
Messages
118
Reaction score
2
Country
United Kingdom
The plastic roofing on my parent's utility room/toilet is leaking quite a lot when it rains. My Dad replaced it once himself maybe 10 years ago, so we at least know that the wooden structure can support his weight but he's a bit too old to be climbing up there now, so I'm hoping I can do it for him. They had some quotes which were around £6,000-£8,000, which seems rather excessive but they're thinking of extending their kitchen into the utility room and out into the garden in the near future, so they really just want a cheap fix for now, as the roof will probably have to be changed again when they extend the kitchen.

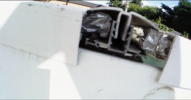
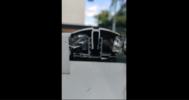
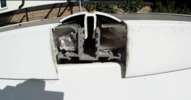
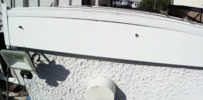
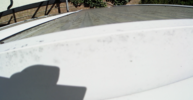
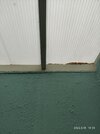
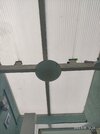
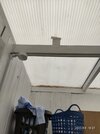
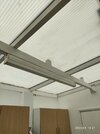
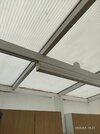
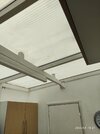
I've attached a few photos from inside, showing the wooden beams that the roofing is supported by. Could I just remove the plastic and replace it with wooden sheets if we're not bothered about the light and just want to make it watertight and warmer? I can access the toilet end from the garden via a ladder, but it's probably going to be easier to start at the other end as it adjoins the garage roof, so I can kneel on that to remove the first section of plastic and replace it with a wooden sheet that spans the width and reaches the first cross-beam, then once that's fixed in place I can kneel on that to replace the next section, etc.

Would I need to cover the wood in rubber sheeting to protect it, or would charcoaling it like this be sufficient to waterproof it?

I could also fit some sheeps wool insulation on the inside that's held up by netting attached to the wooden beams, which will keep the space warmer and also dampen the noise from the rain hitting the roof. As it's only a short-term fix, it's probably not worth covering over the insulation with plasterboard just to make it look nicer.
 

Attachments

  • Toilet inside wall.jpg
    Toilet inside wall.jpg
    262.6 KB · Views: 67
  • Toilet middle.jpg
    Toilet middle.jpg
    204.8 KB · Views: 57
  • Utilit Room Left end.jpg
    Utilit Room Left end.jpg
    183.8 KB · Views: 56
  • Utility Room - Right far corner.jpg
    Utility Room - Right far corner.jpg
    211.6 KB · Views: 62
  • Utility Room middle far side.jpg
    Utility Room middle far side.jpg
    196.7 KB · Views: 58
  • Utility Room middle near side.jpg
    Utility Room middle near side.jpg
    191.8 KB · Views: 65
Sponsored Links
Is the current roof leaking or is it condensation dripping down?

If you are after a lash-up job, then you might be able to drop the panels out replace with wood and use the current glazing bar tops to clamp the wood sheets. What thickness is the multi-wall plastic?

How far apart are the rafters, they look over 600mm apart... need to be mindful of weights or sheeting and roof covering

You'd need to protect the wood, I've no experience with the Japanese burning technique, ...maybe could use proplex (cheap short term lash!) glued to wood or rubber.

Rockwool will be cheapest insulation.
 
The plastic roofing on my parent's utility room/toilet is leaking quite a lot when it rains.
why is it leaking?

is it leaking due to the glazing capping bars failing -were the originals aluminium with rubber seals?

possibly the cheapest way to sort would be to stop the leaks

if you want to replace with something quieter and better insulating then maybe plywood with some epdm rubber over the the top
 
Is the current roof leaking or is it condensation dripping down?

If you are after a lash-up job, then you might be able to drop the panels out replace with wood and use the current glazing bar tops to clamp the wood sheets. What thickness is the multi-wall plastic?

How far apart are the rafters, they look over 600mm apart... need to be mindful of weights or sheeting and roof covering

You'd need to protect the wood, I've no experience with the Japanese burning technique, ...maybe could use proplex (cheap short term lash!) glued to wood or rubber.

Rockwool will be cheapest insulation.
It's definitely leaking. When it rains you can see it dripping onto the floor in the toilet/shower room. I think it also leaks into the main utility room space as well, but I'll check that.

I'll have to check the thickness of the plastic and the rafter spacing. The utility room area is 2.95m (L) x 2.2 (W) and the toilet/shower room is 1.2m (L), so overall the space is 4.15m (L) x 2.2 (W).

Proplex looks interesting, and it comes in sheets of 2.4m x 1.2m, so buying a few of those would be a cheap way to protect the wood. To keep the weight down, how thin do you think the wood could be without causing any problems? I was thinking of screwing L-brackets to the underside of the wood, which I can then screw into the sides of the glazing bar tops from inside, so the wood needs to be thick enough to take the screws for that, unless there's a better way to attach it.

The problem with Rockwool is the fibres can irritate the skin and lungs, so I'd have to seal it off with plasterboard and I'd need to pay someone to do that, or hire one of those machines that lifts it and holds it in place whilst I screw it in but I don't know if that would fit through the doors.
 
Sponsored Links
why is it leaking?

is it leaking due to the glazing capping bars failing -were the originals aluminium with rubber seals?

possibly the cheapest way to sort would be to stop the leaks

if you want to replace with something quieter and better insulating then maybe plywood with some epdm rubber over the the top
I don't think the glazing capping bars have been changed since the utility room was built about 35 years ago. I imagine it's leaking because the plastic has cracked somewhere since my Dad replaced it about 10 years ago.

If it's a lot easier and cheaper to fix the plastic to stop the leaks then I'll do that, but if the plastic needs to be replaced then I might as well replace it with wood and rubber, with some insulation inside to make the space a bit quieter and warmer. It's never going to be very warm, as it has a sliding door to the uninsulated garage, the bathroom window is single-glazed, and the walls aren't insulated, so when the kitchen is extended into that space we'll have to insulate the walls, although it might be better to just knock the walls down and rebuild them at that point.
 
Can you take a pic from outside? possibly the seals on the bars and/or screws covers are shot.

Are you intending to put the wood internally under the plastic sheets? or replace them?
 
Can you take a pic from outside? possibly the seals on the bars and/or screws covers are shot.

Are you intending to put the wood internally under the plastic sheets? or replace them?
Yeah, I'll take some external pictures.

I was planning to replace the plastic with wood. If I put the wood internally, the water is just going to collect on top of it, which won't be good!
 
You could use cavity batts (similar to rockwool, not as irritant) but it's cut into chunks already.
Again if you are after super cheap to tide you over, you can use anything from orange barrier mesh to chicken wire to hold it up... even seen twine zig-zag'd and stapled along rafters to hold it in.

PIR in not that nice to cut either without coughing.
 
Sorry it's taken so long to get some photos. I had to wait whilst my Dad had his solar panels installed.

I measured the distance between the rafters and it's:
95cm from the garage wall to the first rafter
95cm from the first rafter to the second rafter
95cm from the second rafter to the toilet wall
120cm from the toilet wall to the outer wall
110cm from the side walls to the central rafter running along the length of the structure.

The first 3 photos show an exposed cross-section of the fixtures holding the plastic roofing. My Dad says it's been exposed like that for a while, and I imagine that might be letting some rain in but as rain generally falls down rather than sideways and the water in the toilet area drips from around the middle of the roof, there's probably a crack in it that's letting it in. The fact that my Dad says he's patched the roof over the main area and it's no longer leaking in there also points away from this exposed section being the entry point for the rain.

I've never noticed it before, but you can see in these photos that his neighbour has built a brick extension with a rubber or felt roof that's a bit higher than my Dad's extension. I'm sure that wasn't there when he had his built, so the builders probably accessed the neighbour's garden when building it, which isn't possible now that they've built this and that will make it more difficult to seal/trim that side of the roof when I replace it.

Photo 4 shows the trim along the rear wall.

Photos 5-8 show the top of the roof from the side and rear. I'm not sure what the white discs are that you can see in the middle of the roof in photo 8.

Before I took these, I was thinking that I could just cut away the plastic roof from inside, doing it in sections so cutting out the 95cm wide area between the garage wall and the first rafter, than sliding the replacement plywood up through the gap and then fixing it to the wall and rafter with L brackets, before moving on to the next section.

Clearly it's not that simple as the fixings and trim holding the plastic roof and protecting the edges will need to be removed before cutting away the existing roof, and then I'll need some new trim to protect the edges of the plywood and seal the gap between the wood and the walls. Is there anything cheap and easy to fit that would be suitable for that?

I figured I could glue the Proplex to the plywood on the ground before fitting it, so I wouldn't need to climb on the roof to do that after, but I guess there will still be gaps between the Proplex on the adjoining boards, so I'll still need to go on the roof after I've fitted all the plywood to seal the gaps with tape or something?

I think the replacement plywood would need to be 18mm thick to make it safe for someone to walk on. Will the existing rafters be sufficient, or will I need to add some more to support the additional weight of the plywood?
 

Attachments

  • Utility Room roof outside, cross-section 2.png
    Utility Room roof outside, cross-section 2.png
    1.3 MB · Views: 38
  • Utility Room roof outside, cross-section 3.png
    Utility Room roof outside, cross-section 3.png
    584.8 KB · Views: 42
  • Utility Room roof outside, cross-section.png
    Utility Room roof outside, cross-section.png
    1.1 MB · Views: 49
  • Utility Room roof outside, rear corner trim.png
    Utility Room roof outside, rear corner trim.png
    1.5 MB · Views: 39
  • Utility Room roof outside, top from side 1.png
    Utility Room roof outside, top from side 1.png
    464.4 KB · Views: 37
  • Utility Room roof outside, top from side 2.png
    Utility Room roof outside, top from side 2.png
    1.2 MB · Views: 42
  • Utility Room roof outside, top from rear 1.png
    Utility Room roof outside, top from rear 1.png
    577.2 KB · Views: 31
  • Utility Room roof outside, top from rear 2.png
    Utility Room roof outside, top from rear 2.png
    774.3 KB · Views: 50
I'm thinking of doing a more permanent job rather than a quick fix now.

This page says that "cold roof" system, where the insulation is on the inside, is rarely used nowadays, and the preferred method is the "warm roof" system, where the insulation is on the outside, above the structural decking and under the waterproof membrane.

Would I use PIR board for this, so I'd have the 18mm OSB3 or pine layer, than the PIR board, and then the felt or EPDM attached to the PIR, or would there need to be a thin layer of OSB3 or pine on top of the PIR to attach the felt or EPDM to?
 

DIYnot Local

Staff member

If you need to find a tradesperson to get your job done, please try our local search below, or if you are doing it yourself you can find suppliers local to you.

Select the supplier or trade you require, enter your location to begin your search.


Are you a trade or supplier? You can create your listing free at DIYnot Local

 
Sponsored Links
Back
Top