Replacing tiled shower floor with shower tray

Thanks for the above.

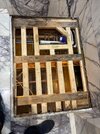
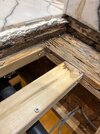
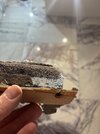
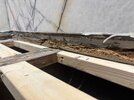
Short update. Rip out is on going not had much time to get on with it and it’s a pain to get out.

Quick question I’m planning on using 22mm no more ply, any idea which merchants stock it tried the usual local ones and no one has it on the shelf. Does everyone buy it online and get it delivered? I don’t really like ordering sheet materials like that as usually get bashed up.
 
Yes, it's usually easier delivered, there's a lot of weight in 22mm. Any reason for using 22mm, 18mm would be more than enough I would think and they are both T&G, is it just to make up the height?

As far as sheds are concerned I believe Wickes used to do it, the larger tiling warehouses should it too. Dive onto their website too as they used to have stockist listings
 
Yes to build up I want the shower sitting as it should with the tiles but the tiles are thick and they have been laid on ply on top of the chipboard so the floor height is way high compared to joist level. Same old story everywhere in this house no rip out just lay new on top of old!

What could I use under the no more ply to build he level up? Multiple no more ply is going to be very heavy!
 
OSB3 - and rather than laying full sheets, you could cut lengths the same width as the joists and then just fit them to them, using them as packers to increase the joist height.
 
Rip out took me a lot longer than hoped due to other projects. You can see the water damage and now I’m left with 65mm to get back to finished floor level.
 

Attachments

  • IMG_7455.jpeg
    IMG_7455.jpeg
    887.6 KB · Views: 15
  • IMG_7456.jpeg
    IMG_7456.jpeg
    782.9 KB · Views: 15
  • IMG_7453.jpeg
    IMG_7453.jpeg
    459.3 KB · Views: 14
  • IMG_7499.jpeg
    IMG_7499.jpeg
    523.3 KB · Views: 15
Thanks I have some uses for the offcut so wanted to get a sheet anyway and want the belt and braces approach there seems to have been a number of issues here over its life this time hopefully it’s right
 
Wow - yup, seems they created quite a few issues over time with water ingress. Do you want the tray sitting on top of the floor level or have you considered dropping the tray in so it ends up level with the floor?
 
I think has been a few showers in here under the previous owners and they seemed to have leaks in different places.

I’ve bought a mira flight low profile so that’s 40 mm. I did think shall I not build it all the way up wasn’t sure if it was an option? Anything that reduces the tile undercut would be good as I think that will be the hardest bit.
 
I set a shower tray into the floor not so long ago so with the tiles and ditra mat and EUFH then the tray is now level with the floor tile.

Looking at your joists again though, they look like I joists, If so then that wouldn't work as batons would need to be added to the side of the joists

That being said with your high floor level as it currently is, If you are going to use 22mm cementitious board then that should be fully load bearing material so you wouldn't need to add anything else which means your tray would come pretty close to the current floor level. Alternatively you could use a sheet of OSB3/WBP Ply at any given thickness to bring the level up to your desired level if needed
 
Hello thanks for all the help with this.

Boards screws and adhesive arrive tomorrow.

See picture of edge I’m left with. I’m planning on cutting back the plasterboard and chipboard back so it’s flush with the timber behind. That gives me about a 40mm recess for the shower to sit in.

Do I tank the whole lot? Wood underside of existing tiles and onto the floor?

Is the Mapei shower kit fine for this?

For the silicone down the edge is there a preferred one to use for this like OB1?
 

Attachments

  • IMG_7626.jpeg
    IMG_7626.jpeg
    610.7 KB · Views: 3
You now want to waterproof the whole section, how that's done is up to you. Yes, the Mapei kit could probably do it but it all depnds on the surface finish once you cut that floor and board back. The Mapei kit is a polymer membrane that's painted on and comes with a primer and tape but you need to be able to seal it all up so if water does get through to it then it can't get anywhere.

You may want to use something to smooth off those cut sections, like a water resistant wall filler or similar before you use the tape and membrane, so it's got something smooth, clean and relatively non porous to fix onto

A good quality sanitary silicone is all that's needed, I wouldn't use a hybrid adhesive, like CT1/OB1 as it pretty unforgiving.
 

If you need to find a tradesperson to get your job done, please try our local search below, or if you are doing it yourself you can find suppliers local to you.

Select the supplier or trade you require, enter your location to begin your search.


Are you a trade or supplier? You can create your listing free at DIYnot Local

 
Back
Top