Rotten floor joists 1st floor

Joined
19 Jan 2023
Messages
26
Reaction score
3
Country
United Kingdom
Morning all,
Long time follower and have used many threads to help with work before but a bit stuck with this one.
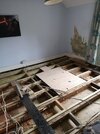
My house is 150 years old and is a mash of renovations and additions. Going to have a rewire in a few months so wanted to check all the floor joists were in good nick and repair/replace if needed. Everything was good except one room, south facing and driving rain (to be re-pointed externally) the joists have rotten/ been eaten away to the limit of the wall pocket. This house is against been regularised! The floor joists vary from 1x5,2x5,3x5 at around 300-400 centres.

Thinking cut 2/3 feet away from the pocket, sister with matching timber securing with m10 bolts, timber connectors, glue etc. This would mean 1/3 of the joist would be sistered.

Can I repair the joists as in the picture or will they all need replacing (removing all plumbing, enlarging pockets for uniformity etc).


Cheers

Elrick
 

Attachments

  • IMG_20230119_113234_resized_20230119_114855843.jpg
    IMG_20230119_113234_resized_20230119_114855843.jpg
    166.2 KB · Views: 154
Sponsored Links
Seems good to me. I did something similar at my SIL's. But used coach screws, m10 ones.
I also wrapped the ends in dpm/dpc before inserting into the brickwork, then expanding foam the gaps... you could use mortar if you'd sooner.

I was thinking, could you use 3/4" structural plywood to do the sistering, glued and bolted should be plenty strong enough.
 
Cheers Mr Chubs,
I've got a bit of 3/4 WBP lying around but not sure if if I'd have enough and pretty pricey. Thanks for the suggestion though.
Would the expanding foam/mortar be for securing the joists? I.e to stop warping? Will be adding some more noggins in anyway as have loads of old 2*4.
Thanks
 
Just for keeping the joist ends steady. once the floor goes down, they won't move, adding noggins will help too.
 
Sponsored Links
Technically the correct way to deal with this is to chop back the infected timber to a metre away from the rotted area. You will need to adequately prop the joists - this will require several appropriately sized Acrow props and four scaffolding planks (two for the floor, two for beneath the the joists - screw the upper ones to the undersides of the joists). The Acrows are installed on the lower boards and screwed onto the upper boards (to prevent them falling when you dismantle your propping), then tightened up. Propping is the way to go if you want to work safely

The appropriate, durable repair is to sister same sized joists which overlap by about a metre and have three fastenings. Coach bolts (or engineers bolts used with oversized washers) are the appropriate fasteners for this job and offer greater strength than coach screws. The plus of using coach screws over conventional bolts is that coach screws can be done up with a single socket. I've used M12s on most repair jobs (it is a size often specified in structursl drawings, too) set at 300 to 600mm centres with dog (star) washers installed in the middle between the joist and the sistering piece. Forget about the glue! Glue not only runs downwards with gravity (all over you, potentially) but it really only gives you a strong joint when used on fully machined (i.e. planed) timber, applied in clean enviroments (because dirt causes reduction of the glue joint strength) and it requires appropriate cramping to develop full strength joints - out on site, especially in older buildings with rough sawn timbers I doubtbyou could guarantee xany additional strength from using it (and I csn't recall a structural engineer ever calling for it). I'd also skip the plywood - it isn't ever going to pass muster with sn S/E or a surveyor - instead just go for same size C16 structurally graded softwood joisting. If your joist ends are going into a subteranesn or exterior wall pockets the timber needs to be pressure or vac-vac treated and the new joist ends should also be envelope wrapped with something like roofing felt (i.e wrapped so that any joints shed water downwards). C16 timber is available off the shelf at decent timber merchants and builders merchants

If you sister joists the new joist ends are obviously going to be offset from the original positions. There are at least 4 common solutions to this in existing brickwork.
(i) chop out new pockets in the masonry,
(ii) fix a new timber ledger to the wall using Rawlbolts or resin anchors and connect your new joist ends to it using steel joist hangers (a piece of DPM between the ledger and the timber is advisable if the wall is below ground llevel or on the outside of the building)
(iii) fix a new timber ledger to the existing wall but below the sistered joists which are cut short if the wall and rest atop the ledger (the same moisture precautions apply as to ii above). Truss clips or blocking between adjaceng joists should be used to prevent joist twisting ,
(iv) install a steel angle plate bolted to the wall to carry the joist ends - in jobs I have done ghis is often specified as sofething like 150 x 150 x 6mm L-section bolted in place on the wall with solid strutting the prevent joist twisting.

There's doing a job and doing a job right. Believe me, plywood, glue and screws is not a good, durable repair. BTW I'm a joiner, so myvwork has to pass muster with Building Control, structural engineers and surveyors, hence the approach
 
Last edited by a moderator:
Thanks JobAndKnock

Was going to use the local timber yard and get c24 treated timber as they still have unregulated timber (matching the size that's there).
Thanks for the advice on M12 bolts was just looking into this now and the star fasteners. In my head it's looking like this.

180mm coach bolt, square washer, 2*5 timber, dog/star, 2*5 timber, dog/star, 2*5 timber, square washer, nut.

3 bolts in the old section - 3 in the new section = six total.

I think this is what we are both thinking.

Ref the pockets, if I sister like the diagram above I'm hoping I can use the existing pockets as will hopefully line up and if not should be pretty close (I'm probs being exceptionally hopeful).

Thanks

Elrick
 
OP,
First thing is to check the level of the floor both ways for significant out of level.

1. your suggestion to cut, say, 2 or 3ft back is good. Be sure to cut all timber square and plumb.
2. sister your bolt-ons with five x two section material. the one by joist will need special attention.
3. cap the tail, that goes straight back into the existing pocket, with 300mm DPC material - dont use roofing felt for capping or as a DPC.
4. you can use lengths of 10mm threaded rod with appropriate nuts & square washers, and dog washer connectors. You cut the threaded rod to suit. Nuts & square washers on outsides, nipped up with a ratchet socket.
5. dont use foam or mortar in the pockets - if necessary, wedge with slate.

6. lay a plank on the floor across the joists - set back to give you working room.
7. screw down (with coach screws) thro the plank and flooring & into the joist you are working on.
8. this will hold the joist you are working on - the other joists will support the plank.
9. prepare the bolt-on before offering it into the pocket.
9. only one joist at a time.

After you have done the first bolt-on you will quickly see which method suits you best for doing the work.
A hired power saw & an 1/2" angle drill would help you.
 
180mm coach bolt, square washer, 2*5 timber, dog/star, 2*5 timber, dog/star, 2*5 timber, square washer, nut.

3 bolts in the old section - 3 in the new section = six total.
The main problem with doing that is that you'll probably struggle to drill the timber and get the bolts in. Assuming a 400mm (approx) centre and 50mm thick timbers your gap is around 350mm into which you need to insert 2 x 50mm timbers plus a dog washer, reducing your gap to around 300mm in which you have to accommodate an angle drill with a 200mm long auger bit (a standard 13 x 230mm auger bit with the end of the shank sawn off sawn off for extra clearance). This can be challenging, but gets more challenging after the first joist, because on subsequent joists you'll lose another 50mm from that space (more of you insert the bolts the wrong way roun). It is also a lot more time consuming to double plate and uses a lot more materials (timber), but I do accept that we normally have brickies on hand to brick infill our new pockets, plus a large breakervto form them in the first case. Hence the alternative methods we sometimes resort to. The steel angle sections tend to go in where we have very ropey masonry and/or major dry rot issues as it physically separates the joist ends from the masonry - and are they ever heavy

3. cap the tail, that goes straight back into the existing pocket, with 300mm DPC material - dont use roofing felt for capping or as a DPC.
I've had instructions to do this both ways. Some S/Es don't like us usIng Visqueen or the like as they reckon it cause the timber to sweat and promotes decay. Againstvl that felt will decay faster. At the end of the day if you are using treated timbers and end sealing the cut ends that should give you extra protection against damp ingress. I have no real opinions on either way other than how the ends are actually wrapped - if done wrong the end wrapping will funnel water into the joint instead of draining it away which promotes rot (and you wouldn't believe how many people can't wrap joist ends properly)
 
Last edited by a moderator:
The new bolt-on joist goes straight back into the existing pocket - there's no need to enlarge the pocket pocket for "2 x 50mm timbers".
Only the new bolt-on goes into the pocket not the sistered length or what you call "double plate".
Doubling up sister timbers is not necessary.
My item #9 suggests preparing the bolt-on & the sistered piece before inserting them in the pocket/floor

If the "masonry is very ropey" then whats the point of fixing angle irons to "very ropey masonry"?

When the cause of dry rot has been rectified the pockets & surrounding brickwork are flooded with fungal chemicals and, as per usual, the joist tails are lathered with fungal mayonnaise & capped with 300mm DPC material.
 
If the "masonry is very ropey" then whats the point of fixing angle irons to "very ropey masonry"?
Because, my friend, Victorian buildings often used what are referred to as "colliery brick" in some parts of the north of England for internal skins. When you deal with a lot of these you find that modern fixings such as concrete screws and Rawlbolts often either won't hold or crack the bricks when tightened, so resin anchors become necessary to get a consistent fix. If the walls of a building are full of dry rot using a steel angle plate instead of a timber ledger (in conjunction with other remedial works, e.g new gutterwork, roof repairs, repairing and repointing exterior masonry, etc stops migration of dry rot into the new joists. It is also fast and easy to install and can give you a dead level surface to install your joist ends onto. As Nige says it can also help tie masonry together. The technique is fairly common in certain types of work.

As to flooding anything with anti-fungal chemicals (quite apart from the deliterious effects run off from buildings treated with anti-fungals can have on water courses), the larger the building, the more expensive that becomes and the less likely it will be an acceptable solution to the client on either environmental or cost grounds
 
Last edited by a moderator:
xxxxxxxxxxxxxxxxxxxxxxxxxx

Civility, please.
 
Last edited by a moderator:
Just reporting back.
Many thanks for the advice. Just finished everything for the sparky to get in tomorrow.
Appreciate it might not be a professional job but the floor doesn't bow an inch or so any more!

Edit. Will be laying 18mm hardwood ply on top. Supported via noggins on the edges. (Yay more noggins :( )
 

Attachments

  • 16787119124257014627643020740942.jpg
    16787119124257014627643020740942.jpg
    304.1 KB · Views: 148
Well done, looks good. Thanks for the update.
Hopefully will last another 150 years.(y)
 

DIYnot Local

Staff member

If you need to find a tradesperson to get your job done, please try our local search below, or if you are doing it yourself you can find suppliers local to you.

Select the supplier or trade you require, enter your location to begin your search.


Are you a trade or supplier? You can create your listing free at DIYnot Local

 
Sponsored Links
Back
Top