Self levelling repair over painted floor

Joined
31 Mar 2012
Messages
56
Reaction score
3
Country
United Kingdom
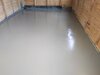
I've been trying to restore a self levelled floor which drops ~30mm from one side to another (7m), total area being around 26m2.

I wasn't too fussed about exact finish though the PU floor paint I hoped would cover up the crimes and a lot of pin holes in the levelling. But this has made it (visually) worse.

I have decided I don't want the slope any more so I am considering to put another layer over self levelling hopefully a layer across the lot, to give a final layer to paint.

The main question is - is it okay to lay self levelling on polyurethane floor paint?
 

Attachments

  • IMG_20210329_094127.jpg
    IMG_20210329_094127.jpg
    112.7 KB · Views: 183
Sponsored Links
I would have thought that you'd need some form of mechanical bond between the floor surface and the SLC, either by scanning the surface or by doing something like adding a compatible PU material and sand blinding it before applyong the SLC. What does the SLC manufacturer's web site say?
 
I've only just bought some SLC so didn't know as I am aware they can vary.

I have Mapei Ultraplan 3240 which says (https://cdnmedia.mapei.com/docs/lib...d62042dcbd08b29d0c018bc9.pdf?sfvrsn=c876810_0)...
Preparation of the Substrate
The substrate should be solid, free of dust, loose particles, paint, oil, gypsum residues or other contamination that could compromise the bond. Timber substrates should be clean and solidly fixed, open joints should be sealed with Planiprep Skimcoat. Cementitious surfaces that are not sufficiently compacted must be removed or, where possible, consolidated with Prosfas or Primer EP. Cracks in the substrate should be repaired with Eporip.The substrate should be primed with Eco Prim Grip or Eco Prim T Plus prior to the application of Ultraplan Renovation Screed 3240.For marine use apply a thin coat of MAPEI Eco Prim Marine onto the clean dry surface without leaving pools of primer an the surface. allow the primer to dry (35-40 minutes) then apply MAPEI Ultraplan Ronovation Screed 3240.

Suggests removal of paint - though all types of paint lumped in as one? Not really sure which primer would be used with a previous SLC (no idea what brand/type though).
 
I think the reason they appear to be lumped as one is that Mapei probably expect their to be some sort of mechanical bond between the SLC and the floor. If the floor is painted then it stands to reason that there is little chance of getting that mechanical bond between the floor and the SLC because you have a nice, slick layer of paint between them.

Why not talk to the Mapei technical department on Tuesday and get them to clarify the situation? On the few occasions I've needed to use them (mainly to deal with problems when resin sealing concrete screeds prior to installing solid wood flooring) I've found their advice to be excellent
 
Sponsored Links
I think the reason they appear to be lumped as one is that Mapei probably expect their to be some sort of mechanical bond between the SLC and the floor. If the floor is painted then it stands to reason that there is little chance of getting that mechanical bond between the floor and the SLC because you have a nice, slick layer of paint between them.

Why not talk to the Mapei technical department on Tuesday and get them to clarify the situation? On the few occasions I've needed to use them (mainly to deal with problems when resin sealing concrete screeds prior to installing solid wood flooring) I've found their advice to be excellent

I had started to call today then realised it was a BH.

Always welcome multiple thoughts though. Will update with what I find out.

If I knew the paint had to come off for sure, would have something to do for this BH weekend.
 
I just went and took a look at the destruction sheet. It clearly states (at least to my mind) that they consider paint to be something which could compromise the bond.
 
I've spoken to them and they suggested Eco Prim Plus (can't find any!) or Primer G (can only find 5kg and they said 1kg would do me 3-4 times over).

The PU has to be removed because "its considered a contaminant" due to not being sure if its bonded or not. This doesn't really confirm if you COULD lay on top of it (assuming it has bonded well etc).

Either way it seems its coming off.
 
You COULD lay on top of it and it MIGHT result in the bond failing at a later date. All of which means you SHOULD remove it, to be CERTAIN. In the event that you can't guarantee what the outcome will be surely it is always better to strip and recommence from a point where success is more likely than failure?
 
What I will do and what I want to know aren't always the same things.

I will remove it, I have a concrete grinder that will take it off in seconds so no farting around with sanders.
 
I finally got around to doing this, got myself a laser level, some levelling tripods and a spiked roller. Removed all the paint, took a little bit more of the high point off.

Now nice and smooth, still got about a 5-8mm drop over the 7m+ which I'm okay with so long as its consistent (the 8ft level doesn't show any gaps I can see) I'm not sure if this shrinks slightly as my pole with a mark on it (that I was lining up with the laser) seemed to be working well.

Tripods lower feet were not square at all, useless, tried to look at the from the position I set the laser against but ended up chucking them out the door soon on. Locally made, not mass manufactured or Chinese rubbish too, expected more.

Roller worked well until the material got too deep for the spikes (I didn't get the shortest but didn't get the longest). So had some pin holes around here.

The first pour was at the highest point which covered a larger area than I was expecting so found it hard to reach the back of the pour. Few more pin holes. I tried to make my own shoe spikes before when painting but attaching to the feet wasn't easy - they're a bit too much to justify buying.

Had 15 bags, mixed 2 at a time in a bin (wife did the mixing and hauling the bags, did well). The last single bag I probably should have done in the "plasterers" bucket as we probably put a bit more air into the mix than normal as it was pretty shallow (was using a spiral mixer instead of the neutral ones). A little more pin holes around this, only used half the mix though.

I had a go at filing the remaining pin holes with 2 part wood filler, but it went off so quickly I barely got a few holes done. I know it says use immediately but expected 20 minutes (though I realise now that is the set time). I went and got the single part filler.

Light sand, PU paint down, looking okay so far.

Used a roller for masonry/concrete this time - what should I really be using? Before I had used a "fluffy" roller (no idea what it was for) then moved to a foam one which gave a better coat - but had none to hand.

Thanks for the previous response(s).
 

DIYnot Local

Staff member

If you need to find a tradesperson to get your job done, please try our local search below, or if you are doing it yourself you can find suppliers local to you.

Select the supplier or trade you require, enter your location to begin your search.


Are you a trade or supplier? You can create your listing free at DIYnot Local

 
Sponsored Links
Back
Top