Setting Out

Joined
14 Jun 2011
Messages
281
Reaction score
34
Country
United Kingdom
Hi all,

just planning my setting out for my bathroom, 600 x 400 porcelain tiles for walls around shower bath and the floor, i drew these to scale. For the walls around the bath i am thinking C looks best and leaves me with the least amount of small cuts. I think the floor is good to go, the two small sections top left will be behind the toilet.

Aquapanel installed around bath, floor screwed down floorboards 9 x 2 joists 300 centres 6 mm hardibacker set on flexible adhesive (bagged) screwed every 200 mm. Room dimensions are 2.4 Mtrs x 2.5Mtrs

Just want some opinions have i got this right?


Sponsored Links
Sorry Maxsys IMO you definitely haven’t got it right :eek: 
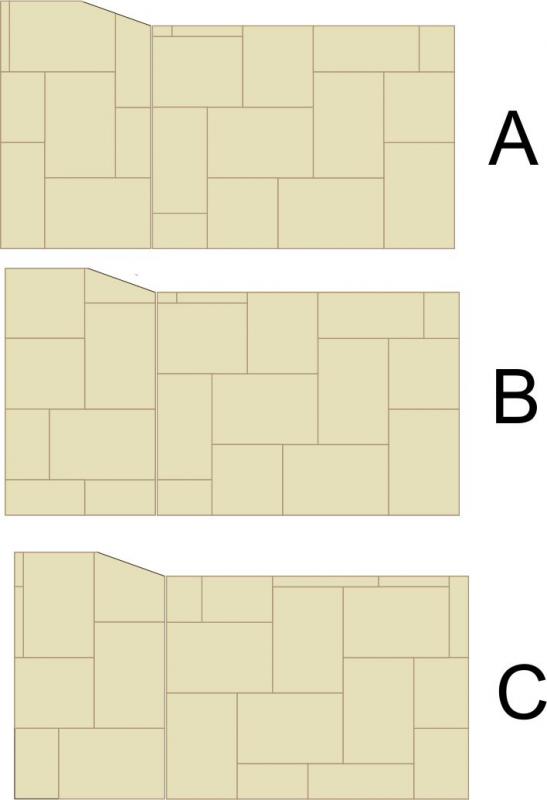
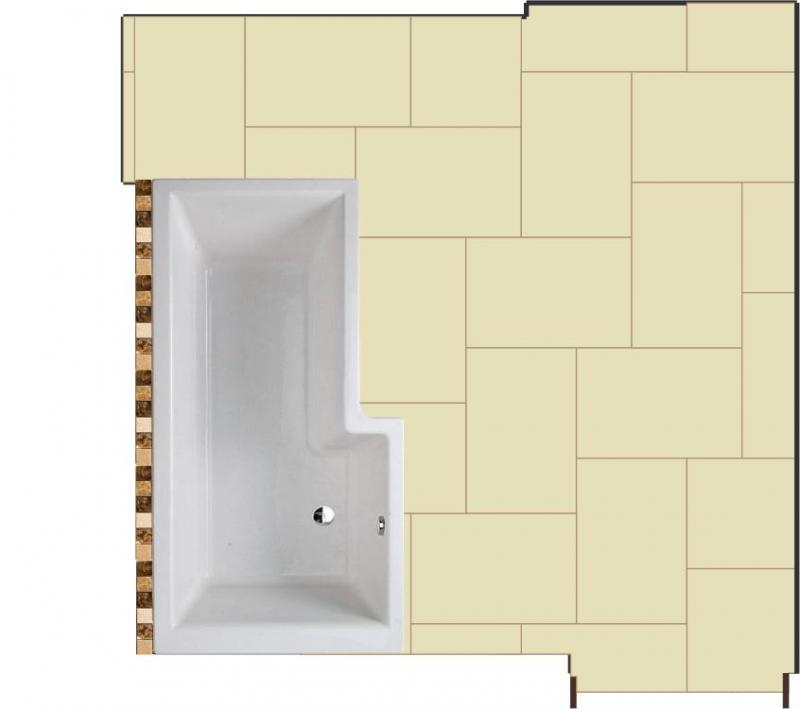
. I’ll be perfectly blunt & say I don’t like & would never tile any of the wall layouts, why have you’ve got interspaced odd size bits of tile which you may have problems cutting accurately anyway; it all looks too random & IMO any of those layouts will look a complete mess. The floor isn’t quiet so bad but, again, I wouldn’t tile in that pattern which only really works on much larger sq/m areas; try it in small areas & it all appears too random.

Wall & floor prep sounds OK; make sure you use quality trade adhesive/grout of the correct type.
 
Hi Richard,

Thanks for the response don't think i explained too well, that is two walls, the long side of the bath and the fat end of the bath, the ceiling slopes hence the angle on the left most picture, i preffered C as a layout because where the two walls join i would have the pattern still flowing around the corner if you like, in A & B i paid no regard to the fact the walls joined.

Does that make a difference or am i still wrong, like i say its just the bath area being tiled and the floor, rest of the room is painted.

Understand what you say about the layout to some degree but i put a couple of rows on the floor, and i like it, bit random myself.

Adhesive will be Granfix Rapidset flexible, grout and sealant Mapei (ultracolour plus) so i can colour match.
 
don't think i explained too well, that is two walls, the long side of the bath and the fat end of the bath, the ceiling slopes hence the angle on the left most picture
Ah well then, that makes a lot more sense; thought you’d totally lost the plot there! :LOL: ;)

The big problem I have is that I just don’t think that layout works with such large tiles on such a small area, whatever combination of the 3you use. You have thin tile slivers in all 3 somewhere which never looks good; but in combination with the “higgledy piggledy” look presented by the grout lines, sorry mate, it just don’t work. IMO it just looks totally confusing but I would invite & appreciate comments from any of the other pro tilers who contribute here.

Laying the tiles standard pattern or even brickweave will look much better IMO but with such large tiles you need to be careful & check the manufacturing tolerance; even in spec it can mean the tiles are bowed & laying them brick weave can lead to excessive lippage.

Understand what you say about the layout to some degree but i put a couple of rows on the floor, and i like it, bit random myself.
It nearly works on the floor but you need a much bigger floor area to get the best effect; but the floor “pattern” should always match the walls.

Adhesive will be Granfix Rapidset flexible, grout and sealant Mapei (ultracolour plus) so i can colour match.
You do need to be careful with grout colour; very light colours are OK on walls but will get rather grubby on floors in a very short space of time. I always advise to go with a darker contrasting colour which IMO looks much better, especially if you go for narrower grout lines; but don’t go narrower than 3mm on the suspended floor.
 
Sponsored Links
OK then, glad i have not lost the plot totally, regarding brick bond pattern i wil lay it out and see what it loks like, but i just think even that looks too "Uniform" i have checked the tiles with a straight edge, no bow that i can see, and the edge is totally straight.

Understood about the thin slithers but according to my measurements they will be about 50mm wide, so not too thin IMO and i can cut them on the Big Clinker.

Standard pattern not an option for me on this one, but i here what you are saying. Like you have said in many posts, its all about personal choice, and yes i would appreciate feedback from more pro tilers.

Understood with the grout, made that mistake before, if i go for a light colour then it will be Kerrypoxy rather than ultracolour plus, if darker to add contrast and match the darkwood i will have for the bath panel, door, frame, sink unit and wall cabinet then ultracolour plus will be the way to go.

Thanks for the input, i appreciate it.
 
So then, to quote the inimitable phrase, “I’m out” :LOL: ; I don’t think I can add any more of any value but would be interested to hear others opinion’s, if any of them are awake! ;)
 
LOL :D

Thanks again, will post pics when done, just so it can be seen in the flesh as they say.
 

DIYnot Local

Staff member

If you need to find a tradesperson to get your job done, please try our local search below, or if you are doing it yourself you can find suppliers local to you.

Select the supplier or trade you require, enter your location to begin your search.


Are you a trade or supplier? You can create your listing free at DIYnot Local

 
Back
Top