
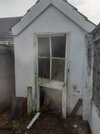
Gonna replace this old door with a 7ft x 3ft blank ply door. Should I replace the lining ? Is it easy to replace? It looks bit rotten. Howdens do soft wood lining 27mm approxand external lining 64mm approx The current linings thickness is 46mm


You are using an out of date browser. It may not display this or other websites correctly.
You should upgrade or use an alternative browser.
You should upgrade or use an alternative browser.
Should i replace this lining?
- Thread starter Keitai
- Start date
Is that picture before or after you have finished?
Andy
Andy
Jesus mate, we all have to learn some where but are you charging top dollar whist doing so?
I spend my time here. primarily to help DIYers, but I learn a lot from other people, If I can help you, I will.
I do however get the impression that you often do not know how to do the job that you have been paid/comissioned to do.
I spend my time here. primarily to help DIYers, but I learn a lot from other people, If I can help you, I will.
I do however get the impression that you often do not know how to do the job that you have been paid/comissioned to do.
D
Deleted member 174758
When you say a "blank ply door", exactly what do you mean? If you are talking about a 44mm thick FD30 ply-faced fire door, then for an exposed position you'll need to ensure that it is an exterior quality door - most FD30s are interior grade and have a chipboard core, not the laminated core of an exterior grade door (I don't think they make solid plywood doors).Gonna replace this old door with a 7ft x 3ft blank ply door. Should I replace the lining ? Is it easy to replace? It looks bit rotten. Howdens do soft wood lining 27mm approxand external lining 64mm approx The current linings thickness is 46mm
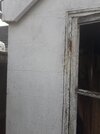
And we are back to terminology again, or the lack of understanding of the same (and yes, it IS important). Do you understand the difference between a door frame, a door casing and a door lining, and where they should be used? If you don't you'll struggle to order the right thing, other than by chance. That thing in your photos should have been a REBATED DOOR FRAME, but from the look of it it has been built-up on site from PAR softwood with planted-on strips to form the rebates (the clue is what appears to be a joint in the top RH corner together with the generally undersize look of it - a proper rebated door frame is going to be at least 38mm thick from the wall edge to the rebate). As it is such a cheap job, so that's exactly what I'd replace it, a cheap job, unless the client has specified otherwise, and always assuming that it actually needs replacement.
Yes, the paint is ropey, but is the wood actually rotten? Have you tested it? (screwdriver test). In general rot occurs most often at the bottoms of the legs, but from what little I can see there doesn't appear to be any obvious rot. But the photos aren't conclusive, and unfortunately you can't tell if it is rotten by just looking alone. It could be that all the frame actually needs is sanding off, maybe the bottoms of the legs treating with wood hardener, priming and a couple of coats of a good quality oil-based gloss paint. Can't see what the other (RH) side leg bottom is like at all, so can't comment on that. Worth a punt, though
If you do replace it, please go for at least a treated softwood rebated door frame, or better still hardwood one and exterior grade hinges
BTW, when you say the linings are 46mm thick, what do you mean?
Last edited by a moderator:
46mm from edge of blockwork to edge of lining (where door butts up to) or as you say rebates door frame.When you say a "blank ply door", exactly what do you mean? If you are talking about a 44mm thick FD30 ply-faced fire door, then for an exposed position you'll need to ensure that it is an exterior quality door - most FD30s are interior grade and have a chipboard core, not the laminated core of an exterior grade door (I don't think they make solid plywood doors).
And we are back to terminology again, or the lack of understanding of the same (and yes, it IS important). Do you understand the difference between a door frame, a door casing and a door lining, and where they should be used? If you don't you'll struggle to order the right thing, other than by chance. That thing in your photos should have been a REBATED DOOR FRAME, but from the look of it it has been built-up on site from PAR softwood with planted-on strips to form the rebates (the clue is what appears to be a joint in the top RH corner together with the generally undersize look of it - a proper rebated door frame is going to be at least 38mm thick from the wall edge to the rebate). As it is such a cheap job, so that's exactly what I'd replace it, a cheap job, unless the client has specified otherwise, and always assuming that it actually needs replacement.
View attachment 277043
Yes, the paint is ropey, but is the wood actually rotten? Have you tested it? (screwdriver test). In general rot occurs most often at the bottoms of the legs, but from what little I can see there doesn't appear to be any obvious rot. But the photos aren't conclusive, and unfortunately you can't tell if it is rotten by just looking alone. It could be that all the frame actually needs is sanding off, maybe the bottoms of the legs treating with wood hardener, priming and a couple of coats of a good quality oil-based gloss paint. Can't see what the other (RH) side leg bottom is like at all, so can't comment on that. Worth a punt, though
If you do replace it, please go for at least a treated softwood rebated door frame, or better still hardwood one and exterior grade hinges
BTW, when you say the linings are 46mm thick, what do you mean?
Hopefully it's not rotten, the screws in hinges arent loose and I can just change the door.
If I did replace I was gonna hammer something into the gap between wall and frame then slide reciprocating saw with metal blade and cut off the screws etc
It's a storage room in a brick (blockwork) shed so as long as the door works e.g swings and latch etc work that's the main thing. I doubt they'll care if the gaps arent exactly same all around or chiselling isnt spot on. They keep wood in there. Dentists surgery. He's asked a handyman not a carpenter after all!Jesus mate, we all have to learn some where but are you charging top dollar whist doing so?
I spend my time here. primarily to help DIYers, but I learn a lot from other people, If I can help you, I will.
I do however get the impression that you often do not know how to do the job that you have been paid/comissioned to do.
Hopefully I can keep the rebated door frame. I guess that would be hard to fit level.
Can't be that much harder than an interior door and I can do them if a bit rough they're functional
When you say a "blank ply door", exactly what do you mean? If you are talking about a 44mm thick FD30 ply-faced fire door, then for an exposed position you'll need to ensure that it is an exterior quality door - most FD30s are interior grade and have a chipboard core, not the laminated core of an exterior grade door (I don't think they make solid plywood doors).
And we are back to terminology again, or the lack of understanding of the same (and yes, it IS important). Do you understand the difference between a door frame, a door casing and a door lining, and where they should be used? If you don't you'll struggle to order the right thing, other than by chance. That thing in your photos should have been a REBATED DOOR FRAME, but from the look of it it has been built-up on site from PAR softwood with planted-on strips to form the rebates (the clue is what appears to be a joint in the top RH corner together with the generally undersize look of it - a proper rebated door frame is going to be at least 38mm thick from the wall edge to the rebate). As it is such a cheap job, so that's exactly what I'd replace it, a cheap job, unless the client has specified otherwise, and always assuming that it actually needs replacement.
View attachment 277043
Yes, the paint is ropey, but is the wood actually rotten? Have you tested it? (screwdriver test). In general rot occurs most often at the bottoms of the legs, but from what little I can see there doesn't appear to be any obvious rot. But the photos aren't conclusive, and unfortunately you can't tell if it is rotten by just looking alone. It could be that all the frame actually needs is sanding off, maybe the bottoms of the legs treating with wood hardener, priming and a couple of coats of a good quality oil-based gloss paint. Can't see what the other (RH) side leg bottom is like at all, so can't comment on that. Worth a punt, though
If you do replace it, please go for at least a treated softwood rebated door frame, or better still hardwood one and exterior grade hinges
BTW, when you say the linings are 46mm thick, what do you mean?
I practised transferring mortise lock onto keep on this job. Drawing latch and lock on door over to door frame. Got centre mark using set square running down door stop used as fence and marked with a pencil. Then drilled out with a forstner bit.
Looking at an old image you posted months ago I didnt understand why you had two vertical lines very near each other (pointed to them with red arrows).
Last edited:
D
Deleted member 174758
The two pairs of lines? The outer ones delineate the outside of the keep plate which should get recessed flush by 2 or 3mm, the innner lines ones mark the outside edges of the mortises you need to accommodate the lock latch/mortise. On better quality keeps there is generally either a black plastic insert piece which sits behind theckeep face plate, or there is a box (sometimes two boxes) formed in steel which are welded or rivetted to the rear side of the keep plate. These are often only a few millimetres from the edge of the keep face plate, but youvstill need to ensure there is some support under the edges of the keep. On simpler keeps, like the one you installed, they aren't provided
Your installation looks a lot neater at fitst glance. You could do with improving the lock plate recesses, though, the edges are still a bit wonky. What are you using to chop out?
Your installation looks a lot neater at fitst glance. You could do with improving the lock plate recesses, though, the edges are still a bit wonky. What are you using to chop out?
Last edited by a moderator:
The two pairs of lines? The outer ones delineate the outside of the keep plate which should get recessed flush by 2 or 3mm, the innner lines ones mark the outside edges of the mortises you need to accommodate the lock latch/mortise. On better quality keeps there is generally either a black plastic insert piece which sits behind theckeep face plate, or there is a box (sometimes two boxes) formed in steel which are welded or rivetted to the rear side of the keep plate. These are often only a few millimetres from the edge of the keep face plate, but youvstill need to ensure there is some support under the edges of the keep. On simpler keeps, like the one you installed, they aren't provided
Your installation looks a lot neater at fitst glance. You could do with improving the lock plate recesses, though, the edges are still a bit wonky. What are you using to chop out?
Spade bits for locks and forstner for keep. Palm router, chisels. It's a rough job on an outside shed so I wanted to practice marking out the keep using combination square. I used illustrations you posted a few months ago. Tried to get centre of door frame for keep running combination square along door stop as fence bebore drilling out with forstner bit. You wrote this shouldn't be done with marking gauge.
Then also using combination square to run lines across from lock so keep lined up with mortise lock.
D
Deleted member 174758
OK, longer term you'll find auger bits a better proposition than spade bits - less likely to wander off course, easier to control. If you don't have wider chisels, you need a couple just for doing jobs like lock fave plate recesses, keep recesses, etc - I almost always have a 38mm (1-1/2in) and a 50mm (2in) reserved for that task and kept razor sharp.Spade bits for locks and forstner for keep. Palm router, chisels.
Yes, because the end of the arm tends to bump into the rebate wall.You wrote this shouldn't be done with marking gauge.
Dare I say it, I think you are improving. Good. Oh look, an Andy, sorry squirrel
internal doors have "liners" because they line the ends of the walls
external doors have frames -usually fixed rebated frames, not plant on stops
Job and Knock refers to a casing, which is not a term I personally hear in the trade, but maybe in other areas -I think I hear it more on American videos TBH
external doors have frames -usually fixed rebated frames, not plant on stops
Job and Knock refers to a casing, which is not a term I personally hear in the trade, but maybe in other areas -I think I hear it more on American videos TBH
D
Deleted member 174758
I rarely watch American videos. They tend to put my teeth on edge!Job and Knock refers to a casing, which is not a term I personally hear in the trade, but maybe in other areas -I think I hear it more on American videos TBH
However, terminology may depend on where you were trained and when. Linings and casings are not the same things to me, and I have seen that differentiation in older text books, too - casings were always rebated, and if you go back pre-WWII that's pretty much all that got installed, whereas in the straightened times of the thirties and during and after WWII using a lining with an attached stop lath (or slamming strip in Birmingham-parlance) became a lot more common, probably because it was cheaper, faster, used less materials and required less skill both to make and to install. If you think about it in an extra deep opening in something like a 1m thick stone wall it is not uncommon to install a door frame and a lining, a door casing and a lining or even just a lining to make up the depth (or on fancier jobs a panelled lining). But as I said, it may be down to region or age (and bear in mind that my sponsor/mentor had served his time before doing service in WWI). Not meant as a justification, but simply saying what I was taught
I've also been told that ledger is an Americanism, but it's certainly used by a lot of S/Es these days (or at least the ones from Arup who I keep having to work with/for) and again I have come across the term in textbooks published in the 1950s and 60s. To my mind it is a far more accurate term to use than wall plate
I have a feeling casings are mentioned in Joyce, I must go and dig it out and have a look.Linings and casings are not the same things to me, and I have seen that differentiation in older text books, too - casings were always rebated
I know what you mean.I rarely watch American videos. They tend to put my teeth on edge
And their lack of safety in wood machining is shocking
D
Deleted member 174758
I think they'd shock even one of my wood machining mentors from my early days - and he was missing several finger ends (a little argument with a French cutter - I used to love them because you could grind a cutter up and run 20ft of moulding really quickly and cheaply, but they were notorous for removing finger tips and spitting knots, etc back in your face)I know what you mean.
And their lack of safety in wood machining is shocking
DIYnot Local
Staff member
If you need to find a tradesperson to get your job done, please try our local search below, or if you are doing it yourself you can find suppliers local to you.
Select the supplier or trade you require, enter your location to begin your search.
Please select a service and enter a location to continue...
Are you a trade or supplier? You can create your listing free at DIYnot Local
Similar threads
- Replies
- 33
- Views
- 21K