Small window ledge

Joined
3 Sep 2015
Messages
315
Reaction score
5
Country
United Kingdom
Hey guys,
In our utility area there are two windows which need window ledges. I have the wood (bull nose hardwood). I have done one but it didn't go brilliantly. So..
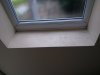
1.Existing one
How can I attach it? Grip fill? I had expected it to sit nicely and not need attaching. The ones my dad has done at home don't!

Could I/should I go round the edges with something, clear silicone I was thinking.
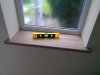
2. New one
What process would you suggest to get the best outcome?

I put thick lining paper down to make a template, transposed this on to the wood and cut. When this was too large, but not large enough to cut, I used a chisel to make it fit..
 

Attachments

  • IMG_20170724_194014.jpg
    IMG_20170724_194014.jpg
    104.9 KB · Views: 108
  • IMG_20170724_193950.jpg
    IMG_20170724_193950.jpg
    131.2 KB · Views: 108
  • IMG_20170724_194003.jpg
    IMG_20170724_194003.jpg
    84 KB · Views: 125
Sponsored Links
dosnt look to bad for DIY, I would pack out underneath the sill, with a few bits of ply to make level, and use grip fill.
silicon bead (coloured) around edge including the chip on the edge. :(
 
Cheers. I guess I'm comparing myself to my dad's handy work, also diy, but mm perfect :)

Yep, the chip is a shame, for sure. This first attempt is in a downstairs toilet that's seldom used. The next one will be visible all the time!

Any tips for a fresh install?? How do you accurately measure and transpose when touching basically have a dodgy window, where it's not level anywhere?! That's the crux of it really.

Also, I guess my chisel technique could do with some work! Perhaps some scoring with a knife first.
 
I've seen a damn site worse than that done by, so called, professionals. I would think you would have a hard time matching the wood colour with filler. When I did mine, and my gaps were much worse than yours, I strip cut wood from edge of the wood I had left which, luckily, were just long enough and edged the gaps out that way. It's a bit of a faff getting the angles right to cut into the corners when you don't have straight reveal walls but mine worked or at least they look a damn site better than they did. I cut my strips to a couple of millimeters on a half decent table saw with a zero clearance insert.
 
Sponsored Links
Thanks. So you guys can't think of a more accurate way to profile this than the lining paper technique?

Using a tape measure means I can't get the same angles. Short of using a flexi curve from an old drawing kit, not sure what else I can use!
 
in this house. the windowboards appear to have been fitted before plastering. They are very hard to get out, but leave recesses in the plaster at the side.

I have replaced a few. Wrapping the board in clingfilm before tidying and painting the plaster means they slide in and out (until you put in a couple of retaining screws)
 
because the walls are unlikely to be level and parallel your choices are
to fit as best you can and fill the gaps
or remove plaster about 3-5mm deeper all round for the window board to slot into and fill this gap
also worth spending time to shape the exposed ends to match the front edge just to finish it off
 
Last edited:
Thanks for the reply. Yes, I certainly was going to finish the edges to match the bullnose, quite looking forward to that bit- not too tricky!

Hmm, I fear messing with the plaster could have dire consequences, I don't feel the extension was done to the highest standard :/
 
How about running a bit of quadrant bead around the edge, fill the gap first with silicon, then fix the bead , this would also hide the chip. the bead could be painted the same as the wall. would not look out of place.
Hows your mitering skills.
 
That's not a bad shout actually bosswhite - I happen to have some quite small hardwood quadrant in the shed. I'll offer a piece up and see how it looks.

My mitering skills aren't too bad, but I suppose that's given a nice right angle, with the sort of crap I have in this house they're more 'challenging'!
 
Fitted mine with foam adhesive as it allows packing to level , gripfill tends to be compromised by dust and can fail on plaster/painted surfaces.
 
Foam adhesive? Like the expanding foam stuff? Think I'm a bit lost!
 
I use expanding foam usually. The front edge is mostly onto level plaster, and the foam brings up the back.

Either foam it , wait 5 minutes and attach the board and apply weight to the back to get it flat, or if that fails pull the board up, and re-seat it carefully.

Can be a pain getting it level left to right, and front to back!
 
Ok here's what I'd do

1- use silicone to stick it down with, it also helps in levelling
2- if you want to reduce that gap use a sliding bevel, never assume it's 90°, they seldom are
3- your walls are painted so use masking tape along the window ledge in a few mm from your cut and around the horn then use decorators caulk, run your finger over it and peel the tape away
 

DIYnot Local

Staff member

If you need to find a tradesperson to get your job done, please try our local search below, or if you are doing it yourself you can find suppliers local to you.

Select the supplier or trade you require, enter your location to begin your search.


Are you a trade or supplier? You can create your listing free at DIYnot Local

 
Sponsored Links
Back
Top