1. Much more likely to be the inlet valve. Particularly since the water is reaching the overflow level.
2. Do not attempt to fix it without isolating the water supply, except as at 5. below
3. If the brass tap in your photograph is connected to the inlet valve, i.e. directly connected to or connected via a short length of pipe or flexi hose to the threaded shank of the inlet valve which protrudes below the cistern, then that is the isolation valve. Shut it off, flush the WC and see if it refills. If it doesn't, then that is the valve. However, it is unusual to have that type of valve on a WC.
4. If looking at the tee handle of the tap end on, it would be clockwise to close and ant-clockwise to open the valve.
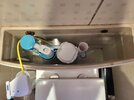
5. As a first step I would adjust the water level by turning the cross head in the white plastic screw which adjusts the height of the float. Left of the picture, blue green circular cap with a white strip at about 4 o'clock. White strip has an oval cut out. Adjustment screw roughly in centre of cut out. Can't tell you which way to turn it as some are right hand thread, others left hand. What you want is for the float (oval blue green plastic inside outer blue green plastic) to go further down. In that way it won't rise as far as water enters before operating the valve mechanism under the round blue / green cap. You don't need to turn the water off to do this, but you might feel more comfortable with it off.
6. As a second step:
6.1. Turn the water to the cistern off.
6.2 Under the round blue / green cover there will be a rubber diaphragm washer. These go hard over time and cease to work properly. You can almost certainly replace it, but would need to know the make and model of the inlet valve to obtain a replacement, and hopefully to find out how to remove the cover.
7. If the problem persists, replace the whole inlet valve:
7.1. Turn the water to the cistern off, flush the WC and sponge out any remaining water form the cistern.
7.2 Remove the cistern from the bowl:
7.2a Remove the screws securing the cistern to the wall. They look rusty and may break. If so, try and leave at least 6mm of the top of the screw sticking out of the wall and remove later with grips.
7.2b Remove the screw securing the cistern to the bowl. These are white plastic screws with rubber washers. One is visible just about under the overflow pipe. To get at the other you may need to remove the outlet valve. These are usually on a bayonet type fitting. Turn about 1/8 turn anti-clockwise (looking down) and lift out.
7.2c Undo the tap connector attaching the pipework to the threaded shank of the inlet valve.
7.2d Lift the cistern off the bowl. There will be a large rubber "doughnut" washer between cistern and bowl.
7.3. You will need to source
7.3a A new doughnut washer
7.3b A new inlet valve. Go for one with a brass threaded shank as there is less chance of cross threading the tap connector nut on reassembly. My preference is the Fluidmaster Pro, but check first that it will fit. If not, try the Viva Skylo 1/2" (normal UK size) brass threaded one.
7.3c I would recommend replacing the cistern to bowl screws (7.2b above) with stainless steel ones..
7.3d I would also advise replacing the screws attaching the cistern to the wall with equivalent sized brass ones, and fitting rubber washers (1/2" tap washers are ideal) between the screws and the cistern inner.
7.3e A couple of 1/2" fibre tap connector washers. (They often come in 5 or 10 packs. A decent plumbers merchant will sell you one, or probably give it to you if you buy the rest of the bits from them).
7.4 Remove the old inlet valve by undoing the (usually) white plastic nut under the cistern.
7.5 Fit the new inlet valve loosely. It will probably come with a cone shaped rubber washer. This goes inside the cistern, with the small side of the cone going into the hole in the cistern. Screw the white plastic nut onto the threaded shank of the cistern, but don't tighten it.
7.6 Fit the new doughnut washer, put the cistern back in place and fit the new cistern to bowl securing screws. Tighten these screws a little at a time and evenly, so that the cistern remains level. They should be pretty tight when complete, so that the rubber washers are slightly compressed and watertight.
7.7 Screw the cistern to the wall, but leave slightly loose.
7.8 Make sure any remains of the old tap connector fibre washer are remove from the tap connector, and screw the tap connector loosely onto the threaded shank. At least 3 or 4 turns on.
7.9 Do up the white nut securing the threaded shank to the cistern fairly firmly.
7.10 Tighten the screws securing the cistern to the wall. They should be tight enough to prevent movement between wall and cistern, but not overly tight.
7.11 Tighten the tap connector nut onto the the threaded shank finger tight, then tighten the securing nut (7.9) firmly, making sure the inlet valve does not twist within the cistern and finally secure the tap connector nut. Firm finger tight plus half a turn should do it.
7.12 If removed, replace the flush valve.
7.13 Turn the water on and let the cistern fill. It should stop filling when the water level reaches a height mark on the cistern back. This should leave it about 20 to 25 mm below the overflow pipe.