Towel rail leaking

Joined
20 Oct 2021
Messages
98
Reaction score
2
Country
United Kingdom
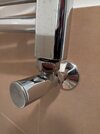
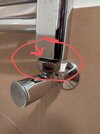
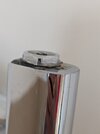
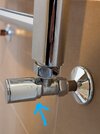
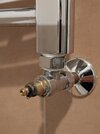
I have found that my towel rail is leaking, not from the valve but from the nut where its attached to the rail. Picture attached. If i unscrew apply PTFE and screw back will that work? Will there be a lot of water? Not keen on draining the whole house down.

Thanks!
 

Attachments

  • PXL_20250304_225159911.jpg
    PXL_20250304_225159911.jpg
    126.3 KB · Views: 68
  • PXL_20250304_225159790~2.jpg
    PXL_20250304_225159790~2.jpg
    139.8 KB · Views: 73
If it is coming from the tail, then it’ll need ptfe or equivalent/better. No need to drain the whole house as it’s after the valve, so shut off both valves, bleed rad until water stops and then you can carry on. However water will continue to drip profusely until you get the tail back in and connected. The only other way would be to plug it with a blanking plug or drain and remove the rad, refit and vent.
 
Is the leak from above the nut ( where the tail is threaded into the radiator), and misleading you ?
If the leak is indeed where you think it is ,try tightening the nut a tad.
 
Is the leak from above the nut ( where the tail is threaded into the radiator), and misleading you ?
If the leak is indeed where you think it is ,try tightening the nut a tad.
Yes it's exactly from there. Thanks will try this first.
 
I tightened that, and then found that there is a leak at the top of the rail as well. See picture, any suggestions for the top? Thanks
 

Attachments

  • PXL_20250306_102217801.PORTRAIT.jpg
    PXL_20250306_102217801.PORTRAIT.jpg
    128.1 KB · Views: 54
The one at the top probably (the bleed screw unit) needs a new rubber O-ring. Again, turn off both valves feeding the towel rail, drain enough water out to get it below the top leak, then unscrew the unit, put on a new O-ring and screw it back in.
 
Thanks all for your help. I have a very basic question. How do I turn off both valves. The one on the right is easy as its the actual valve. The one on the left had a blank which i removed. There I can see a flat screw head. When i tried to tighten this clockwise it just pushed right in and water started coming out. When i go anti clockwise it pulls back and on doing so fully water starts leaking. So i had to stop mid way which prevents a leak. How do I close off this left side before going about changing the o ring on the bleed unit? Pictures attached. Thanks.
 

Attachments

  • PXL_20250308_224826131.jpg
    PXL_20250308_224826131.jpg
    185.7 KB · Views: 62
There I can see a flat screw head. When i tried to tighten this clockwise it just pushed right in and water started coming out.
What do you mean by " it just PUSHED right in" ?
Does it rotate and screw down ,or just push down ?
If it does actually screw down fully ,is it just a dripping or a constant stream of water that comes out ?
 
It screws down, so may be it was just a drip and I should keep going? It felt like it was getting looser rather than getting tighter. This is while rotating clockwise. When I go anti clockwise it tightens.
 
Screw it fully down clockwise, if all you get is a few drips place something below to collect them.
Then use the air bleed valve to release pressure ,a little water should come out and then stop. If it doesn't stop, one of the valves isn't fully closing
 
To update, I managed to change the bleed valve successfully and it's not leaking anymore. However, now I found that the bottom right still has a tiny leak. Picture attached. I am guessing the valve needs replacing. Could you guide me on replacing / tightening this. Thanks
 

Attachments

  • PXL_20250312_072039043.PORTRAIT~2.jpg
    PXL_20250312_072039043.PORTRAIT~2.jpg
    193.1 KB · Views: 50
Unscrew the chrome disc on the end of the valve ,then pull off the chrome handle and show us another picture.
 
Please see attached. Also, I put that ptfe there it wasn't there earlier.
 

Attachments

  • PXL_20250312_200319342.PORTRAIT.jpg
    PXL_20250312_200319342.PORTRAIT.jpg
    179.9 KB · Views: 49

If you need to find a tradesperson to get your job done, please try our local search below, or if you are doing it yourself you can find suppliers local to you.

Select the supplier or trade you require, enter your location to begin your search.


Are you a trade or supplier? You can create your listing free at DIYnot Local

 
Back
Top