Upstairs bedroom, radiator replacement

Joined
26 May 2016
Messages
5
Reaction score
0
Country
United Kingdom
Hi,

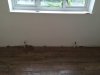
As part of my home renovation project, I have moved onto the second bedroom in the house, all the old woodchip has been stripped, I've re-plastered the walls and ceiling, and am now at the stage where I am ready to replace the radiator.

In terms of the radiator, so far I have done the following:
  • Isolated the lockshield valve and old thermostatic valve on the pipes
  • Drained the old radiator and removed it from the wall along with the old brackets
  • Applied blanking nuts to the valves to ensure no leaks while I worked on the rest of the room.
  • Re-skimmed the wall behind the radiator
  • Base coated the walls (ceiling tomorrow)

I plan on measuring out the first length of the flooring to be at the radiator wall, so want to be able to line the flooring up to the pipework and drill through the laminate for the pipework to slot through for a neat finish.

Once the first length of flooring is down, my intention is to add the new valves, close them, and apply the blanking nuts while I finish off the flooring and apply the skirting. Once both the floor and skirting is applied, I will then finish the work on the radiator.

Am I correct in thinking, that as the radiator is above the level of the combi boiler (it's situated downstairs in the utility room), that It would be safe for me to do the following:
  • Turn off the main stopcock
  • Lower the pressure in the boiler to 0
  • Switch the boiler off at the mains.
Will this be enough to then work on the pipes without having water go everywhere? I don't plan on cutting or moving any of the pipework, just replacing the old valves and installing the new radiator.

There is one slight issue, the old radiator was 1260mm and the new radiator is 1200mm, so was planning on using a pair of radiator valve extensions to accommodate the difference in size.

Have I missed anything?

Any advice is appreciated.
 
Sponsored Links
Do you have a drain cock at low level on the radiator pipework? It would be best to use this to drain water from the system until it is below the level of the radiator valves that you want to remove.
It's likely that other radiators on that floor will contain water so you need to open the highest air vent and release the vacuum. You don't need to drain completely, just until water stops coming out of the valves at the removed rad location - remove the caps and open one of the valves with a rubble sack (with no holes) around it to catch any water. When refilling you'll need to add some inhibitor back into the system. There are other ways but it depends on your level of confidence!
 
I prefer these extensions - you can cut them to exact size and I think they look better than the chunky barrel type!

image.jpeg
 
Thanks for the replies, so I am not completely off my tree then.

The boiler, is a reasonably new (2 years) Vaillant - we had the system changed when we moved in - and can be drained from downstais to the outside - there is an overflow to dump the water.

I like the look of those extensions too, I believe my local screwfix has them.

I'm reasonably confident about doing the work - providing I don't need to move the pipework - just don't want to be flooded. ;)

Thanks for the help, and I'll be sure to pick up some inhibitor - how much is needed in this instance? a litre/500ml?
 
Sponsored Links
Close off the rads above or on the same level as the rad you are replacing, saves losing all that water (and inhibitor), you may have a little water from the rising tails and pipework from the other rads so just be prepared to catch that.
Amount of inhibitor depends on its concentration and what was in the system previously. Check the container and it will explain what capacity of system the amount is suitable for.
 
When you say the boiler has an overflow to outside, you're not talking about the discharge pipe are you? Don't use the PRV on the boiler to release pressure from the system - once activated, they can fail and will not hold pressure in the system any more and then the PRV will need replacing!
 
So, I went to my local screwfix today and picked up a set of these after talking to the chap in store:
http://www.screwfix.com/p/radiator-union-valve-tail-pack-of-2/78169

I thought great, means its all one unit, and I don't have anything else to buy.

I explained to him that I had already purchased their Kudox radiator, along with the following valves:
http://www.screwfix.com/p/drayton-rt212-white-chrome-trv-15mm-angled-l-s/53581?_requestid=237583

He assured me that the union valve would do the trick to bridge the gap between where the valves and the rad will sit. I took his word for it - figured that the chap in store would know the products they sell reasonably well.

Got home to start lining up and measure out where to hang the radiator to be inline with the pipes etc.

Unpacked the valves - to check the fittings etc - problem.

The union valves do not fit. And by the looks of them, they are designed to bridge the gap if I wanted to keep the old valves - which I can of course do - I still have the valves attached to the pipes, though it wasn't what I intended to do. Frustrating.

I did call screwfix to ask them about an alternative product - they weren't particularly helpful over the phone.

However, I figure if I can swap the tail valves purchased for these:
http://www.screwfix.com/p/radiator-compression-valve-tail-15mm-pack-of-2/10954

Then I presume, these would do the job in closing the connection on the tail valve into the rad itself:
http://www.screwfix.com/p/compression-fittings-cap-nut-15mm/60219

Oh, and in terms of draining off the valve, no I am not going to be going anywhere near the PRV, instead, in my hallway I have the a drain off valve which I am going to use - there's more space out there to catch the water, and it seems simpler to me than messing around with the boiler.

In other news, the ceiling is now painted, and skirting board lengths are nearly all cut - just have to splice two pieces together for the longest wall and scribe the joins.
 
So after swapping out the union valves with the tail valves in my earlier post, I bit the bullet and partially drained the system (switching all the thermostats and lock shield off to retain the water in the rads).

Draining was simple enough from the hallway. And with a little effort I removed he old imperial valves, olives and nuts so that I could measure out my flooring and slot the new laminate over the pipes.

Spent most of yesterday in the room from painting to pipes to floor and I'm pretty pleased with the results.

I've not yet got he rad on he wall, still got a bit more floor to put down as well as the new skirting.

Switched the system back on. No leaks = success.

Thanks for the help, appreciated!
 

Attachments

  • image.jpeg
    image.jpeg
    85.1 KB · Views: 258
Feel proud my son & carry it like a totem! The emancipation of the male sex has made us weak and vulnerable - if the lights were to go out once and for all, how many would survive? :eek::LOL:
 

DIYnot Local

Staff member

If you need to find a tradesperson to get your job done, please try our local search below, or if you are doing it yourself you can find suppliers local to you.

Select the supplier or trade you require, enter your location to begin your search.


Are you a trade or supplier? You can create your listing free at DIYnot Local

 
Sponsored Links
Back
Top