UPVC window gasket replacement possible?

Joined
26 Jan 2021
Messages
5
Reaction score
0
Country
United Kingdom
Hi All,

I have just bought a house with upvc windows which I believe are fairly old. In the long term I want to replace them but for now I would just like to give them some TLC.
I am intending to replace seals around the opening windows and seal around the frames.
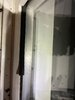
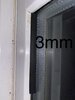
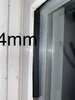
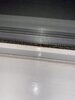
The seal between the double glazed unit and actual upvc frame has seen better days however. Can I replace this by prying the old stuff out, getting a seal of the same profile and pushing the new seals back in? Pictures attached for reference.

Thanks

Dan
 

Attachments

  • D256BFFD-2638-445F-98F0-571EF7F51E03.jpeg
    D256BFFD-2638-445F-98F0-571EF7F51E03.jpeg
    199.3 KB · Views: 389
  • 27DE5CD9-A8CA-439F-89B2-0C98A452CB0B.jpeg
    27DE5CD9-A8CA-439F-89B2-0C98A452CB0B.jpeg
    223.5 KB · Views: 385
  • 7EB00F60-A10B-45AA-9FF7-58AD121AFB61.jpeg
    7EB00F60-A10B-45AA-9FF7-58AD121AFB61.jpeg
    166 KB · Views: 374
Sponsored Links
Hi and congrats on your new home :)

As a first step, have you tried cleaning the rubber seals? Looking at them, I reckon they would clean up fine and the requirement to try and replace them would be avoided. I would definitely try that first and if they still look pants, then think about replacement options.
 
Thanks for the advice diy_fun_uk. Unfortunately they are past the point of needing a food clean. They have actually rotted and recessed past the edge of the upvc in places.
Thanks

Dan
 
Sponsored Links
Thanks again Diy_fun_uk, I shall dig out sections of wedge gaskets from most of my windows as they are all fairly well perished.

Are the tools on that website necessary, the roller in particular?

Thanks again for your help!
 
Thanks again Diy_fun_uk, I shall dig out sections of wedge gaskets from most of my windows as they are all fairly well perished.

Are the tools on that website necessary, the roller in particular?

Thanks again for your help!
Tbh I just picked that site as an example so you can see the type of gasket required. Those tools aren't necessary. If you have a good pair of scissors for cutting the ends you should be fine. The new gasket should push in without much problem. This is where it's important to get the correct size. I notice that site does a sample pack, might be worth buying that first (from any site that offers it) to ensure you're buying the correct sized gasket. Even with the correct sized gasket, if you're struggling to get it pushed in, a very small amount of slightly warm soapy water will help!

And don't cut the sections too short as the stuff can shrink a bit over time. Be careful you don't stretch the new gasket out when measuring/fitting as it'll be too short when it settles.

How to replace glazing gasket - YouTube
 
I have received the sample pack today, looks like it's going to work a treat as per the attached picture.
Any top tips for removing the okd gaskets. Mine appear to be potentially glued in. As they are in such a perished state they are crumbling apart. I will pick them all out if necessary but wondered if there was any tips and tricks to speed it up?

Thanks Again

Dan
 

Attachments

  • 1F7EE637-7983-4649-9709-AF1BD66B9529.jpeg
    1F7EE637-7983-4649-9709-AF1BD66B9529.jpeg
    211.8 KB · Views: 295
That was quick! The one you've shown in the picture seems wider than the existing gasket? Before you order, ensure the gasket you've selected definitely fits into the space. Do this by removing a section of the old gasket and inserting the sample pieces until you find the right one, not too tight not too loose as they say!

I doubt the old ones are glued. If they're crumbling, all I can suggest is using a tool that can get underneath (e.g. something with a hooked end) so you can then prise the gasket up and out.
 
I think it's hard to judge what was there before as they are so perished as you can see. I just tried both the 3mm and 4mm after your message. I'm not now sure which to order? What is your opinion from the attached images. Thanks again!
 

Attachments

  • 26928EC3-9BBC-4844-87EA-1C2640E77791.jpeg
    26928EC3-9BBC-4844-87EA-1C2640E77791.jpeg
    222 KB · Views: 343
  • 2AA3CACC-B7F4-4881-95FE-AF0AB1C7799F.jpeg
    2AA3CACC-B7F4-4881-95FE-AF0AB1C7799F.jpeg
    159.8 KB · Views: 313
  • 25CEDC38-E76C-4760-BAB2-F2A396E3CEBE.jpeg
    25CEDC38-E76C-4760-BAB2-F2A396E3CEBE.jpeg
    204.3 KB · Views: 287
  • 03CE9E4E-CE9A-45F9-A6CA-1CF324ABAE4C.jpeg
    03CE9E4E-CE9A-45F9-A6CA-1CF324ABAE4C.jpeg
    162.7 KB · Views: 311
I bought sample pack of ebay and replaced the mine when I found correct size. Your 3mm looks fine though. I'm still annoyed I cut 30mm too long and they still shrunk though. Could not squash in any longer though
 
'If' the 3mm is fitting well into the gap (i.e. snug fit) then it'll do the job. Ideally you'd want one a bit thinner e.g. 2mm - 2.5mm purely from a looks perspective. If you Google 2mm wedge gasket you'll find other options but as I say if you're happy enough with the 3mm then go for it

As I said before make sure you don't stretch it out when fitting cause it'll shrink back and leave gaps at the end
 

DIYnot Local

Staff member

If you need to find a tradesperson to get your job done, please try our local search below, or if you are doing it yourself you can find suppliers local to you.

Select the supplier or trade you require, enter your location to begin your search.


Are you a trade or supplier? You can create your listing free at DIYnot Local

 
Sponsored Links
Back
Top