Using a Scheppach HS 105 Table Saw

Joined
27 Apr 2015
Messages
227
Reaction score
4
Location
Yorkshire
Country
United Kingdom
Hi. I just bought a new Sheppach HS-105 table saw. But, before I use it, I want to make sure I know what I'm doing.

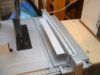
With this product the instructions mention the rip fence (or parallel stop) and something called a rail fence. Now, the instructions say that the rail fence attaches to the rip fence in two ways. A cut of thickness under 25mm the rail fence attaches one way, above 25mm the other way. That makes it look like you always attach the rail fence.

Now, I notice that the scale to be used when measuring is to the right of the blade is good only when there is no rail fence attached. The scale for use with measuring to the left of the blade starts at a different position. Does this mean then, that you would only attach the rail fence when work is to the left of the blade? Or what? Not having ever used a table saw, I'm rather perplexed. I don't grasp why there is a rail fence at all. Thanks. Rich
Sheppach HS105 01.JPG Sheppach HS105 02.JPG Sheppach HS105 03.JPG
 
Sponsored Links
Don't need to do this mate, just use the face of the fence for anything over the rail depth. I never used to bother with those tho for smaller work pieces, I'd use a sacrificial board underneath instead.

The idea of the extra rail is to help prevent binding with the blade on smaller stock.
 

Attachments

  • Sheppach HS105 03.JPG
    Sheppach HS105 03.JPG
    324.6 KB · Views: 523
The full length fence is useful for sheet goods. For solid timber the add on fence can be pulled back to allow for the timber warpage.
Could also be useful for multiple cutting to act as a release fence. Though most people just clamp on a packer fence.
The low profile edge fence allows thin cuts close to the guard.
 
Last edited:
I think I need to show in picture form what I think the instructions are saying.

In the drawings I have made, "A" shows the scale setup. The distance of a cut "d" is the distance between the blade and the side of the rip fence. So, in a 100mm cut, without the rail fence, the distance between the blade and the edge of the rip fence is 100mm.

Now, the instructions seem to be saying always use the rail fence. In "B", the instructions appear to be saying set the rail in the position shown when cuts are under 25mm. I've no real understanding what the rail fence is doing. In "C" this is the setup when the work is above 25mm in depth. Again no real idea what the rail fence is doing.

Of course, when the rail fence is used, you can say goodbye to the scaling as a direct reading. Because in both "B" & "C", the cut you are making is "d" minus the width of the rail fence. So, if rail fence is 50mm wide you would have to set the rip fence to 150mm.

EDIT: Is the rail useful because essentially it is offering a narrower contact with the work?
 

Attachments

  • Use of fence rail.jpg
    Use of fence rail.jpg
    66.9 KB · Views: 1,073
Last edited:
Sponsored Links
Drawing C. Discard it.
Never fit an auxiliary fence in that manner.
 
I'd see if you can just take the bolts out of the side of the rip fence. Ignore the marking on the scale, and measue the distance between the rip fence and the blade.
 

DIYnot Local

Staff member

If you need to find a tradesperson to get your job done, please try our local search below, or if you are doing it yourself you can find suppliers local to you.

Select the supplier or trade you require, enter your location to begin your search.


Are you a trade or supplier? You can create your listing free at DIYnot Local

 
Back
Top