Where to start first tile

Joined
7 Oct 2004
Messages
498
Reaction score
2
Country
United Kingdom
Hi,

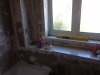
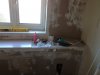
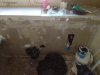
I am going to start tiling my bathroom soon but am unsure where to start the first tile on one of the walls. See pictures, as it as window and also a ledge I am not sure where would look best to start. I was thinking of just measuring the width an then starting in the middle but would involve to half tiles at each end, however I also discovered that I could also get 4 full tiles along the wall with a bit cut off the last one. If anyone can suggest any ideas or advise what a professional would do it would be reall appreciated.Many thanks, Pete.
 

Attachments

  • image.jpg
    image.jpg
    106.2 KB · Views: 391
  • image.jpg
    image.jpg
    106.2 KB · Views: 372
  • image.jpg
    image.jpg
    132.1 KB · Views: 333
Sponsored Links
To set out before cutting or fixing any tile:

1. find the centre of the widow cill.
find the centre of the ledge.
find the centre of the boxed-in wall.

2. Equalise the centre lines to determine one controlling centre line. Always first find the centre line of any wall or flat surface.

3. Note the width of the off-cuts at either end of your tile runs, your off-cuts should be equal at either end of the course - aim to get the ledge and cill off-cut grout lines to line up with the wall grout lines.

4. you will have to play with the setting out lines before, typically, arriving at a compromise. What you dont want is slivers of off-cuts, and obviously off-centre centre tiles. eg. use three full tiles (not four) "along the wall" and divide the left over space by two. the result is the width of each off-cut. Allow for grout lines.

5. the ledge height can be used as a datum and taken all around the room as your controlling line.

6. Vertical: from floor to ledge courses must also be equally worked out - keep the cut tile course as the base course (skirting level) if possible. But you also have to judge how the courses will sit on the bath tub rim - sometimes you have to work with two datums: 1. the ledge and 2. the rim of the bath.

AAMOI:
That whole boxing-in arrangement could be demolished back to the solid wall, and just a little boxing-in made up at the end of the tub, and to cover the corner pipe drops.
The plaster board on the wet walls should be liquid tanked.
 
Thanks Ree for the detailed response, really appreciate it. Would you mind just explaining section 2 regarding equalising the centre line in more simple terms for me, sorry.

Thanks again.

Pete.
 
Just what it says: first find three centre lines - one for the cill and one for the ledge and one for the wall below the ledge.
Now find a controlling centre line by moving the three lines about until a compromise is reached.

You have to initially work with three centre lines because the three surfaces are of unequal length.
 
Sponsored Links
Ok. Thanks again, so you wouldn't reccommend using the almost 4 tiles by just starting in one corner.

I should find the centre line then measure half of a full tile and match up the centre of the tile with the centre point.

Sorry for all the questions, just wanted to get it right.

Thanks
 
Why would i advise you to go to the trouble of finding a common centre line if it was just as easy to "start in a corner"?

No, thats not right. You find a common centre line and work from it.

Set three tiles centred on the line, and equal out whats left at either end. To equal out you might have to move the centre (datum) line.

I wont go on with this thread: suffice to say always work from the centre not the edge or "corner".
 

DIYnot Local

Staff member

If you need to find a tradesperson to get your job done, please try our local search below, or if you are doing it yourself you can find suppliers local to you.

Select the supplier or trade you require, enter your location to begin your search.


Are you a trade or supplier? You can create your listing free at DIYnot Local

 
Back
Top