
If you have any questions relating to Plastering & Rendering, please post them in the Plastering & Rendering forum.
Before reading on, it’s worth noting that Plastering is a skill that takes a lot of hands-on practice to become proficient at.
If it is your first go, try not to bite off more than you can chew (e.g. a 5m x 2m wall in your living room) and would recommend practising on some plasterboard first.
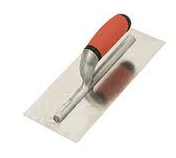
Plastering trowels come in a variety of sizes, materials, makes etc.
For a beginner, an 11” trowel is recommended.
Normally the budget ones are made from ordinary steel, and won’t come with the edges worn-in and with an uncomfortable plastic handle etc.
This can make them difficult to work with (especially for getting a good finish when skimming).
A number of branded trowels exist - stainless steel is recommended & reliable makes are Marshalltown, Tyzack, Ragni to name but three. There are probably others.
Check the edges of a prospective trowel purchase.
Pre-worn are easier to get going with - but if not already worn-in, you can always use an emery cloth or an oil stone on the edges to speed up the process.
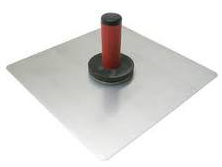
A hawk is used to hold an amount of plaster for you to work from.
Some plasterers work direct from the bucket of mixed plaster, others prefer putting the mixed plaster onto a spot board, and load the hawk from that.
A spot board is useful. If mixed plaster is placed onto a wetted spot board, it can keep the plaster fresher for a bit longer (compared to working direct from the bucket). Though a spot board can be improvised from an offcut of plywood for example.
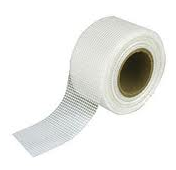
Scrim tape is a self-adhesive tape with a criss-cross mesh. It is used for reinforcing joins prior to skimming or joint filling.
![]()
A Darby is used for smoothing undercoat plaster. For example when patching plaster, the edges of the existing plaster can be used as a guide to work from.
Usually 1200mm in length.
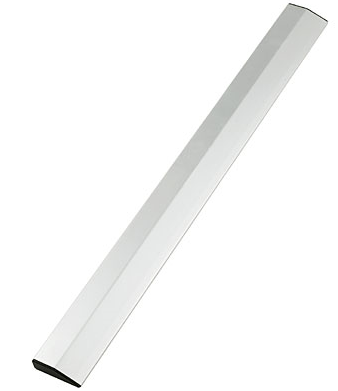
A straight edge can be used similar to a Darby for smoothing undercoat plaster/render, but can also be used for helping to align plasterboards in dry-lining or Dot & Dab. Straight Edges can be 1200mm or even 1800mm in length.
The most common Undercoat Plasters are Bonding, Hardwall, and perhaps Browning.
For DIY/beginners - Bonding is a good choice, but beware, it is only really suitable for low suction backgrounds.
This means for most uses it will probably need diluted PVA to control suction and stop it cracking before it sets.
The British Gypsum website has extensive information on the different types of plasters.
http://www.british-gypsum.com/products/thistle_plaster_products.aspx
Useful data extracted from the website above:
| Type | Plaster (25kg bag) | Average Thickness (mm) | Average Coverage (m2) |
|---|---|---|---|
| Undercoat | Bonding | 11 | 3.0 |
| Undercoat | Browning | 11 | 3.5 |
Render is mixed from Cement, Sand and optionally Hydrated Lime. Render is suitable for use either indoors or outdoors (unlike gypsum undercoat plasters).
e.g. from post http://www.diynot.com/forums/viewtopic.php?p=1097053#1097053
Courtesy of Roughcaster, Posted: Sat Jan 03, 2009 1:49 am
Standard render mix:
4 plastering sand - 1 cement -1 lime = scratch coat.
5 plastering sand - 1 cement -1 lime = top coat.
Use a plasticiser/waterproofer in the batch (mix). This will help to aerate the mix, make it easier to use/spread, and the w/proofer will reduce the suction when you come to the top coat. Always “measure” any admix correctly, especially waterproofer!! ....... Lime in a batch is optional, but it allows flexibility
in the finished render coats, and reduces the risk of cracking….. I prefer lime in a mix.
When cement rendering, make sure you use the correct sand,, “washed plastering sand” is always advised. DON’T use ordinary building sand.
External rendering should also not use the standard galvanised steel metal beads, usually used in internal work. Stainless steel beads are available (though are more expensive).
NOTE: If lime is used you do not need to use a plasticiser.
Plasterboards are available in a wide variety of sizes and technical specification.
They can be used for structural construction e.g. stud wall, or for fixing to existing brick/block.
For more details on boards available see the British Gypsum (BG) website
http://www.british-gypsum.com/products/plasterboard___accessories.aspx
A frequent option discussed with boards is the choice between tape&joint versus skimming.
There are pros and cons, and very dependent on your skill level etc. The forum has a number of posts where the topic is discussed in more detail.
| Type | Plaster (25kg bag) | Average Thickness (mm) | Average Coverage (m2) |
|---|---|---|---|
| Finish | Multi-Finish | 2 | 10.0 |
| Finish | Board-Finish | 2 | 10.0 |
“A solid walled structure, built with breathable materials, which needs to breathe”
It’s inevitable that you will find dampness somewhere in an old house. Nothing lasts forever, but despite English weather, our old buildings stand the test of time better than any modern house. The worst enemy of old houses is we humans - it’s what we do to them, or fail to understand about them, that causes problems and makes you think you have to ‘Damp Proof’.
Source: http://www.heritage-house.org/pages/managing-damp-in-old-buildings.html
Note: This can be applied to modern houses with damp problems as well. Using this site will give you some understanding in dealing with any related damp problem so please read this page before doing anything like stripping the plaster off or doing a damp-proofing as it may save you a great deal of cost and time!
Read this valuable information about condensation - http://www.heritage-house.org/pages/about-condensation.html
Can I do own preparation before a pro plasterer skims etc ?
Ask your chosen Pro before doing any prep yourself.
If there is a problem with the final job, there can be a debate as to why - was it your prep?
If the pro plasterer does it all, there can be no doubt.
How can I update an Artex covered ceiling?
e.g. Asbestos - http://www.diynot.com/forums/viewtopic.php?p=1714268
e.g. Covering artex - http://www.diynot.com/forums/viewtopic.php?p=1352314
Plastering chimney enclosures (beware hygroscopic salts)
e.g. Hygroscopic salts - http://www.diynot.com/forums/viewtopic.php?p=697355
Plastering around fires, stoves etc (beware heat restrictions)
e.g. http://www.diynot.com/forums/viewtopic.php?p=1801047
Why use diluted PVA?
For internal work, diluted PVA (1:5 ratio with water) can be applied to blocks/bricks/existing plaster to help control suction. If you don’t, when the plaster is applied, it draws all the moisture out before it has chance to set and will crack. Note: diluted PVA is not suitable for wet areas e.g. bathroom or outdoors (as it’s water soluble).
Tape and jointing vs skimming?
e.g. http://www.diynot.com/forums/viewtopic.php?p=490654
Filling chases after electrical work?
e.g. http://www.diynot.com/forums/viewtopic.php?p=1278498
Bathroom plastering?
e.g. http://www.diynot.com/forums/viewtopic.php?p=1209737
Re-occurring ceiling cracks?
e.g. http://www.diynot.com/forums/viewtopic.php?p=1224356
Lath & Plaster/Patching small areas?
e.g. http://www.diynot.com/forums/viewtopic.php?t=251771
Electric mixers?
e.g. http://www.diynot.com/forums/viewtopic.php?t=249179
Drying new plaster?
New plaster requires time to dry out thoroughly before it is painted (or tiled), and is best left to dry naturally.
If undercoat plaster is used, then the drying time can significantly increase.
As a guide - skim only - e.g. 1 week.
Undercoat (called Float&Set) and skim - e.g 3 weeks - 1 month.
These may be conservative, but the drying process continues even when the surface looks dry.
Painting new Plaster?
Once the plaster has dried out sufficiently, if it’s being painted, then the first coat must be a ‘wash-coat’.
This is a diluted mix of water and emulsion (1:1). May as well use white, in fact the cheaper emulsions are probably better than expensive for this purpose!
A wash-coat is also good at highlighting flaws in the plastering, and at this stage can always use some remedial easi-fill to fill in any imperfections you’re not happy with.
If you don’t use a wash-coat, the chances are the highly absorbent fresh plaster will suck all the moisture out of your paint, and it will peel away later. Oh - and PVAing before painting to control suction is a no-no if you want your paint to stick. ;-)
Joining Angle beads?
Angle beads come in standard lengths of 2.4m or 3m.
Best bet is to use from only the one piece.
However, sometimes it is necessary to join two ends together for a longer run.
A better result can be achieved if the edges to be joined are
(i) both cut to a fine point
(ii) a small length of a nail or discard of electrical wiring placed inside the radius of the bead at the join
(iii) one side squeezed slightly to help trap the nail etc