Wiring an Evohome BDR91 to Hallway Thermostat - Which wires go where?

Joined
23 Feb 2017
Messages
9
Reaction score
0
Country
United Kingdom
Hello there,

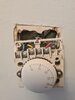
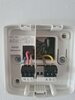
I am installing my Honeywell EvoHome in our new house and it should be easy. All I need to do is replace the Hallway Thermostat (Honeywell T6360B) with the Wireless Relay box (BDR91). However, I am not sure which wires from the old thermostat go into which places in the BDR91. As shown in the photo the hallway thermostat has four wires (inc the earth) and these go into locations 1, 2 and 4. I can work out which ones go to N and L in the BDR91, but do I need a 'switching live' (i.e. a separate wire from L to A), or where does the third wire from the hallway thermostat go into?

We have an Ideal Logic Heat 30 boiler, not a combie as we have a separate hot water tank.

Any help will be super appreciated.

Cheers, Stewart
 

Attachments

  • 20211002_152336.jpg
    20211002_152336.jpg
    189.9 KB · Views: 414
Sponsored Links
these go into locations 1, 2 and 4.

Looking at your photo they go to 1, 2 & 3, which is where they should be. There isn't a wire in 4.

The terminals at the Honeywell are identified for you on the inside of the cover

cover.jpg


So in your case:

Terminal 1 Live (Red wire)
Terminal 2 Neutral (Blue wire)
Terminal 3 Switched live (Yellow wire)

The BDR has the following connections:

BDR91.JPG


You can see that they are marked N / L(1) / L(2) / A / B / C. Ignore the wiring in the photo above, it's a different system. In your case:

Red wire to L(1)
Blue wire to N
Yellow wire to B

Add a link wire between terminals L(2) and A

The BDR is double insulated so does not need an earth connection. Put the earth wire in a separate insulated connector and tuck it safely out of the way.

There are no hot water control wires at the Honeywell room thermostat, so the hot water control will remain elsewhere as it is now.

If you have an existing programmer for the central heating, that would now need to be set to be permanently 'on' 24/7 to keep the BDR91 powered.
 
Last edited:
Great thanks for the reply, really helpful & clear.

However ... I wired it in as suggested & the BDR91 does not turn on (i.e. no lights, even when I press & hold for more than 5 secs). My multimeter says that there is 9.6 V going from N to L.

Do I assume I need more than 10 V to run the BDR91? If so what can I do to get it working.

Thanks again, Stewart
 

Attachments

  • 16332674836453708334392119010457.jpg
    16332674836453708334392119010457.jpg
    154.2 KB · Views: 312
Last edited:
I wired it in as suggested & the BDR91 does turn on (i.e. no lights, even when I press & hold for more than 5 secs).

I assume that is a typo and should say "does not turn on"?

Anyway, yes you require 230V for the BRD91

BDR91.JPG


The same as the original thermostat. Although the original thermostat would work in a fashion on a lower voltage, but it's not the correct thermostat for a low voltage application. As it clearly shows a 230V L and N supply to terminals 1 & 2, and the accelerator device that improves accuracy shown connected between terminals 2 and 3 wouldn't work on a low voltage.

cover.jpg


Did you make sure that:
If you have an existing programmer for the central heating, that would now need to be set to be permanently 'on' 24/7 to keep the BDR91 powered.
 
Last edited:
Sponsored Links
Simple answer - no I didn't turn it to permanently on (as clearly told to). As expected it now works.

Thanks for the reminder, great help, cheers.

I'd feel even more silly if this wasn't a DIYnot forum!

Now I just need to bind & set the system up.

Thanks again.
 
As you are based in Canada, I suspect what you have written is based on the heating systems installed in North America. It doesn't really relate to heating systems in the UK. Here thermostats cannot be used as relays and 'hot wires' doesn't mean anything.... Unless you are into stealing vehicles. :)
 
Last edited:

DIYnot Local

Staff member

If you need to find a tradesperson to get your job done, please try our local search below, or if you are doing it yourself you can find suppliers local to you.

Select the supplier or trade you require, enter your location to begin your search.


Are you a trade or supplier? You can create your listing free at DIYnot Local

 
Back
Top