woodworm one side - damp solid kitchen floor the other

Joined
30 Dec 2016
Messages
73
Reaction score
0
Country
United Kingdom
bought a 1920's house - surveyor picked up woodworm in the lean too - said potential for inside

and yes a month in the big bloke helping out with the damp proofing put foot thru floor!!

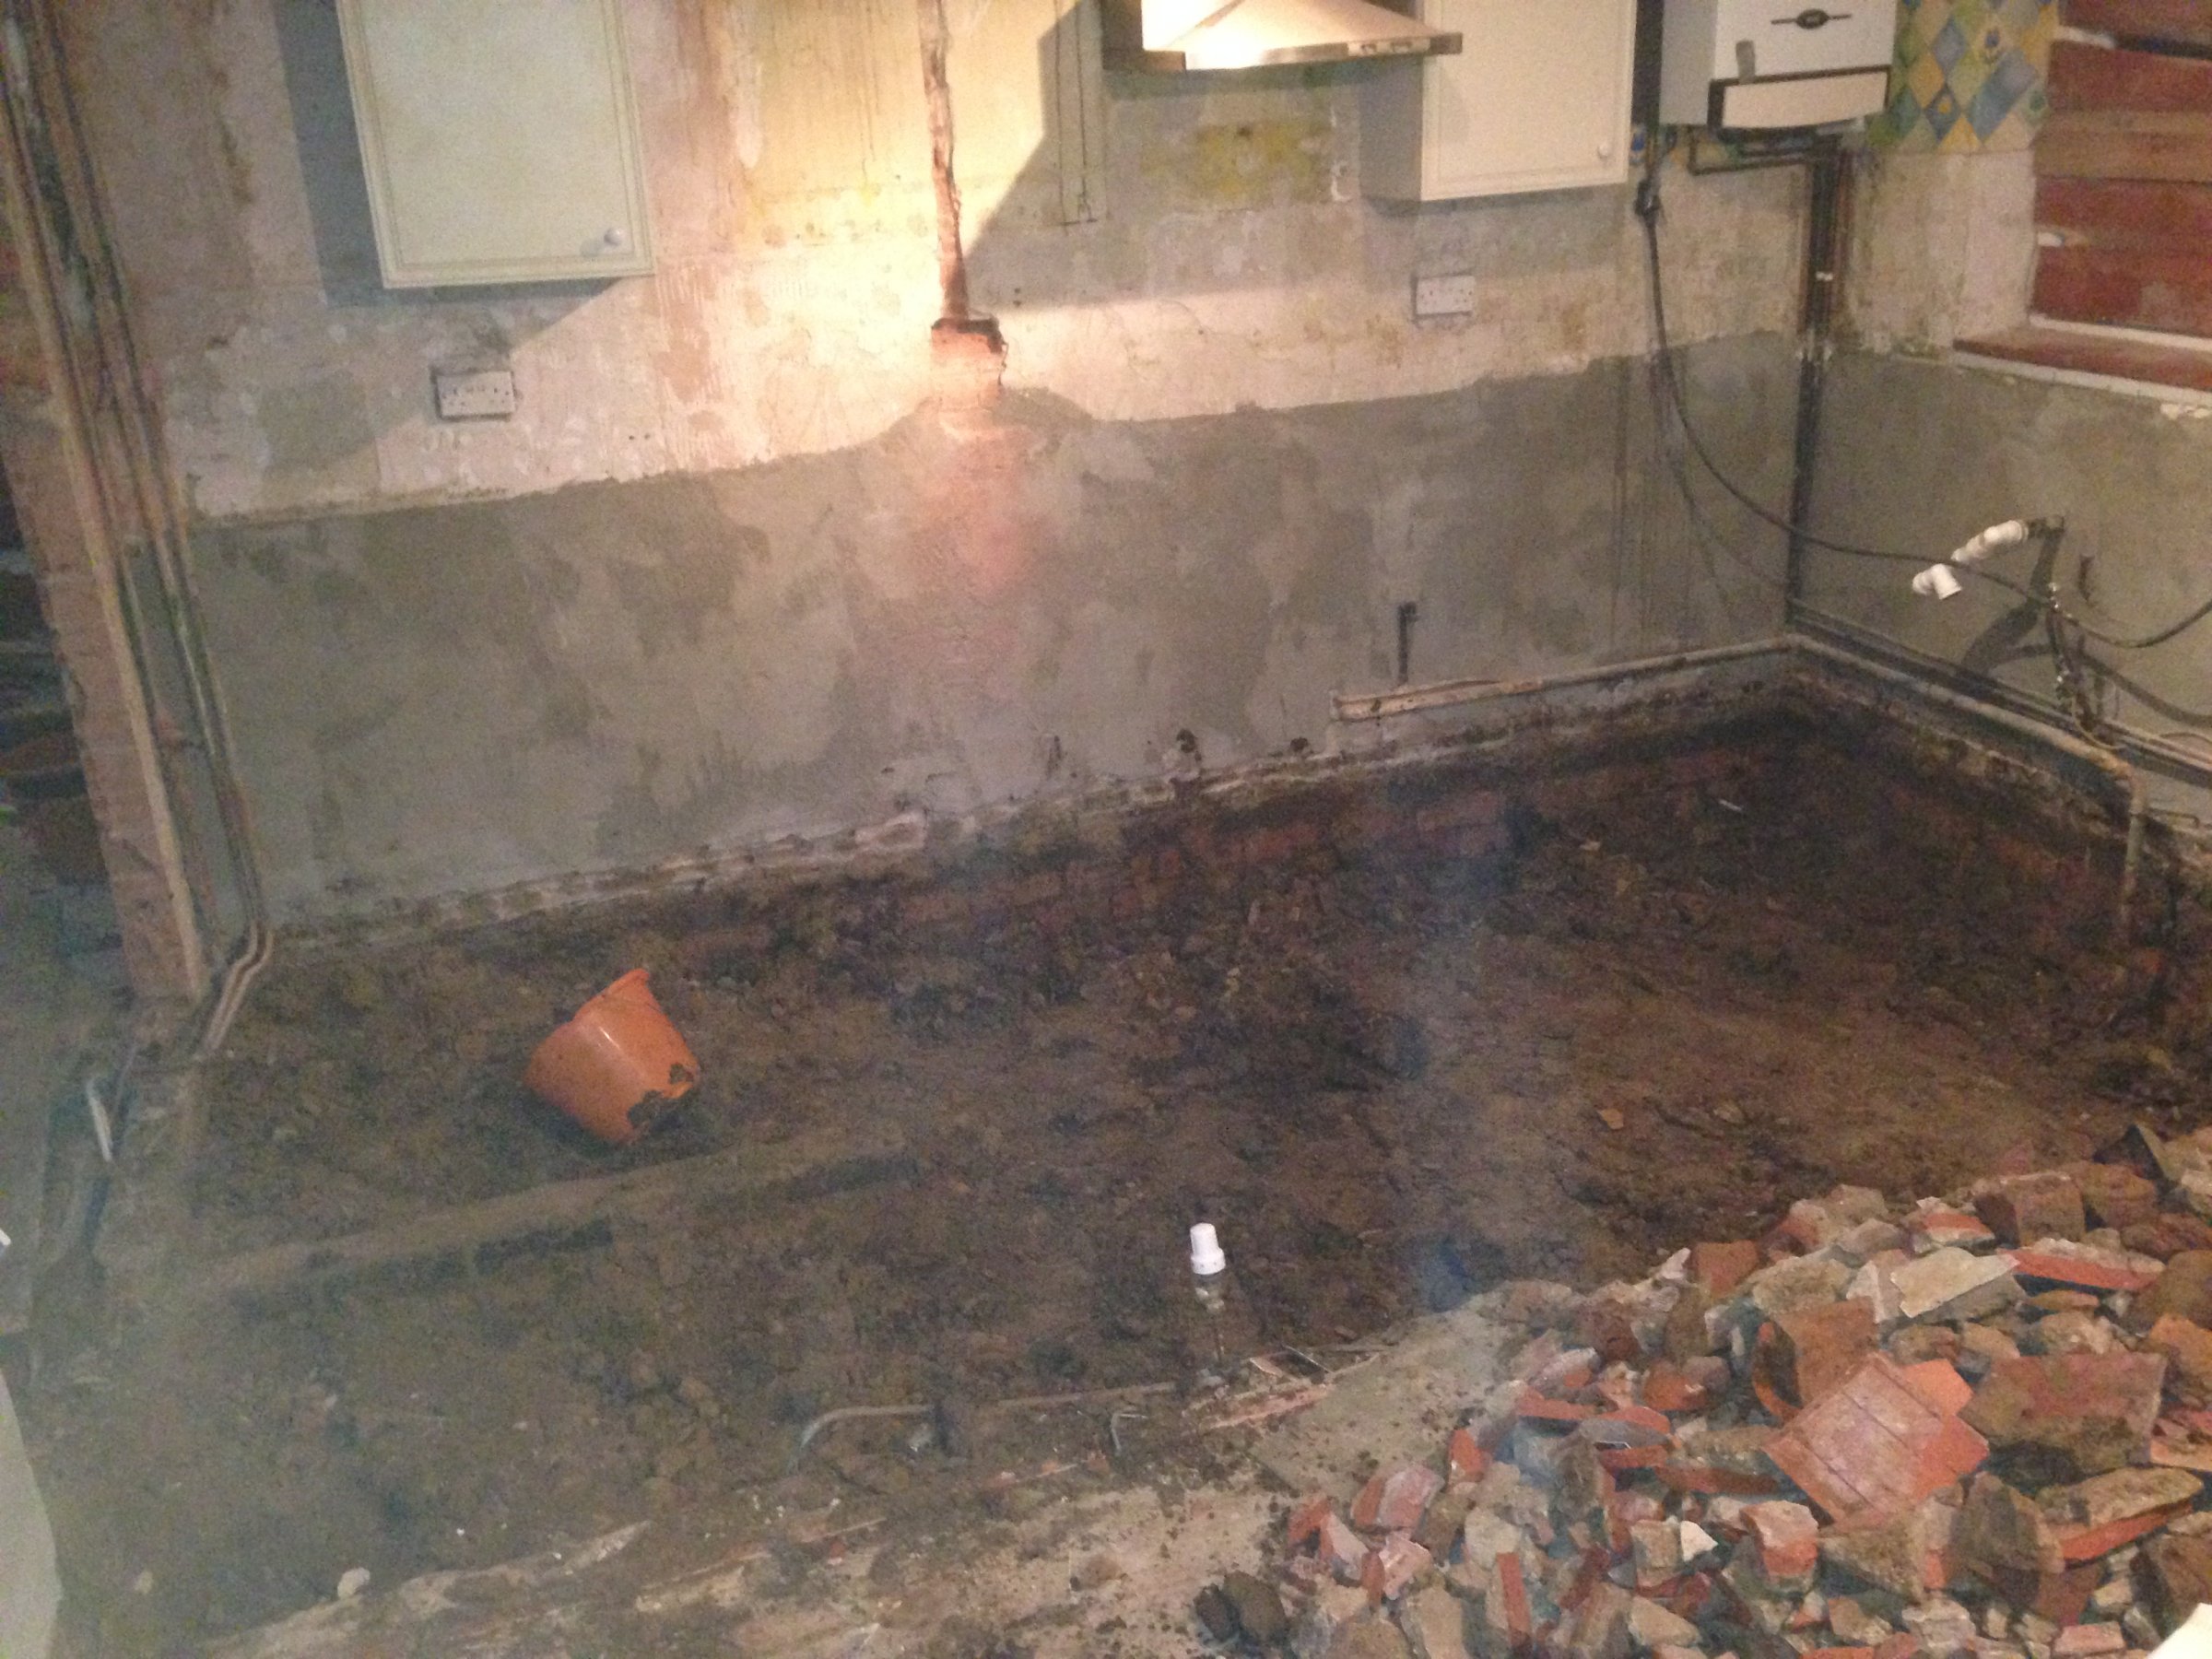
after having a wall down we realise that the solid quarry tiles under several layers ( old laminate floor and lino )

we also realise after knocking the wall down ( make kitchen diner ) that the kitch floor after removing laminate etc is about 15 mm higher than the rotten floor boarded part,,

old kitchen was quite small. 2 m X 3 m

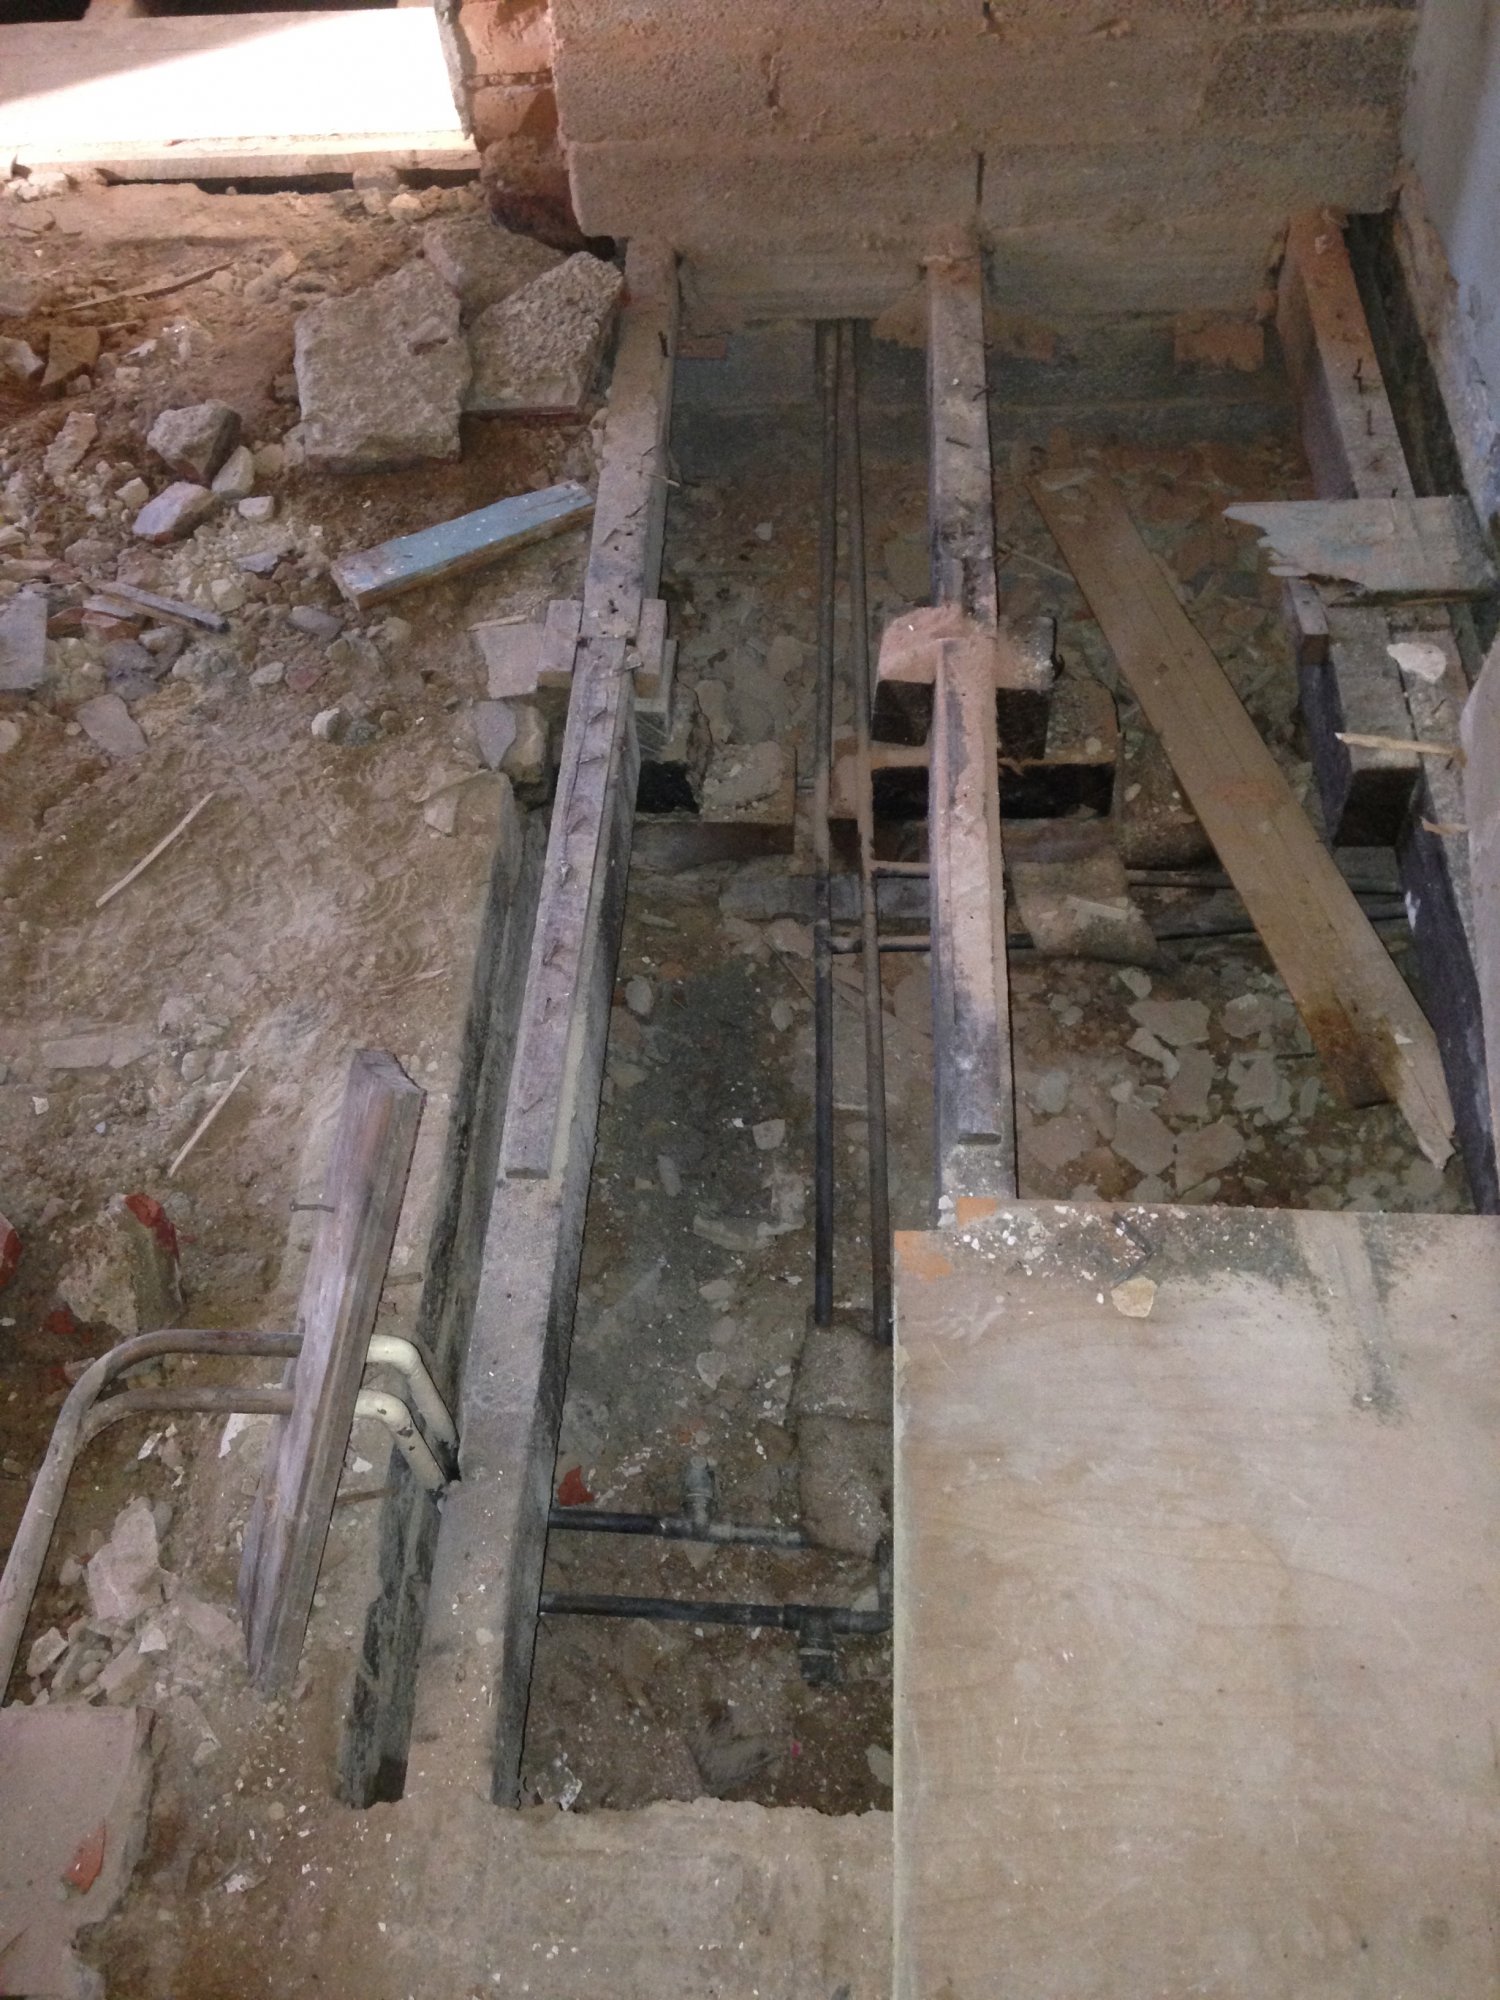
thinking we might dig out the kitchen part say 45 cm of clay and put some hard core broken bricks etc in there and throw some joists accross and redo the whole floor.

would need to treat joists with woodworm stuff

what floor to use? we were thinking we would go wood laminate floor over say green chipboard ( easier to cut I guess? )

or would we better with pine or some other T=G proper floorboards?

I guess will be hard to take up the old floor boards with out damage? not sure how infested they are?

thanks! first post!
 
Sponsored Links
I think first priority is to find where the damp is from and open and dry everything out. Then worry about digging it out and damp proof membrane or insulated floor. Not sure of the differences there but I'd go for something other than chip board. It can easily get creaky! Good luck.
 
If you're going to go down 45cm, then you could put down hardcore, blinding sand, membrane, insulation, screeding, 10mm XPS insulation, and then tile the floor.
 
The clay under the quarry tiles is quite damp. theres an old lead water pipe which is the water main coming in there and when I took the sink off the cold water pipe was dripping where the kitchen tap was connected... ( have added service valve and stopped that drip )

theres a lot of air bricks - and can see day light thru them now have taken skirting off. so I think vent wise its ok.

seems easier to sling some joists over - theres a dwarf wall where the kitchen wall has come down.. just need some hangars on the other side?

dig down to match the floor void on rest of house? want the floor to be consistant thru out kitchen/diner
 
Sponsored Links
- theres a dwarf wall where the kitchen wall has come down.. just need some hangars on the other side?
I'd avoid trying to get zip hangers into old masonry - you'll potentially struggle trying to get them level and in line if the masonry is anything other than perfect. Easier to fix a treated softwood wall plate to the masonry using Rawlbolts (or if the masonry is really crap resin anchors) then hang standard joist hangers off the wall plate
 
OP, why not post pics of internal above floor and below floor level - and external at ground level?
Is the water main still in lead?
Is it your intention to clear out the kitchen and lift the whole floor?
FWIW, there is nothing wrong with chipboard if its properly fixed down onto properly fixed joists.
 
ok I will take some pics tomorrow.

yes the mains is a lead pipe to the street.. Severn trent have sent forms so we can find an approved plumber to replace it with PVC- the house is almost 100 years old!

we have cleared out the whole kitchen becos it was rotting etc. we have dryzoned the internal wall and replastered with dri thistle (?) ) surprised it was a cavity wall!

I do worry abit about if we dig out the clay some support for the wall is removed.. could I pour some concrete and make a dwarf wall for my joists to sit on? I could put a damp proof membrane across that?

chip board seems fast and easy. could use double layer green stuff?
 
took me and the missus about 6 hours yesterday...

we should aim for about 10 cms under the joists for air flow?

i like the soft wood on the wall for mounting rather than hangars,, actually I see the builders just sat the original joists on dwarf walls....


soil seems much wetter in the area of the lead water main - theres also a drain on the other side of that wall - looks like the water main follows the drain

all the clay is a bit wet actually but the other 'wetter' spot is by the kitchen sink... and theres a drain on the other side of the wall there.
 

Attachments

  • IMG_6867.jpg
    IMG_6867.jpg
    107.7 KB · Views: 213
10cm will be plenty for ventilation, but definitely resolve the sources of water first. I think you can get a free repair on a lead pipe although it may have to be the one in the front garden. Replace with blue mdpe.
Thanks for the photos!
 
150mm is the recommended min. for ventilation under the joists - if possible you want air bricks to provide through ventilation.
Once the soil is cleared then lay a membrane (DPM) over the soil.
Do not use hardcore.

You could bolt plates to the walls as job&knock suggests - if you do then wrap the back of the plates with DPC material to protect them from damp & fill the bolt holes with silicone before entering the bolts.
Or you could cut pockets in the walls and insert the joist tails - the tails to be capped with DPC material.
If the joists rest on any knee walls then isolate them from the masonry with strips of DPC.

You can select your own plumber or DIY it yourself for replacing the lead water main - all thats required is the installation meets the Water Regs requirements. Go post in the plumbing forum for more on this.

Clean out your gullies and water test them.
 
hi Vinn - thanks for that- i actually came to ask that question - but u'd already answered!

looks like I can sit them on the old wall by take a course of bricks out- will the brickwork be close enough to level if I use it as a guide on the other side?

I will probably get some treated wood - if I bolt it to the wall I worry that the wood will rot in time. ( so need to use damp proof membrane between it and the wall. fill holes with silicone to stop moisture goign up the bolts.

IMG_6903.JPG IMG_6904.JPG
 
What do you mean by "old wall" and why would you "take a course of bricks out"?
Brick courses are good guides for a rough level.
Treated wood is not necessary.

Is the pic with the green hose showing a knock-through? Is this the old wall etc?

FWIW: clean up & remove all debris as you go along - it will make working conditions far easier.
 
yep pic with green house is the wall thats been knocked thru. I will have to take a course of bricks out to get the joists to meet up.

I took a few bricks out to take the photo..

when you say soft wood plate - what size wood do you recommend?

I found metal hangars-

http://www.diy.com/departments/steel-joist-hanger-w50mm/243274_BQ.prd?icamp=recs&rrec=true

I think the trick is getting them level no matter what bolt them to. any tips?

for joists I can use carcassing timber? http://www.diy.com/departments/carc...treated-c16-t45mm-w95mm-l2400mm/149680_BQ.prd


I stuck the hardcore from the quarry tiles next to the hole I was going to throw them back into - any one want some hardcore? :ROFLMAO:
 
Dont buy from B&Q - go to a local timber or builders merchants for joists tell them what you need - they will deliver. But not knowing the span lengths I cant advise on joist section size. You can buy the joists slightly long and cut them on site.
The plate can be the same section size as the joists.
That kind of hanger is fine - fill all the small holes.

One thing is: where are the air bricks for ventilating this suspended floor(s)? Ventilation should vent through from the rear wall to the front wall of the house.
 

DIYnot Local

Staff member

If you need to find a tradesperson to get your job done, please try our local search below, or if you are doing it yourself you can find suppliers local to you.

Select the supplier or trade you require, enter your location to begin your search.


Are you a trade or supplier? You can create your listing free at DIYnot Local

 
Sponsored Links
Back
Top