
A homeowner has five roof windows fitted into a low-pitch kitchen roof, all installed about five years ago. Three of them have started letting water into the roof space, not through the glass itself but down near the bottom apron – the moulded flashing piece that sits below the window and laps over the roof covering. A general builder has been out, glued the apron edge down with some kind of solvent, and that has reduced the leak but not stopped it. The roof pitch is around 15 degrees, the covering looks flat (not a profiled tile), and the owner wants to know what is actually going on and how to put it right.
This is a common one in UK houses. Before you start spending money, do a couple of simple checks so you are fixing the cause, not the symptom. I will run through what is likely happening, what you can safely check yourself, and what a proper fix looks like, plus the usual bodges that do not last.
What is likely going on
Roof windows like these are rated down to a minimum pitch, usually 15 degrees with a standard flashing kit, and lower than that only if a special low-pitch underfelt collar and the correct flashing variant have been used. At 15 degrees you are right on the edge. Water runs slowly off a shallow roof, wind drives rain back up the slope, and any small gap, lifted edge or missing detail will let water in that would never trouble a steeper roof.
The other thing to understand is that water rarely leaks where it shows. It gets in somewhere higher, the head flashing, a side gutter piece, a lap in the underlay, a nail hole, even a tile a metre above the window, then tracks down the timber or the back of the flashing and drips out at the lowest point it can find. On these windows that lowest point is the apron at the bottom. So the apron is where you are seeing the water, but it is not necessarily where it is getting in. Gluing the apron down can slow the drip because you have blocked one of the exit routes, but the water is still arriving from somewhere and will find another way out sooner or later.
The specific things that fail on low-pitch installs:
- Flashing kit fitted is the standard one, not the low-pitch variant.
- Underfelt collar (the secondary drainage membrane that sits under the flashing and drains onto the roof underlay) missing or badly lapped.
- Apron not properly dressed down onto the covering. On a flat interlocking tile or slate the apron needs to sit tight; on a profiled tile it has to be worked into the contours.
- Side gutters or head flashing lapped the wrong way, or sealed with mastic instead of being properly overlapped.
- Tiles or slates above the window cut short, slipped, or lacking the right side clearance.
Simple checks first (safe from inside and from a ladder)
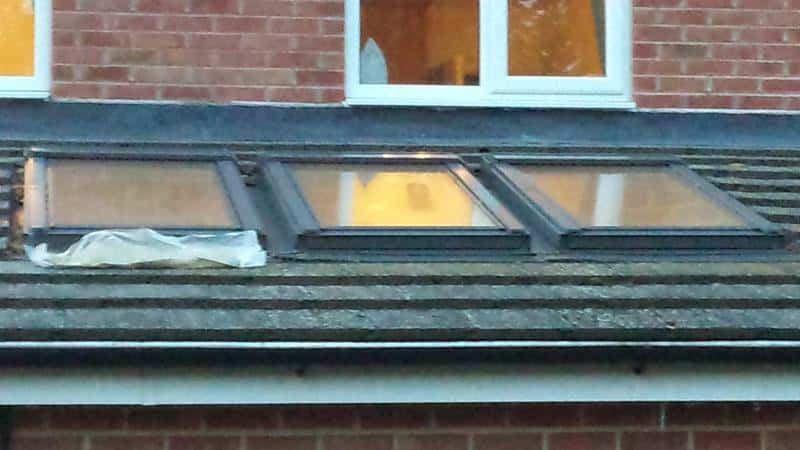
Do not guess, prove it. Before anyone goes lifting flashings, do these:
- **Inside the roof space, find the wet timber.** Get up there during or just after rain with a torch. Look at the rafters and the underlay around and *above* the window. If the underlay is wet a foot or two up the slope, the water is coming in higher than the apron. If it is only wet right at the bottom of the window frame, the apron area is the entry point.
- **Check the underlay laps and any drainage onto the felt.** On a proper low-pitch install there should be an underlay collar tucked under the felt above the window and lapped over the felt below, so any water that does get past the flashing runs harmlessly down onto the roof underlay. If you can see the felt cut tight to the frame with no collar, that is a red flag.
- **Look at the apron from outside.** Is it sitting flat and tight to the covering, or has it lifted, curled, or sprung away at the edges? Press it gently. If it springs back up, it is not held down properly.
- **Look at the side flashings and the head.** Water marks, debris trails, moss lines and staining will often show you the path water has been taking. A clean dry line down one side and a dirty wet line down the other tells you a lot.
- **Check the tiles or slates immediately above the window.** Any slipped, cracked or short-cut pieces? Any sign someone has bedded them in mastic instead of fixing them properly?
- **Hose test, top down.** On a dry day, with someone watching inside the roof space, run a hose gently onto the roof starting *below* the window and working upwards in stages: apron first, then sides, then head, then the tiles above. Give each area five minutes. The moment water appears inside, you have found the zone. This one test is worth more than any amount of guessing.
The result of those checks tells you whether you have got an apron problem, a flashing-kit problem, or something higher up the roof entirely.
Proper fix: good, better, best
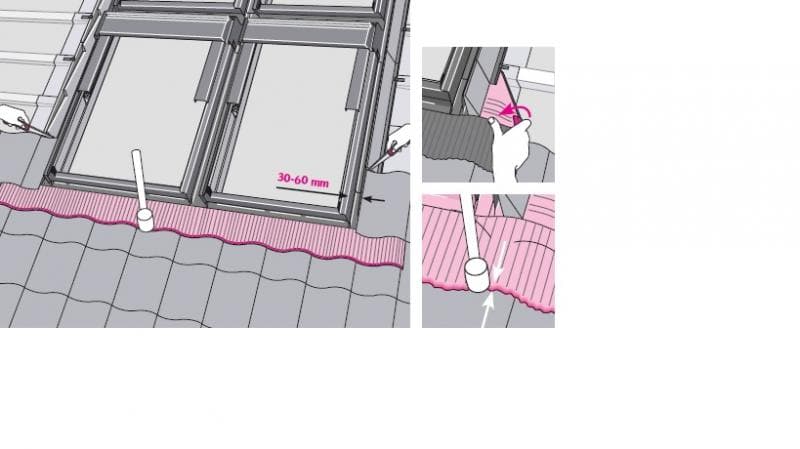
**Good (if the diagnosis is genuinely a lifted or poorly dressed apron and nothing else):** Lift the bottom row of tiles or slates, pull the apron free, clean everything up, and re-dress it properly onto the covering. On flat interlocking tiles it should sit tight with no gaps. If the original flashing is the moulded type with a flexible skirt, it needs to be worked down by hand and along the edges with a soft mallet, not glued. Replace any clips or fixings, re-lay the tiles, and make sure the side gutters lap *over* the apron, not under it. This is a half-day job for a competent roofer and will last if the rest of the install is sound.
**Better:** Lift the flashing kit completely, check the underlay collar underneath, and renew anything that has perished or was not fitted in the first place. Five years in, the secondary membrane is often the weak link on a borderline-pitch install. While it is open, check the head flashing and the lap onto the tiles above. Refit with the correct kit for the pitch and covering. A day's work per window for a roofer who knows these systems.
**Best:** If you have got three out of five windows leaking on a 15-degree roof, the install itself is the problem, not the individual windows. The proper answer is to strip back, fit the manufacturer's low-pitch flashing kits with the correct underlay collars, and make sure the tiles or slates around each window are cut and laid to the right clearances. It is not cheap, but on a shallow roof it is what gives you a dry kitchen for the next twenty years rather than the next twenty months.
Bodges and mistakes to avoid
- **Solvent or mastic round the apron edge.** It blocks one exit route, the water backs up and finds another, and now you cannot lift the apron to see what is underneath without damaging it.
- **Flashband or self-adhesive bitumen strip slapped over the join.** Looks like a fix for about a year, then it lifts at the edges and traps water behind it.
- **Silicone everywhere.** Silicone is not a roof covering. It hides the problem and makes the proper repair harder.
- **Hammering a plastic apron skirt flat with a metal hammer.** The wooden or rubber mallet instruction in the manual is for dressing a flexible skirt into the shape of the tile. On a flat covering you are just bedding it down, not reshaping it. Battering it with the wrong tool can split it.
- **Assuming the leak is where the drip is.** Nine times out of ten on roof windows, the entry point is higher than the stain.
When to bring in a specialist
Get a proper roofer, not a general builder, for this. Roof windows on a low pitch are a specialist detail and the manufacturers' instructions are specific. If the underlay needs opening up, or you suspect the flashing kit is the wrong type for the pitch, that is roofer territory. If you see daylight through the roof, sagging timbers, or large patches of wet rotten rafter, get someone out quickly. Water gets in, then it shows up somewhere else, and rotten structural timber is a much bigger bill than a re-flash.
Reality check
Expect mess. Any proper investigation means lifting tiles, possibly cutting back plasterboard or insulation inside to trace the water path, and working in the roof space. Pick a dry spell. You do not want the roof open in driving rain. Budget for the possibility that once it is opened up, the underlay collar is missing on all five windows and they all want doing while the scaffold or roof ladder is there. It is far cheaper to do them together than to keep going back. And give any sealants, adhesives and timber repairs proper time to cure and dry before you close everything up. A rushed repair on a shallow roof will be back to haunt you the first time you get a south-westerly with horizontal rain.