
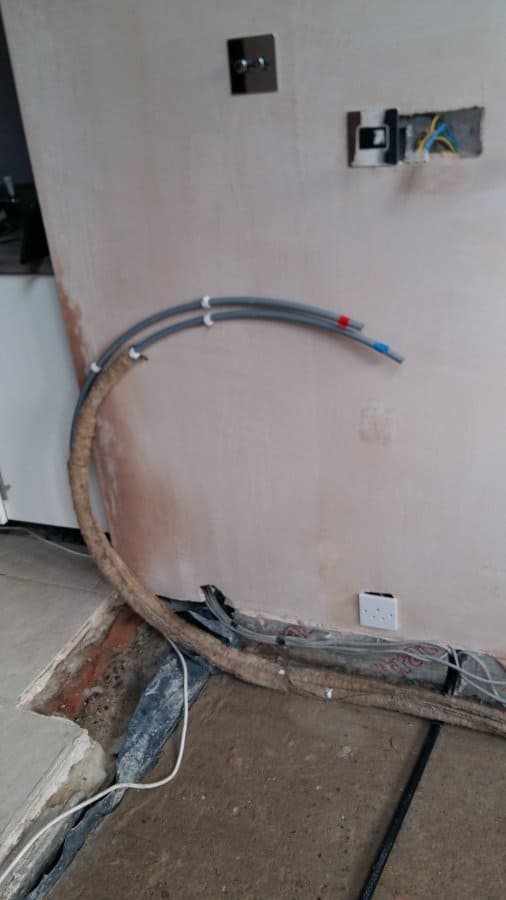
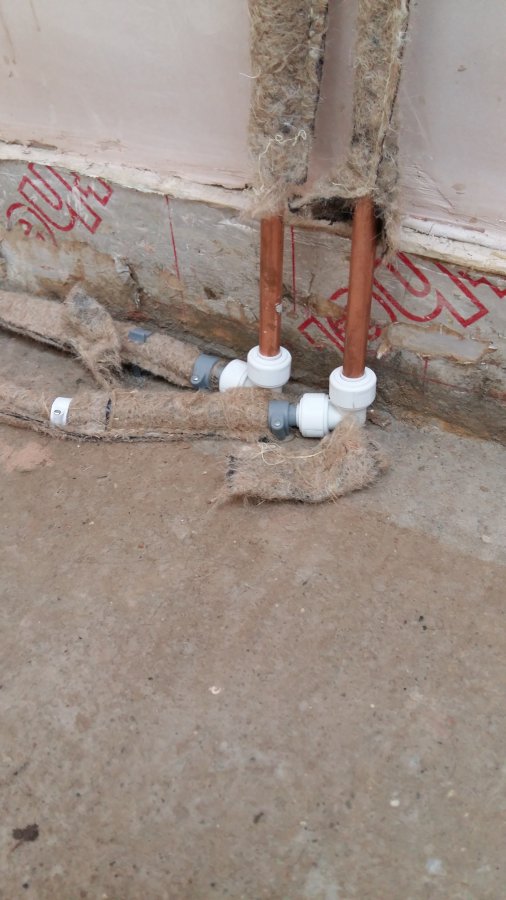
A homeowner is having a solid floor built up with a wet screed and the plumber has laid the hot and cold supplies in grey flexible plastic pipe with push-fit elbows that will end up buried in the screed. The pipe has a thin foam sleeve over it but the joints aren't fully covered. Copper radiator tails are also sitting exposed on the sub-base. The question is simple – is this acceptable, or is it storing up trouble the moment the screed goes down?
This is a common one on new builds and extensions. Before you start arguing with the plumber, it's worth understanding what the regs say, what the pipe materials can and can't tolerate once they're locked in concrete, and where the real risks sit. I'll run through what's likely going on, what to check, and what a proper job looks like, plus the usual shortcuts that come back to bite you.
What's actually going on here
Two different pipe runs, two different problems.
For the hot and cold water supplies, the Water Regulations are clear that buried services should be run in a duct or sleeve, not just wrapped in a bit of foam. The reason isn't only about protecting the pipe from the screed. It's so the pipe can be pulled through and replaced later without breaking up the floor. Foam lagging doesn't do that. It insulates and gives a token bit of separation, but once screed is poured around it, that pipe is there for good.
For the copper radiator tails, the issue is chemical. Wet cement is alkaline, and alkalis attack copper over time. Bury bare copper in screed and you're on a countdown. Could be years, could be sooner if the mix is aggressive or there's any movement. That's why copper in screed has to be properly isolated from the cement.
Then there's the joints. Push-fit elbows buried under a finished floor are the bit that makes most experienced hands wince. They may well last, but if one ever weeps you'll be lifting tiles or engineered board to find it. Sound practice is to bring pipe up out of the floor in a single continuous run and make your joints above the screed where you can see them and get to them.
Simple checks before the screed goes down
Walk the floor with the plumber and go through these one at a time. Don't guess, prove it.
- Are there any joints below finished screed level? Push-fit elbows, couplers or tees buried in the pour are the main red flag. If you can see fittings sitting on the sub-base, they'll be entombed. Any buried joint is a future access problem.
- Is the water pipe in a proper duct or oversleeve? Look for a larger diameter tube that the pipe passes through, open at both ends so the pipe could theoretically be drawn out. A thin foam wrap is not a duct. Foam only means not compliant with good practice for buried services.
- How does the pipe rise out of the floor? Ideally it comes up in one continuous length using a proper forming bend or a factory bend, not an elbow. An elbow at floor level is a buried joint, so avoid.
- Is the copper separated from the screed? Look for Denso tape wrapped tightly with good overlap, or a plastic sleeve or conduit over the copper. Bare copper touching where screed will contact is a corrosion risk.
- Are there any obvious kinks, crushed sleeves, or spots where the wrap has been pulled back at fittings? Any gap in the protection is where the screed will find the metal.
- Has the system been pressure tested and left under pressure? Test before the pour and leave it under pressure during the pour so any damage from a wheelbarrow or trowel shows up immediately. Any drop on the gauge means find it now, not after tiling.
The proper fix, good, better, best
Good. Copper rad tails wrapped properly in Denso (petrolatum) tape with a decent overlap all the way to where they exit the floor. Plastic hot and cold sleeved in foam is the bare minimum many jobs get away with, but it isn't what the regs ask for. Every joint brought above finished floor level. No elbows in the screed. Use a cold-forming bend or factory bend to turn the pipe upwards in one piece.
Better. Run the hot and cold in a proper pipe-in-pipe conduit, a larger plastic outer tube that the service pipe sits inside, open at both ends so it's drawable. Copper heating pipes sleeved in plastic conduit or heavily Denso'd, again with no buried joints. Pressure test and leave under pressure while the screed goes in.
Best. Design the pipework so nothing is buried that doesn't have to be. Bring supplies up through the wall or through a designated riser and drop back down to appliances above the floor where possible. Where pipes must cross under the screed, they run in continuous lengths inside a proper duct, terminating in a box or riser where any future joint can be reached. Copper heating pipes replaced with plastic barrier pipe on the buried sections so corrosion isn't a factor at all, and still no joints in the screed.
If you're specifying this from scratch, the time to do it is before the quote goes in. A contractor who's priced to lash it in won't want to redo it halfway through, and fair enough.
Bodges and mistakes to avoid
- Foam lagging as a substitute for a duct. It's insulation, not a sleeve you can draw a pipe through. Once the screed sets, that pipe isn't coming out.
- Push-fit elbows buried in the pour. They might last twenty years. They might not. Either way, a leak means lifting the floor.
- Bare copper straight into screed. Alkali attack is a known failure mode. Don't rely on "it'll be fine."
- Wrapping Denso tape loosely or stopping short at a fitting. The screed finds every gap. Overlap by at least half the tape width and carry it well past any transition.
- Skipping the pressure test, or testing then depressurising before the pour. If a trowel nicks a pipe during the pour, you want to know that day, not next winter.
When to bring in a specialist
If the plumber is pushing back and the floor is about to be poured, that's the moment to pause and get a second opinion from another qualified plumber, ideally one who does underfloor and screed work regularly. Don't try to instruct your contractor off the back of forum advice or hand them materials you've bought yourself. That rarely ends well and muddies who's responsible if it leaks. Raise it as a question, such as "how are you protecting the copper from the screed, and can the water services be run in a proper duct?", and see what answer you get.
Any buried leak later on, or signs of damp coming up through the floor finish, is a job for someone with leak detection kit before you start breaking anything up.
Reality check
Once that screed is down, everything under it is effectively permanent. You've got one shot to get it right. The extra cost of proper ducting and a few more metres of continuous pipe is small compared to lifting a tiled floor in five years. Screed also needs proper drying time before floor finishes go on, and rushing that is another common cause of grief later. Take the time now to walk the floor, photograph every run before the pour, and keep those pictures. If anything ever does go wrong, you'll be very glad you know exactly where the pipes are and what's protecting them.