
A homeowner spotted a persistent drip behind the washing machine, coming from the area where the appliance hose meets the isolator valve on the mains supply. The blue plastic lever on the valve keeps showing a bead of water even after wiping it dry, and the hose nut has already been tightened as far as it will go. The question is: what are these bits actually called, what's causing the drip, and is it something a reasonably careful homeowner can sort themselves?
This is a common one in UK houses. Before you start spending money, do a couple of simple checks so you're fixing the cause, not the symptom. I'll run through what's likely happening, what you can safely check yourself, and what a proper fix looks like, plus the usual bodges that don't last.
What you're looking at
The bit sticking out of the wall with the blue lever is an appliance isolation valve (sometimes called a washing machine valve or mini-lever valve). The blue lever is a quarter-turn handle: flat with the pipe means open, across the pipe means shut. The grey ribbed hose is the appliance fill hose, and where it screws onto the valve there's a rubber washer inside the nut doing the sealing.
Behind the valve, out of sight, there's usually either a compression fitting (an olive squeezed onto a copper tail) or a push-fit connector joining it to the pipework in the wall. That matters because it decides what tools you need if the valve itself has to come off.
What's likely going on
With a drip appearing on the lever itself rather than the hose nut, nine times out of ten it's one of two things. Either the rubber washer inside the hose connector has perished or pinched and water is tracking down onto the valve body, or the valve's internal seal (around the ball or spindle the blue lever sits on) has failed. Cheap plastic-bodied isolators are famous for this. The spindle seal gives up, especially if the lever's been turned a few times.
Water is sneaky. It'll appear at the lowest point it can reach, not necessarily where it's actually coming from. Water gets in, then it shows up somewhere else. That's why wiping and watching is the first move.
Simple checks first (safe)
Before touching anything, pull the machine out gently, put a couple of old towels down, and have a torch handy.
- Dry the whole area completely with kitchen roll: valve, hose nut, and pipe. Watch for 5-10 minutes. Where the first fresh bead appears tells you a lot. A drip forming on the hose nut points to a washer or hose fault. A drip forming from under the blue lever points to the valve body or spindle seal. A drip appearing behind the valve where it enters the wall points to the fitting behind the valve.
- Gently wiggle the hose side to side (with the tap left as it is). If a droplet appears at the nut when you move it, the washer isn't seating properly.
- Check the hose itself along its length. The metal ferrule where the grey hose is crimped onto its ends can split or weep. If the hose is damp halfway along, the hose is done.
- Turn the blue lever fully closed and see if the drip stops within a few minutes. If it stops, the leak is from the valve spindle seal. If it carries on, water is getting past from the hose side or upstream of the valve.
- Feel the wall or skirting below the valve. Damp plaster or a stained skirting means this has been going on longer than you think, worth mentioning because small constant drips wreck floors and kickboards.
Don't guess, prove it. Ten minutes with kitchen roll saves buying the wrong part.
Proper fix: good, better, best
Good: new washer
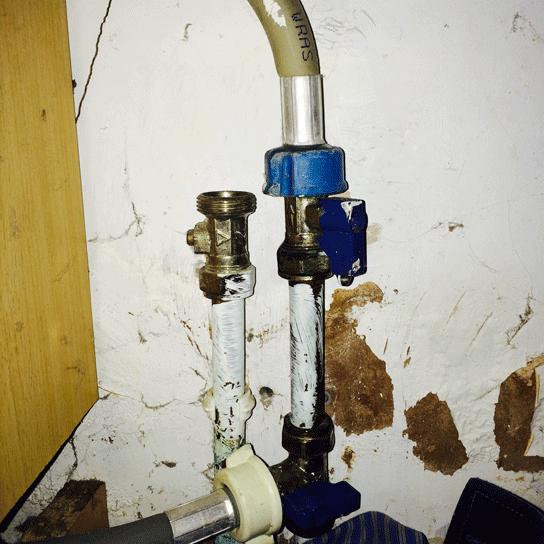
If the drip is definitely at the hose nut, undo the hose (turn the valve off first, have a towel ready), pop the old rubber washer out of the nut, and drop a new one in. Washing machine hose washers come in cheap packs and are the standard fix. Hand tighten, then a nip with pliers or a spanner. Not gorilla-tight, or you'll deform the washer and make it worse.
Better: new hose
If the hose ferrule is weeping, or the hose has been on there years, just replace the whole hose. New ones come with washers already fitted. Same routine: valve off, unscrew both ends, fit new, hand tight plus a small nip. Cheap insurance.
Best: new isolation valve
If the leak is coming from the valve body or under the lever, the valve itself needs replacing. These are inexpensive, a couple of quid from any decent merchant or DIY shed. The job goes like this:
- Turn off the mains stopcock and open a tap downstairs to drain the pressure.
- Have towels and a small bowl ready. There's always a bit of trapped water.
- Hold the pipe or valve body firmly with one spanner and undo the nut behind the valve with another. Two spanners always, or you'll twist the pipe in the wall and cause yourself a much bigger job.
- If it's compression, you'll see a brass olive on the pipe. You can usually reuse it if it's in good shape, or fit a new olive with the new valve. A smear of jointing compound on the olive helps it seat.
- Fit the new valve the same way round (arrow on the body points in the direction of flow), tighten the nut hand-tight, then about a turn to a turn and a quarter with the spanner. Hold the body still while you tighten.
- Reconnect the hose with a fresh washer, open the mains slowly, and check every joint with dry kitchen roll.
If what's behind the valve is push-fit rather than compression, it's even simpler. Press the collar in and pull the valve off, then push the new one on until it stops. Just make sure the pipe end is clean and square.
Bodges and mistakes to avoid
- Cranking the hose nut tighter and tighter. Once the washer's shot, more force just splits it or cracks the plastic thread. It won't seal.
- Wrapping PTFE tape round the hose thread. The seal is the rubber washer, not the thread. PTFE does nothing useful there and can stop the nut seating properly.
- Silicone or sealant smeared round the leaking valve. Classic desperation move. It hides the drip for a week, then it's back and now you can't see what's going on.
- Using one spanner to undo the nut behind the valve. You'll rotate the pipe in the wall, potentially cracking a joint you can't see. Two spanners, always, on any compression fitting.
- Ignoring a slow drip because "it's only a bit." Constant damp behind a machine rots chipboard flooring, lifts vinyl, and stains plaster. The fix is cheap, the damage isn't.
When to call someone in
If the valve behind the wall is soldered copper with no accessible fitting, or the pipe spins when you try to undo the nut, stop and get a plumber. Same if you can't find or turn off the main stopcock. No point starting a job you can't stop. And if you open things up and find the pipe itself is corroded or the wall behind is soaked through, that's a bigger conversation than a two-quid valve.
Reality check
This is a job most reasonably practical homeowners can manage in an hour with two adjustable spanners, some towels, and a new valve. Access is the annoying bit. Washing machines are heavy and the floor behind them is rarely pretty. Give yourself room to work, protect the floor, and don't rush the reassembly. Once it's done, leave the machine pulled out for 24 hours and check the joints daily with dry kitchen roll before you shove everything back. If it's still dry after a wash cycle or two, you're sorted.